


ZR33-DMX USER GUIDE
Using DMX 512
Within the lighting industry, the DMX communication protocol is widely used for
remote control of lighting and other equipment. The
is fitted with a DMX 512
compliant interface as standard, giving the user the possibility of controlling the smoke
and light from a single source. The
uses a single channel to fire and control the
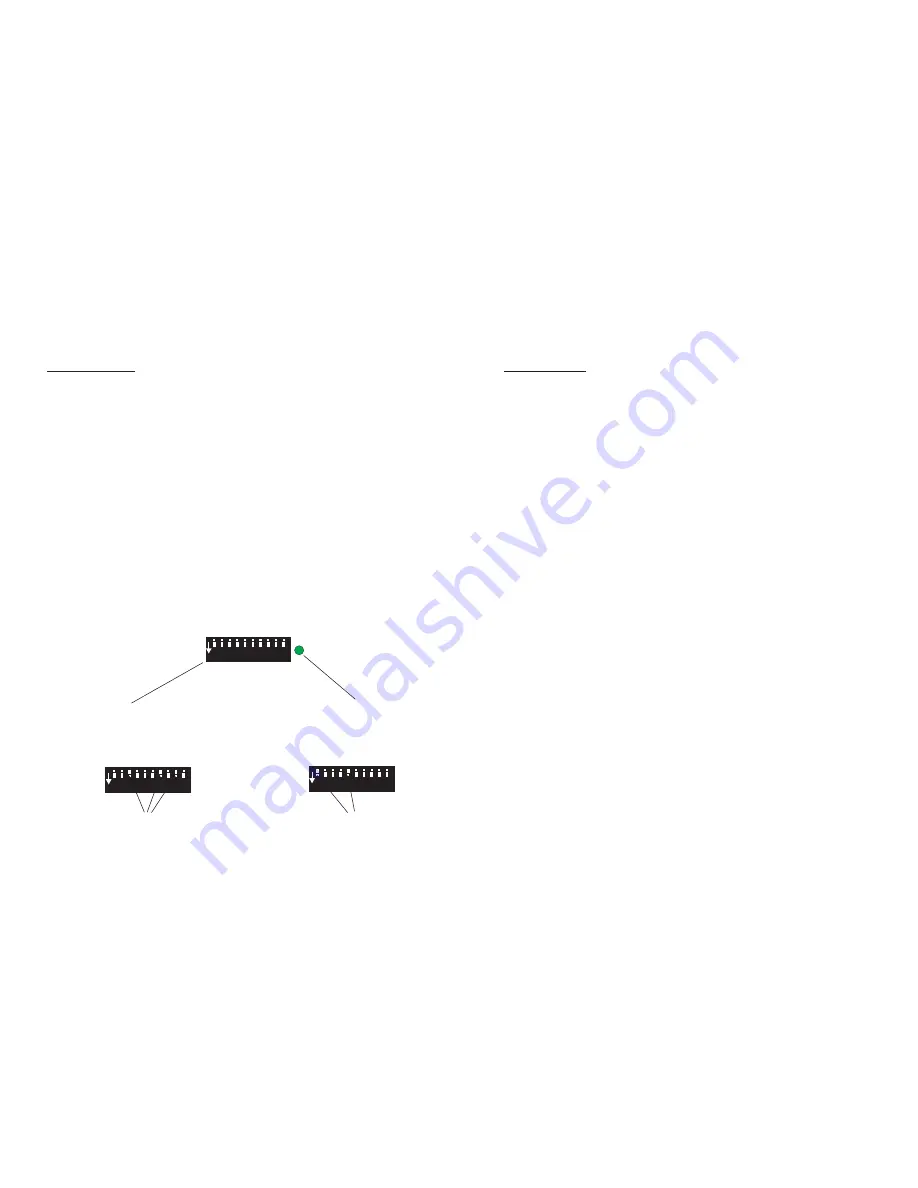
output level; the interface can be addressed from channel 1 to channel 512. The
address is set using the 10 way dip switch at the rear of the machine. To address the
channel, convert the channel number to binary and set this number on the switches (on
is down). There are some samples of different channel settings below.
The
is fitted with two XLR sockets, one is for DMX IN & one is for DMX
OUT, enabling the
to be used in a chain. When there is valid DMX, i.e. the XLR
is connected and the desk is powered, the small green LED will light. However, if there
is no address set, the LED will not light and DMX will be disabled. If an address is set
and DMX is present the machine will automatically start to heat up and after 10 - 12
minutes you will be able to operate the machine using DMX. Increasing the DMX level
will increase the smoke output level.
ZR33
ZR33
ZR33
ZR33
1 2 3 4 5 6 7 8 9 10
10
10
9
9
8
8
7
7
6
6
5
5
4
4
3
3
2
2
1
1
ON
ON
ON
Valid DMX LED
Address Switches
512
512
256
256
128
128
64
64
32
32
16
16
8
8
4
4
2
2
1
1
DMX Value
Switches 3,7, &9 on
Address set to 324
Switches 1 & 5 on
Address set to 17
PAGE 8
MARTIN MANUFACTURING (UK) PLC
ZR33-DMX USER GUIDE
Getting Started
•
•
•
•
Once you have selected the best position for the
you can begin to use
the machine. Check that the mains power supply matches the voltage and
frequency on the serial number label. If not, contact your JEM dealer for
advice.
Now set the mains switch, at the rear of the machine, to the ‘ON’ position
and press the grey “stand-by” button.
Allow around 10 -12 minutes for the machine to reach operating temperature
While it heats up you should check the level in the fluid container, the
container can hold up to 9.5 litres of fluid.
NOTE! Do not allow the
to run out of fluid. Serious damage may
occur if the machine is operated when no fluid is connected.
When the machine has reached working temperature the green “ready” LED
will light on the rear of the machine and the machine can now be operated.
Check the “output” knob is turned fully clockwise (maximum) then press and
hold the red “fog” button. The fluid pumps will start operating; if the
machine has a new container of fluid it will take a few seconds for the pumps
to prime.
When the pump has primed smoke will be visible. The output can now be set
to the desired level by turning the “output” knob. The timer may be activated
or you can simply use the “fog” button when smoke is required, Alternately
you may wish to use DMX to operate the
.
For further information on using the controller and DMX see the relevant
pages in this user guide.
When you have finished using the machine you should use the “stand-by”
button to turn off the heaters and then turn the mains switch off. If any
problems occur when operating the
please refer to the trouble
shooting guide..
ZR33
ZR33
ZR33
ZR33
PAGE 5
MARTIN MANUFACTURING (UK) PLC


