background image


Jema  Autolifte  –  Denmark

  -  WE  ARE  HERE  TO  SURPRISE! 


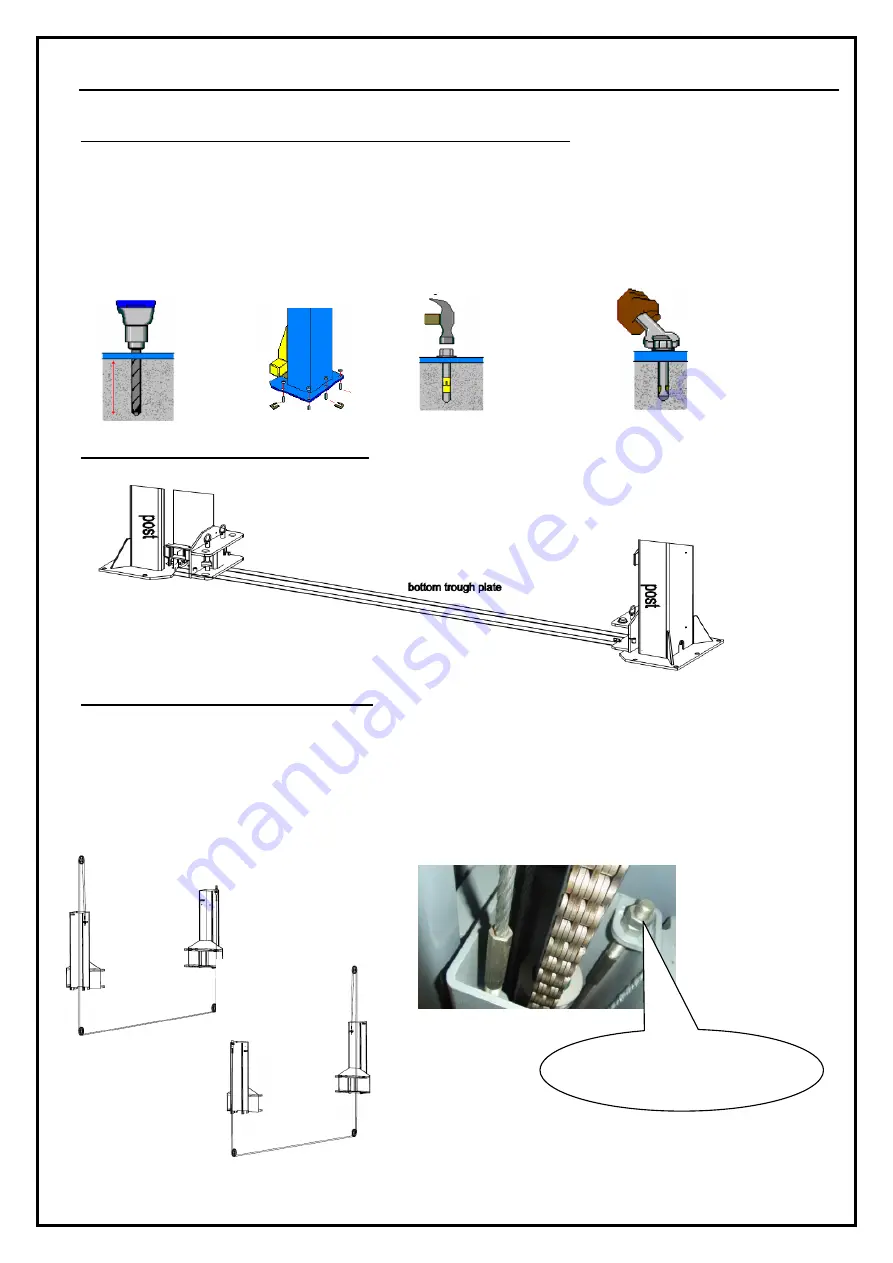
Step five: erect the posts, main post first and then the assistant post 

1.  Drill each anchor hole in the concrete using a rotary hammer drill. To assure full holding power, do not ream the hole or 

allow drill to wobble. 

2.  After drilling, remove dust thoroughly from each hole and make certain that the column remains aligned with the chalk line 

during this process. 

3.  Position  the  main  column  at  the  designated  chalk  locations  and  follow  the  same  procedures  step  1,  2  to  position  the 

assistant column. 


Step six

Install the bottom trough plate 


Step seven: connect the wire rope 

1.  Raise and lock each carriage approximately 800mm high above the ground. 

2.  Make sure that the safety locks on each column are fully engaged before attempting to route equalizer cables. 

3.  Carriages must be equal height from the floor before proceeding. 

4.  With the carriages in equal position from the floor, route the equalizer cables as shown. 

5.  After the equalizer cables have been routed, adjust each cable so that they are equal tension. 

6.  Grease the wire rope with butter.(this step must be carried out ) 


Bolt  to  adjust  the  tightness  of 

the wire rope


Summary of Contents for JA3500T

Page 1: ...Jema Autolifte Denmark WE ARE HERE TO SURPRISE JA3500T Lifting capacity 3500KG Floor Plate Two Post Lift Electrical Release Original Instruction ...

Page 2: ...pments needed 3 1 2 Parts check 3 1 3 Space required 3 2 Precautions during installation 3 3 Installation 3 4 Check list after installation 4 Operation instruction 12 15 4 1 Precautions during operation 4 2 control box panel description 4 3 Flow chart for operation 4 4 Operation 4 5 Emergency lowing when the power is off 5 Trouble shooting 16 16 6 Maintenance 17 18 7 Annex 18 30 Annex1 Shipping sh...

Page 3: ...qualified staff properly trained for the specific use of the machine 1 3 6 Do not wear unfit clothes such as large clothes with flounces tires etc which could get caught by moving parts of the machine 1 3 7 The lift surrounding area must be free from people or objects which could be a danger for lifting operations 1 3 8 The lift is only designed to lift the entire body of vehicle having maximum we...

Page 4: ... surround environment 1 5 Warning signs All safety warning signs presented on the machine with the purpose to draw the operator s attention from dangerous or unsafe situations The labels must be kept clean and they have to be replaced if detached or damaged Read the meaning of the labels carefully and memorize it ...

Page 5: ... Product Introduction The floor plate lift is composed of posts carriages lifting arms cylinders and power unit etc The lift is operated by an electric motor controlling a hydraulic system which delivers the hydraulic fluid to cylinders inside the columns for lifting two trolleys The safety teeth block will bite with safety plate in the posts automatically Therefore the lift will not lower when hy...

Page 6: ...ntify the components and check for shortages as ANNEX 1 shipping sheet Contact us immediately if shortage discovered If the buyer still installs the machine upon the shortage the manufacturer and the dealer will not hold any responsibility and will not solve the problems by free 3 1 3 Space required The lift should be located on a relatively level concrete floor having minimum thickness of 18cm Th...

Page 7: ...e careful in this step in case the posts fall down the personnel or the parts are damaged Step three Remove the first post and place a supporter under the second post then remove the bolts Step four Decide the installation position of the columns erect the main and assistant post Pay attention that the width between posts is 2780MM 1 Determine which side will be the main post to mount the power un...

Page 8: ...the same procedures step 1 2 to position the assistant column Step six Install the bottom trough plate Step seven connect the wire rope 1 Raise and lock each carriage approximately 800mm high above the ground 2 Make sure that the safety locks on each column are fully engaged before attempting to route equalizer cables 3 Carriages must be equal height from the floor before proceeding 4 With the car...

Page 9: ...te Denmark WE ARE HERE TO SURPRISE 9 Step eight connect the oil hose Connect the oil hose as the following diagram Step nine Install four safety plates four electromagnets and the electromagnet covers Safety plate ...

Page 10: ...Step ten mount the power unit and the control box 1 Mount the power unit on the main post 2 Connect the power unit with the control box as the wiring diagram 3 Connect the limit switch Step eleven Install the oil hose cover Limit switch Oil hose cover ...

Page 11: ...gaged Step thirteen fill the hydraulic oil The volume of the oil tank is 10L To insure the lift in a normal work condition the oil should be over 80 of the oil tank volume Use AW 32 in winter 46 in summer or other good quality garage hydraulic oil Step fourteen try running the lift Do not place any vehicle in this step Step fifteen install the chain protection and the door opening protection Chain...

Page 12: ...ny leakage 4 1 2 The lift if its safety device malfunctions shall not be used 4 1 3 The machine shall not lift or lower an automobile if the center of gravity of automobile is not within the supporting range of the supporting device Otherwise the manufacturer will not bear any responsibility for the consequence resulted from the operation above mentioned 4 1 4 The staff or operators shall be in a ...

Page 13: ... the gear pump work Cylinder piston drives the chain work Chain drives the carriage to rise The lift is raised 4 2 control box panel description 4 3 Flow chart for operation Description Function Power switch Connect the power Power lamp Show the power is on UP button Raise the lift LOCK button Make sure the security during repair work DOWN button Lower the lift Raising Lowering ...

Page 14: ... is secure 5 Continue to press the UP button to raise the lift to the demanded height 6 Press the handle of the manual unloading valve to lock the lift 7 Check the security of vehicle and then turn off the power switch before performing maintenance or repair work Lower the lift 1 Turn on the power switch 2 Press the DOWN button on control box the lift will raise about 5CM automatically to release ...

Page 15: ... fitting opposite of the oil out let to connect the manual hydraulic pump b Press the handle of the hydraulic pump optional to supply oil to the cylinder to release the lock c Pull off the electromagnets on the two posts d Loosen the electrical valve of the power unit to lower the carriage ...

Page 16: ...uld be more than 2 3 oil tank volume The oil absorbing pipe is loose Tighten it A piece of trash is under cushion valve or the cushion valve is loose Clean or adjusts it Carriages go down slowly after raising Raising too slow The oil hose leaks Check or replace it The seal of the cylinder is abrasion Replace the seal The single valve leaks Clean or replace it The overflow valve leaks Clean or repl...

Page 17: ...safety lock audibly and visually while in operation Check safety latch for free movement and full engagement with rack Check hydraulic connections and hoses for leakage Check chain connections for bends cracks and looseness Check cables connections for bends cracks and looseness Check for frayed cables in both raised and lowered position Check snap rings at each roller and sheave Check bolts nut a...

Page 18: ... for the user who will find the equipment in perfect condition each time he restarts work 7 ANNEX ANNEX1 Shipping Sheet S N DESCRIPTION PART NO MATERIAL Q TY 1 Main and assistant post JA3500T C A1 Component 2 2 Carriage JA3500T C A2 Component 2 6 Power unit JA3500T C B5 B6 Component 1 7 Assistant cylinder JA3500T C A5 B4 Component 1 8 Main cylinder JA3500T C A5 B5 Component 1 9 Electrical system J...

Page 19: ...ction hook JA3500T C A1 B6 Welding piece 4 38 Door opening protection JA3500T C A7 B10 Rubber 2 39 Bolt M8 30 Standard piece 4 41 Screw M8 12 Standard piece 8 42 Screw M5 10 Standard piece 24 43 Screw M5 20 Standard piece 12 44 Screw M6 8 Standard piece 4 45 Screw M6 16 Standard piece 4 46 Screw M8 25 Standard piece 4 47 Flat washer 6 Standard piece 8 48 Flat washer 10 Standard piece 4 49 Spring w...

Page 20: ...Jema Autolifte Denmark WE ARE HERE TO SURPRISE 20 ANNEX 2 Overall Diagram ...

Page 21: ...RISE 21 ANNEX3 Space Required ANNEX4 Hydraulic Connection 1 main cylinder 2 assistant cylinder 3 electrical unloading valve 4 throttle valve 5 motor 6 coupling 7 gear pump 8 single way valve 9 overflow valve 10 anti surge valve 11 cushion valve ...

Page 22: ...Jema Autolifte Denmark WE ARE HERE TO SURPRISE 22 Annex5 Wiring diagram Single phase ...

Page 23: ...SE 5A 1 11 FU1 FUSE 16A 32A 3 2 12 FU FUSE 10A 1 13 M MOTOR 380V 220V 2 2KW 1 14 SB3 BUTTON Y090 1 DOWN 15 SB2 BUTTON Y090 1 LOCK 16 SB1 BUTTON Y090 1 UP 17 KA RELAY LY2N AC24V 1 18 KT TIME RELAY ST6PA 5S AC24 1 19 SB4 EMG STOP Y090 1 ANNEX6 Parts list of power unit S N DESCRIPTION Q TY 1 MOTOR 1 2 VALVE BOARD 1 3 OVERFLOW VALVE 1 4 FITTING 2 5 CUSHION VALVE 1 6 ABSORBING OIL PIPE 1 7 OIL FILTER 1...

Page 24: ...1 B1 Down wheel 1 45 013 JA3500T C A11 Height adapter 4 Welding piece 130MM 014 GB 818 2000 Screw M6 20 12 Standard piece 015 JA3500T C A18 Oil hose cover 6 Q235A 016 JA3500T C A13 Safety plate 4 45 017 JA3500T C A17 Positioning block 4 Q235A 018 GB 818 2000 Screw M6 16 4 Standard piece 019 GB 818 2000 Screw M5 10 16 Standard piece 020 JA3500T C A14 Electromagnet 4 Component 021 JA3500T C A15 Elec...

Page 25: ...nt 902 JA3500T C A7 Long arm 2 Component 903 JA3500T C A12 Pin 4 Component 904 JA3500T C A8 B5 Foot protector 2 Welding piece 905 JA3500T C A7 B3 Long extensive arm 2 Welding piece 906 JA3500T C A7 B1 Long arm 2 Welding piece 907 JA3500T C A8 B1 Short arm 2 Welding piece 908 M5 12 Screw 16 Standard piece 909 JA3500T C A7 B2 Rubber pad 4 Rubber 910 Circlip for shaft 26 4 Standard piece 911 JA3500T ...

Page 26: ...422 JA6214 A5 B4 Long tie in 1 Component With anti surge valve 501 JA3500T C A4 Electrical system 1 Component 502 GB T70 8 1885 Screw M5 12 4 Standard piece 601 Nut M6 8 Standard piece 602 JA3500T C A1 B6 Chain protection hook 4 Welding piece 603 JA3500T C A1 B5 Chain protection 2 Q235A L 2700mm 604 Flat washer M6 8 Standard piece 605 M6 8 Screw 4 Standard piece 703 JA3500T C A10 Cover plate 1 Q23...

Page 27: ...5 6 Transformer JBK 100VA240V 24V Pcs 1 The outlook is the same as item 5 7 320019 Transformer JBK 100VA380V 24V Pcs 1 8 Transformer JBK 100VA400V 24V Pcs 1 The outlook is the same as item 5 9 Transformer JBK 100VA415V 24V Pcs 1 The outlook is the same as item 5 10 328005 AC contactor CJX2 1210 AC24 Pcs 1 11 540035 Fuse holder TFBR 102 Pcs 1 12 328008 Fuse holder RT18 32X Pcs 3 13 328010 Fuse 16A ...

Page 28: ... 2 16 540088 Fuse 10A 6 30 Pcs 2 17 321024 Limit switch ME8104 Pcs 1 18 323002 Terminal block TB1512L Pcs 1 19 328026 Rectifier KBPC5A 35A Pcs 1 20 328014 Capacitor 4700UF 50V Pcs 1 21 328074 Control box Pcs 1 22 328072 Relay LY2NJ AC24 Pcs 1 23 328073 Relay seat PTF 08A Pcs 1 ...

Page 29: ...214F A3 B3 Teeth block 4 Q235A 223 JA3500T C A7 B10 Door opening protection 2 Rubber 224 JA3500T C A7 B1 Sliding block 16 Nylon 1010 909 JA3500T C A7 B2 Rubber pad 4 Rubber 911 JA3500T C A7 B4 C4 Rubber pad 4 Rubber 921 JA3214F A4 B3 Teeth block 4 Q235A 401 JA3500T C A4 B2 Oil hose 1 Component 2880mm 402 JA3500T C A5 B10 Short tie in 1 35 With anti surge valve 403 JA3500T C A5 B 4 Assistant cylind...

Page 30: ...nnex8 Size and weight requirement for the vehicle Jema Autolifte Tel fax 45 48180300 45 48195240 E mail info jemaautolifte dk www jemaautolifte dk Model No A mm B mm C mm D T E T F T G T JA3500T 2400 2900 100 2 0 1 5 1 5 2 0 D E F G Valve board diagram ...

Page 31: ...Jema Autolifte Denmark WE ARE HERE TO SURPRISE 31 ...

Page 32: ...Jema Autolifte Denmark WE ARE HERE TO SURPRISE 32 ...

Reviews: