


G
RIDDLE
AO310
G
RIDDLE
JEA8200ADX
Preheat
5 minutes
Preheat
5-10 minutes at specified
on
Hi.
setting –
Do not preheat on Hi.
Sausage Patties
Hi
4-5 min.
2-4 min.
9-10
4-5 min.
2-4 min.
Bacon
Hi
3-5 min.
2-3 min.
10
3-5 min.
2 min.
Ham Slice
Hi
4 min.
4 min.
9
4 min.
2 min.
Hamburgers
Hi
5-6 min.
5-6 min.
9
6 min.
5 min.
Fish Sticks
Hi
5 min.
4-5 min.
8
5-7 min.
5-6 min.
Hot Dogs
10
5-6 min.
4-5 min.
10
5-6 min.
4-5 min.
Buns
Hi
2-3 min.
-----
9
3 min.
-----
French Toast
10
3-4 min.
2-3 min.
10
2-3 min.
2-3 min.
Grilled Sandwiches
10
4-5 min.
3-4 min.
9
4 min.
3 min.
Pancakes
10
2-3 min.
1-2 min.
10
2 min.
1-2 min.
Eggs
6-7
2-3 min.
(1) min.
7
2-3 min.
(1) min.
M
ODEL
JEA8200ADX
1.
Make sure controls are in the OFF posi-
tion. The basin should be empty and
clean. Insert basin pan and grill element.
2.
Place griddle over grill element so drain
holes are in front. This will permit ex-
cess grease to drain into the grease con-
tainer.
6
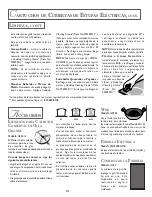
E
LECTRIC
G
RIDDLE
1.
Before the first use, wash your new
griddle in hot soapy water, rinse and dry.
Then "condition" the surface by wiping
on a thin coating of cooking oil or short-
ening. Remove excess oil or shortening
by wiping again with another paper towel.
DO NOT
use cooking sprays on the
griddle surface.
2.
Preheat the griddle as noted in the
charts.
3.
Use nonmetallic spatulas or utensils
while cooking to prevent damaging the
finish.
4.
When cooking meats, use the downdraft
fan or range hood to capture smoke.
NOTE: DO
NOT
IMMERSE THE TERMI-
NAL PLUG IN WATER (MODEL AO310
ONLY). SEE BOTTOM OF GRIDDLE FOR
FURTHER INSTRUCTIONS.
1.
Once the griddle has cooled (DO NOT
IMMERSE A HOT GRIDDLE IN COLD
WATER), wash with soap or detergent
in hot water in the sink. Be sure to re-
move all food residue before cooking on
the griddle again.
2.
Remove stubborn spots with a plastic
mesh puff or pad. For best results, use
only those cleaning products which state
they are recommended for use when
cleaning nonstick surfaces.
Do not use
steel wool or coarse scouring pads.
3.
DO NOT wash in dishwasher.
U
SING
THE
G
RIDDLE
C
LEANING
○○○○○○○○○○○○○
○○○○○○○○○
○○○○
○○○○○○○○○○○○○○○○○○
G
RIDDLE
G
UIDE
Control
Approx. Cook Time
Control
Approx. Cook Time
Food Items
Setting
Side 1
Side 2
Setting
Side 1
Side 2
Note:
These are suggested guides for control settings and times. Factors, such as low
voltage, size of food and food temperature, may affect the times and control settings which
provide the best results.
○○○○○○○○○○○
○○○○○○○○○○○
○○○○○○○○○○○
○○○○○○○○○○○
E
XPRESSIONS
®
C
OLLECTION
M
ODEL
AO310
1.
Make sure controls are in the OFF posi-
tion. The basin should be empty and
clean.
2.
Slide the griddle towards the receptacle
until the terminal plug is completely en-
gaged. The griddle should rest on the
basin.
NOTE:
The liner pan may remain in
place but is not necessary.
I
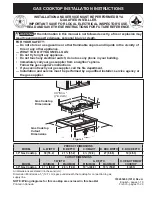
NSTALLATION