18
Connect Blower Electrical Parts
1.
Locate the capacitor (in Blower Motor Kit).
NOTE:
The capacitor is supplied with a small harness that
terminates in a two-pin connector as shown.
Post 1
Post 2
2.
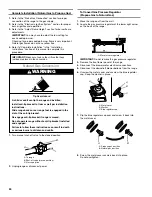
Locate the capacitor storage tray in front of the blower
bellow connection point in the lower right side of the range.
8.
Install blower electrical terminal cover.
NOTE:
When replacing cover, insert the terminal cover
tabs in the corresponding slots in the range, and push
the terminal cover rearward to engage.
9.
Install terminal cover screw.
Retention
bracket
3.
Place capacitor in tray.
4.
Secure the capacitor with the capacitor retention bracket,
then install the bracket screw.
Capacitor
storage tray
5.
Secure the blower motor strain relief, near the quick
connection end, to the blower electrical terminal cover
with the two provided screws.
3
2
1
7.
Locate the 4-pin connector on the blower motor wire and
plug it into the terminal connection point directly behind the
capacitor storage tray.
NOTE:
The terminal release (clip point) will be facing
toward the front of the range.
10.
Replace the access panel by aligning the studs with the
keyhole slots on the range. Press the access panel forward
into the slots and push downward to engage the studs.
11.
Reconnect power.
6.
Locate the two-pin connector on the blower motor wire
harness and connect it to the two-pin capacitor connector.
1
2


