


B–4
16023537
©2004 Maytag Services
Use and Care
U
SING
Y
OUR
C
OOKTOP
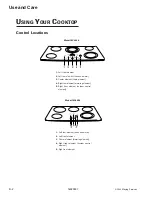
On Indicators
All Models
- The
LOW
light will illuminate when the element
is on.
Hot Surface
Indicator Lights
A Hot Surface light is located next to each element. The light
will illuminate when the cooking area is hot. It will remain on,
even after the control is turned off, until the area has cooled.
Cooling Fan
A cooling fan will automatically turn on when any element is
turned on. The fan is used to keep internal parts inside the
cooktop cool. The fan will automatically turn off when all the
elements are off. With heavy use, the fan may continue to run
after the controls are turned off until the cooktop has cooled.
Control Lockout
The touchpad controls can be locked out for cleaning and to
prevent unwanted use.
To lock controls:
Press and hold the
All-Off/Lock
pad for three seconds.
To unlock controls:
Press and hold the
All-Off/Lock
pad for three seconds. The
All-Off/Lock
light will illuminate whenever the controls are
locked.
Cook and Warm Element
The Cook and Warm Element, located in the left rear position,
is a fully-functioning element that provides an
Ultra Low/
Warm
heat setting for holding delicate sauces and keeping
cooked foods warm.
To use the
Warm
setting, touch
ON
, and then touch
Ultra
Lo/Warm
on the Temperature Selector Bar.
To use the regular temperature settings, touch
ON
, and then
touch any setting from LOW to HIGH on the Temperature
Selector Bar.
Note:
When using the normal temperature settings to
prepare foods, it will take a few minutes for the cooking
area to cool to the
Ultra Lo/Warm
temperature setting.
Triple Element
(select models)
The Triple Element, located in the center position, offers three
different element sizes to accommodate different pan sizes.
Use one, two or three sections of the element to best match
your pan.
To use the element:
1. Press
ON
. The inner-most element will activate.
2. Set the desired temperature on the Temperature Selector
Bar.
3. Press
ON
again to activate the center and middle areas.
4. Press
ON
again to activate all three areas.
Note:
The Triple Element will remember the setting from
the last time it was used. Therefore, one, two or all three
areas may activate when
ON
is pressed. To change the
areas activated, press
ON
again while the indicator light on
the left is flashing. If the indicator light on the left is not
flashing, press
ON
twice. Red lights on the control will
indicate which areas of the element are activated.
Custom Control Dual Element
The Custom Control Dual Element offers two element sizes
and is located in the right front position. This element uses an
electronic sensor to constantly monitor and adjust heat output
for precise and consistent temperature control.
To use the element:
1. Press
ON
. The inner-most element will activate.
2. Set the desired temperature on the Temperature Selector
Bar.
3. Press
ON
again to activate the entire element.
Note:
The Custom Control dual Element will remember the
setting from the last time it was used. Therefore, one or
both areas may activate when
ON
is pressed. To change
the areas activated, press
ON
again while the indicator
light on the left is flashing. If the indicator light on the left
is not flashing, press
ON
twice. A red light on the control
will indicate which areas of the element are activated.


