background image

9

2. When the desired thickness is reached, the ice sheet is 

released and slides onto a cutter grid. The grid divides the 
sheet into individual cubes.

3. The water containing the rejected minerals is drained after 

each freezing cycle.

4. Fresh water enters the machine for the next ice making cycle.
5. Cubes fall into the storage bin. When the bin is full, the ice 

maker shuts off automatically and restarts when more ice is 
needed. The ice bin is not refrigerated, and some melting will 
occur. The amount of melting varies with room temperature.

NOTE: As the room and water temperatures vary, so will the 
amount of ice produced and stored. This means that higher 
operating temperatures result in reduced ice production.

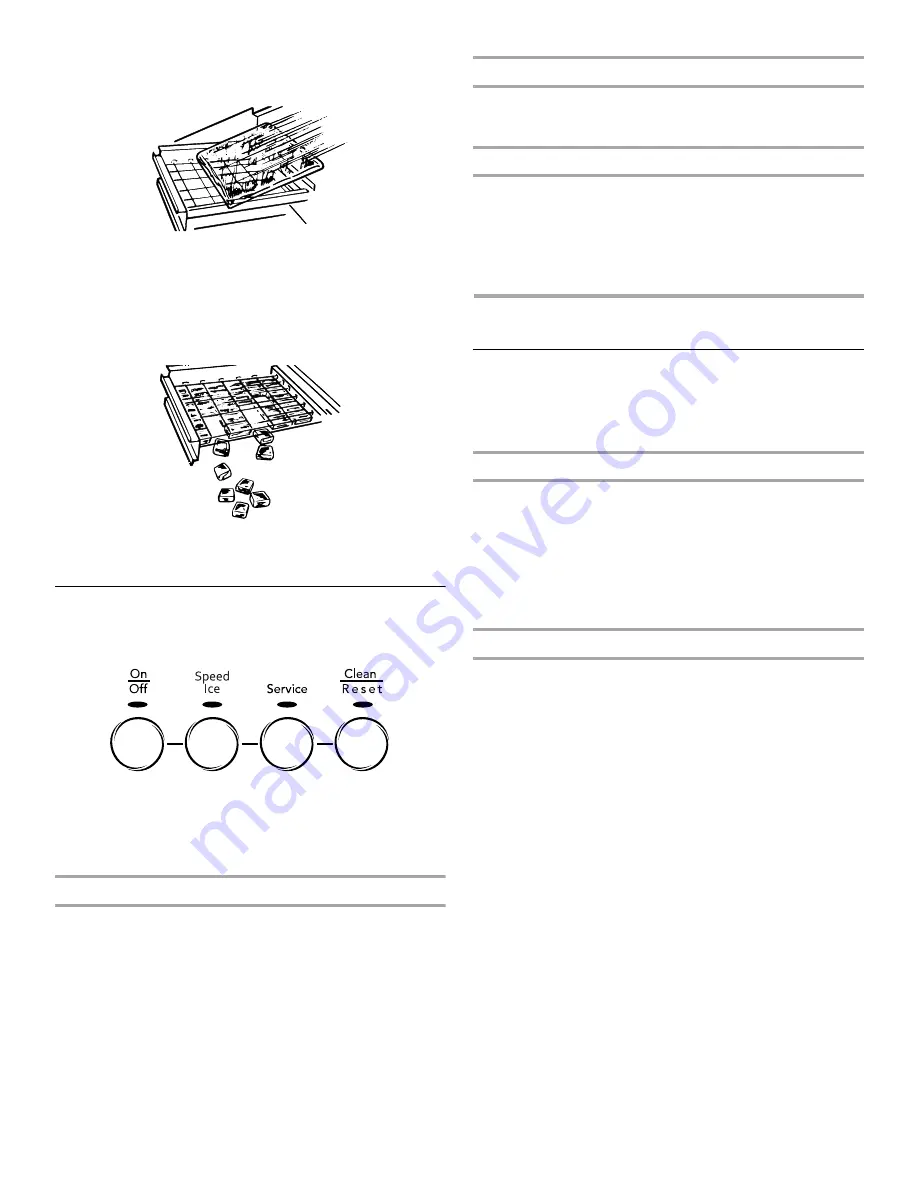
Using the Controls

1. To start the normal ice making cycle, press ON.
2. To stop ice maker operation, press OFF.

NOTES: 

Pressing the ON/OFF switch does not shut off power to 
the ice maker. 

Allow 24 hours to produce the first batch of ice. Discard 
the first batch produced.

Speed Ice Mode

Select the Speed Ice feature when you have an upcoming need 
for a large amount of ice and the ice bin is low or empty. The 
Speed Ice mode will produce a greater quantity of ice in a 24-hour 
period. 

Press and hold SPEED ICE while the ice maker is on. The 
indicator light will illuminate. 

Press and hold SPEED ICE again to turn off the Speed Ice 
feature. The indicator light will turn off.    

Service

The service light indicates when service is needed. If the service 
light turns on, turn the ice maker off and back on. If the service 
light turns on again, call for service.

Clean/Reset

The Clean/Reset Status light will help you know when it is time to 
clean your ice maker. The light will change to yellow. This tells you 
it is almost time to clean your ice maker. It is recommended that 
you clean the ice maker when the status light changes to red OR 
ice production decreases significantly. To clean your ice maker, 
see “Ice Maker System” in the “Cleaning” section. 

ICE MAKER CARE

Cleaning

The ice making system and the air cooled condenser need to be 
cleaned regularly for the ice maker to operate at peak efficiency 
and to avoid premature failure of system components. See the 
“Ice Maker System” and the “Condenser” sections.

Exterior Surfaces

Wash the exterior enamel surfaces and gaskets with warm water 
and mild soap or detergent. Wipe and dry. Regular use of a good 
household appliance cleaner and wax will help maintain the finish. 
Do not use abrasive cleaners on enamel surfaces as they may 
scratch the finish.
For products with a stainless steel exterior, use a clean sponge or 
soft cloth and a mild detergent in warm water. Do not use abrasive 
or harsh cleaners. Do not use chlorine bleach on the stainless 
steel surfaces.

Ice Maker System

Minerals that are removed from water during the freezing cycle will 
eventually form a hard scaly deposit in the water system. Cleaning 
the system regularly helps remove the mineral scale buildup. How 
often you need to clean the system depends upon how hard your 
water is. With hard water of 15 to 20 grains/gal. (4 to 5 grains/

liter), you may need to clean the system as often as every 

6 months.
NOTE: Use one 16 oz (473 mL) bottle of approved ice maker 
cleaner. To order, call 1-800-JENNAIR and ask for Part Number 
4396808. In Canada, call 1-800-807-6777.
1. Press the selector switch to OFF.
2. Wait 5 to 10 minutes for the ice to fall into the storage bin. 

Remove all ice from the storage bin. 

3. Unscrew the drain cap from the bottom of the water pan 

located inside the storage bin as shown. Allow the water to 
drain completely.

4. Replace the drain cap securely on the water pan. If the drain 

cap is loose, water will empty from the water pan and you will 
have either thin ice or no ice. 

5. Read and follow all handling information on the cleaner bottle 

before completing the steps below. Use one 16 oz (473 mL) 
bottle of approved ice maker cleaner.

Summary of Contents for JENN-AIR ICE MAKER

Page 1: ...ir ca MANUAL DE USO Y CUIDADO Si tiene preguntas respecto a las caracter sticas funcionamiento rendimiento partes accesorios o servicio t cnico llame al 1 800 JENNAIR 1 800 536 6247 o visite nuestro s...

Page 2: ...C mo funciona su f brica de hielo 21 Uso de los controles 21 CUIDADO DE LA F BRICA DE HIELO 22 Limpieza 22 Cuidado durante las vacaciones y mudanzas 24 SOLUCI N DE PROBLEMAS 25 Funcionamiento de la f...

Page 3: ...emperatures above 55 F 13 C and below 110 F 43 C Best results are obtained between 70 F 21 C and 90 F 32 C The ice maker must be installed in an area sheltered from the elements such as wind rain wate...

Page 4: ...ll receptacle installed by a qualified electrician Water Supply Requirements A cold water supply with water pressure of between 30 and 120 psi 207 and 827 kPa is required to operate the ice maker If y...

Page 5: ...ional Plumbing Code and any local codes and ordinances Use copper tubing or Whirlpool supply line Part Number 8212547RP and check for leaks Install tubing only in areas where temperatures will remain...

Page 6: ...standpipe with a 1 3 81 cm to 2 5 08 cm PVC drain reducer installed directly below the outlet of the drain tube as shown You must maintain a 1 2 54 cm air gap between the drain hose and the standpipe...

Page 7: ...he straight side of the end cap facing the front of the ice maker 7 Place the door back into the skin keeping the edge covers in place Replace the two screws in the top and bottom 8 Set the door aside...

Page 8: ...r being forced over the condenser by the condenser fan During the harvest cycle you may hear a thud when the ice sheet slides from the evaporator onto the cutter grid When you first start the ice make...

Page 9: ...red OR ice production decreases significantly To clean your ice maker see Ice Maker System in the Cleaning section ICE MAKER CARE Cleaning The ice making system and the air cooled condenser need to b...

Page 10: ...ull the bottom forward and then pull down to remove the lower access panel 4 Remove dirt and lint from the condenser fins and the unit compartment with a brush attachment on a vacuum cleaner 5 Replace...

Page 11: ...soft clean dishcloth using warm water and a mild liquid dish detergent 16 Plug in ice maker or reconnect power 17 After cleaning make sure that all controls are set properly and that no control indic...

Page 12: ...removed from the water during the ice making process Is there a whooshing sound Check the following things Make sure that the water supply is hooked up and turned on Make sure that the drain cap is ti...

Page 13: ...unusually high mineral content in the water supply The water may need to be filtered or treated Is there mineral scale buildup Clean your ice maker See Ice Maker System in the Cleaning section Are th...

Page 14: ...authorized modifications made to the appliance 9 Expenses for travel and transportation for product service if your major appliance is located in a remote area where service by an authorized Jenn Air...

Page 15: ...de sufrir una lesi n y lo que puede suceder si no se siguen las instrucciones Su seguridad y la seguridad de los dem s es muy importante Hemos incluido muchos mensajes importantes de seguridad en este...

Page 16: ...un circuito separado que sirva s lo para la f brica de hielo Use un contacto que no pueda ser desconectado con un interruptor o con una cadenilla de tiro IMPORTANTE Si este producto est conectado a u...

Page 17: ...altura de las patas de la siguiente manera Gire la pata niveladora hacia la derecha para bajar ese lado de la f brica de hielo Gire la pata niveladora hacia la izquierda para levantar ese lado de la f...

Page 18: ...ielo a su desag e de conformidad con todos los c digos y ordenanzas locales y estatales Si la f brica de hielo viene con un sistema de desag e por gravedad siga estas instrucciones cuando instale las...

Page 19: ...nille nuevamente el pasador de la bisagra superior en la bisagra superior 5 Quite el revestimiento de la puerta en algunos modelos de la siguiente manera Quite los dos tornillos de la parte superior e...

Page 20: ...de hielo y ajuste los tornillos 6 Saque el pasador de la bisagra superior Volver a colocar la puerta 1 Coloque la funda pl stica del pasador de la bisagra en el orificio de la bisagra superior en la...

Page 21: ...ndiciones normales de funcionamiento la f brica de hielo funcionar a las temperaturas prefijadas El sensor de nivel del hielo ubicado en el dep sito de almacenaje del hielo controlar los niveles del h...

Page 22: ...impieza depende del grado de dureza del agua Con agua dura de 15 a 20 granos por gal n 4 a 5 granos por litro es posible que se necesite limpiar el sistema cada 6 meses NOTA Use una botella de 16 oz 4...

Page 23: ...r y saque la tapa de la rejilla de corte 5 Desenchufe el arn s de cableado del lado izquierdo de la rejilla de corte 6 Desenchufe el sensor de nivel del hielo del lado derecho de la rejilla de corte J...

Page 24: ...llos 15 Limpie el panel de control con cuidado usando un pa o para vajilla con agua tibia y un detergente suave para vajilla 16 Enchufe la f brica de hielo o reconecte el suministro de energ a 17 Desp...

Page 25: ...rica de hielo parece ser ruidosa Circula el agua a trav s de la f brica de hielo Este es el funcionamiento normal Se agrega agua una vez por cada ciclo de fabricaci n de hielo Se est desbordando el ag...

Page 26: ...itado todos los materiales de empaque en el momento de la instalaci n Hielo delgado blando o aglutinado Hay un contenido alto de minerales en el suministro de agua Puede ser necesario filtrar o tratar...

Page 27: ...hogar 8 Reparaciones de piezas o sistemas como resultado de modificaciones no autorizadas que se hayan efectuado en el electrodom stico 9 Gastos de viaje y transporte para obtener servicio para el pr...

Page 28: ...ous disent comment r duire le risque de blessure et ce qui peut se produire en cas de non respect des instructions Votre s curit et celle des autres est tr s importante Nous donnons de nombreux messag...

Page 29: ...ver un circuit sp cial la machine gla ons Utiliser une prise o l alimentation ne peut pas tre coup e l aide d un commutateur ou d un interrupteur tirage IMPORTANT Si ce produit est connect une prise d...

Page 30: ...ns 4 Au moyen d une cl molette modifier la hauteur des pieds comme suit Tourner le pied de nivellement vers la droite pour abaisser ce c t de la machine gla ons Tourner le pied de nivellement vers la...

Page 31: ...n de vidange conform ment aux codes et r glements locaux et provinciaux Si la machine gla ons est fournie avec un syst me de vidange par gravit suivre les instructions ci dessous lors de l installatio...

Page 32: ...rtie sup rieure de la porte sur certains mod les Garder les pi ces ensemble et les mettre de c t 3 Retirer l axe de la charni re sup rieure 4 Retirer la porte des charni res et revisser l axe sup rieu...

Page 33: ...turation du c t oppos de la porte et les conserver 2 ter les vis du loquet de porte magn tique et les r installer du c t oppos de la porte 3 Pousser les bouchons d obturation en place du c t oppos de...

Page 34: ...ace se d gage et glisse dans une grille de coupe o elle est taill e en gla ons 3 L eau contenant les d chets min raux est vacu e apr s chaque programme de cong lation 4 De l eau fra che s infiltre de...

Page 35: ...ge Retirer toute la glace du bac d entreposage 3 D visser le capuchon de vidange du bas du bac eau situ l int rieur du bac d entreposage tel qu illustr Laisser l eau se vidanger compl tement 4 R insta...

Page 36: ...e la cale d espacement en plastique du c t droit du support de la grille de coupe suit cette derni re 8 Retirer les deux vis ailette qui maintiennent le bac eau en place Appuyer avec une main sur l av...

Page 37: ...e la grille de la base du support du panneau avant Tirer vers l avant pour enlever le panneau de l ouverture d acc s inf rieure 5 D connecter les canalisations d entr e et de sortie sur le robinet Lai...

Page 38: ...t il de la glace entre la plaque de l vaporateur et la grille de coupe V rifier que la machine gla ons est d aplomb Voir Nivellement Si la machine gla ons est d aplomb mais que le probl me persiste ef...

Page 39: ...e ou trait e Y a t il une accumulation de tartre Nettoyer la machine gla ons Voir Syst me de la machine gla ons dans la section Nettoyage Les gla ons sont ils agglom r s dans le bac Si les gla ons ne...

Page 40: ...retien ou de r paration Jenn Air autoris n est pas disponible 10 La d pose et la r installation de votre gros appareil m nager si celui ci est install dans un endroit inaccessible ou n est pas install...

Reviews: