background image

11

Level Range

1.

Place level on the oven bottom, as indicated in one of the two
figures below, depending on the size of the level. Check with
the level side to side and front to back.

2.

If range is not level, use a wrench or pliers to adjust leveling
legs up or down until the range is level.

NOTE:

Range must be level for satisfactory baking

performance and best cleaning results using AquaLift

®

Self-Clean Technology.

Electrical Connection - U.S.A. Only

If your home has a 4-wire direct connection, go to “Install Using
Direct Wire”.

Install Using Direct Wire

WARNING

Electrical Shock Hazard

Disconnect power before servicing.

Use 8 gauge copper or 6 gauge aluminum wire.

Electrically ground range.

Failure to follow these instructions can result in death,
fire, or electrical shock.

Direct Wire Strain Relief

1.

Disconnect power.

2.

Remove the lower access cover screws located on the back of
the range. Pull the bottom of the cover toward you and out to
remove cover from range.
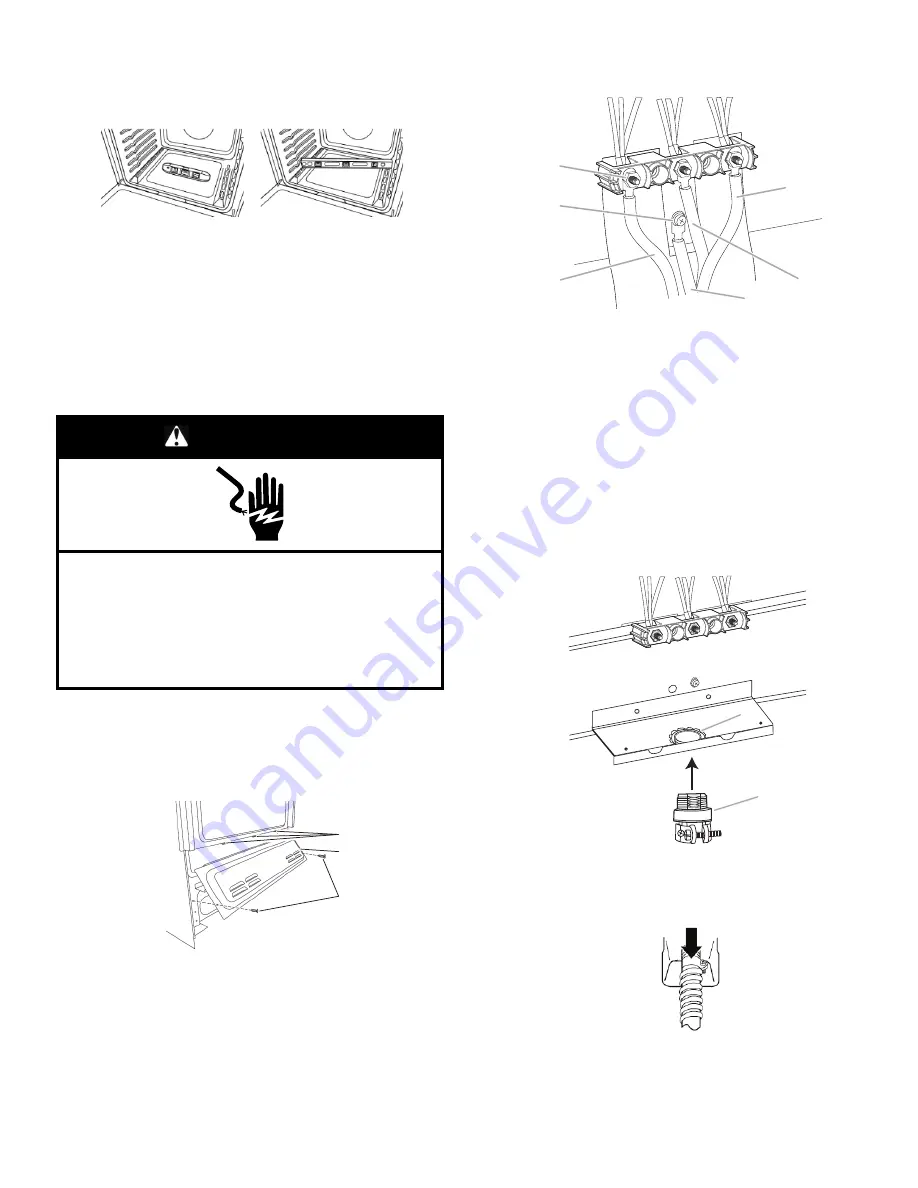
A

B

C

A.

Mounting tabs (3)

B.

Lower access cover

C.

Screws (2)

3.

Remove the three 10-32 hex nuts from the terminal posts
securing the power cord.

A

B

C

E

F

D

A.

10-32 hex nut

B.

Ground-wire
screw

C.

Line 2 (red)

D. Green ground wire
E. Neutral (center) wire
F. Line 1 (black)

4.

Use a Phillips screwdriver to remove the ground-wire screw
from the back of the range. Save the ground-wire screw.

5.

Remove the power cord from the terminal posts.

6.

Use a flat-blade screwdriver or pliers to compress the tabs on
the power cord strain-relief and pull the power cord through
the opening in the cord/conduit plate.

7.

Assemble a UL listed conduit connector in the opening.

Remove the knockout as needed for the flexible conduit
connection.

Assemble a UL listed conduit connector in the opening of
the cord/conduit plate.

A

B

A.

Removable retaining nut

B.

Conduit

Tighten strain relief screw against the flexible conduit.

Summary of Contents for JES1450ML

Page 1: ...S A Only 11 Verify Anti Tip Bracket Is Installed and Engaged 13 Remove Replace Drawer 14 Oven Door 14 Complete Installation 15 Moving the Range 15 S CURIT DE LA CUISINI RE 16 S curit de la cuisini re...

Page 2: ...ket Re engage anti tip bracket if range is moved Do not operate range without anti tip bracket installed and engaged Failure to follow these instructions can result in death or serious burns to childr...

Page 3: ...Cooking Utensils Only certain types of glass glass ceramic ceramic earthenware or other glazed utensils are suitable for range top service without breaking due to the sudden change in temperature Ute...

Page 4: ...abrasive powder cleansers chlorine bleach rust remover or ammonia 1 Remove food residue with the Cooktop Scraper For best results use the Cooktop Scraper while the cooktop is still warm but not hot to...

Page 5: ...eaned when oven cools At high temperatures foods react with porcelain Staining etching pitting or faint white spots can result Cleaning Method Clean cycle See Clean Cycle first Clean Cycle AquaLift Te...

Page 6: ...sistance with AquaLift Technology call 1 877 258 0808 in the U S A or 1 800 807 6777 in Canada or visit our website at http whirlpoolcorp com aqualift INSTALLATION INSTRUCTIONS REQUIREMENTS Tools and...

Page 7: ...501A or with local codes In Canada the installation of this range must conform with the current standards CAN CSA Z240 1 latest edition or with local codes Mobile Home Installations Require When this...

Page 8: ...cified Rating of Power Supply Cord Kit and Circuit Protection 120 240 V 120 208 V Ampere 8 8 16 5 kW 7 8 12 5 kW 40 or 50 16 6 22 5 kW 12 6 18 5 kW 50 The NEC calculated load is less than the total co...

Page 9: ...rom the carton Stack one cardboard corner on top of another Repeat with the other 2 corners Place them lengthwise on the floor behind the range to support the range when it is laid on its back 4 Using...

Page 10: ...n tip the range and be killed Install anti tip bracket to floor or wall per installation instructions Slide range back so rear range foot is engaged in the slot of the anti tip bracket Re engage anti...

Page 11: ...he lower access cover screws located on the back of the range Pull the bottom of the cover toward you and out to remove cover from range A B C A Mounting tabs 3 B Lower access cover C Screws 2 3 Remov...

Page 12: ...nstallations 1996 NEC Mobile homes Recreational vehicles In an area where local codes prohibit grounding through the neutral 1 Pull the wires through the strain relief on bottom of range Allow enough...

Page 13: ...the back wall 2 Place the outside of your foot against the bottom front of the warming drawer or baking drawer to keep the range from moving and then grasp the back of the range as shown 3 Slowly atte...

Page 14: ...2 Push the drawer in all the way 3 Gently open and close the drawer to ensure it is seated properly on the glides on both sides Oven Door For normal range use it is not suggested to remove the oven do...

Page 15: ...for 5 minutes check for heat If the range is cold turn off the range and contact a qualified electrician If You Need Assistance or Service Please reference the Quick Start Guide for contact informatio...

Page 16: ...ni re peut basculer si vous appliquez trop de force ou de poids la porte de la cuisini re sans avoir ad quatement fix la bride antibasculement AVERTISSEMENT Risque de basculement Une personne enfant o...

Page 17: ...imante 3D Utiliser uniquement des mitaines s ches Les mitaines humides ou tremp es sur les surfaces chaudes peuvent provoquer des br lures dues la vapeur Ne pas laisser les mitaines toucher des l ment...

Page 18: ...s surfaces de l appareil peuvent devenir suffisamment chaudes pour causer des br lures les ouvertures de ventilation et les surfaces autour de ces ouvertures les portes du four et les hublots de porte...

Page 19: ...ommages Nettoyant affresh pour acier inoxydable num ro de pi ce W10355016 vendu s par ment Consulter le Guide de d marrage rapide pour obtenir les coordonn es PEINTURE M TALLIQUE sur certains mod les...

Page 20: ...rille d tuvage uniquement la grille d tuvage n est pas lavable au lave vaisselle Bien que le r servoir soit durable il perdra progressivement de son lustre et ou se d colorera lorsqu on le lave au lav...

Page 21: ...nt la surface en mail de l int rieur du four REMARQUES La cuisini re doit tre d aplomb afin que toute la surface du fond de la cavit du four soit recouverte par l eau au d but du Programme de Nettoyag...

Page 22: ...bserver les dispositions de tous les codes et r glements en vigueur C est l installateur qu incombe la responsabilit de respecter les distances de s paration sp cifi es sur la plaque signal tique La p...

Page 23: ...cm maximum de profondeur pour l armoire sup rieure C 30 po 76 2 cm minimum de largeur d ouverture D 18 po 45 7 cm entre l armoire lat rale sup rieure et le comptoir E 30 po 76 2 cm minimum de largeur...

Page 24: ...ble en ligne Cette cuisini re est quip e d un Cordon lectrique Homologu par la CSA International brancher dans une prise murale standard 14 50R Veiller ce que la prise murale se trouve proximit de l e...

Page 25: ...la cuisini re repose sur sa partie post rieure Voir la section R glage des pieds de nivellement REMARQUE Pour relever la cuisini re en position verticale placer un carton ou un panneau de fibres dur a...

Page 26: ...rtelles Fixer la bride antibasculement au plancher ou au mur conform ment aux instructions d installation Faire glisser de nouveau la cuisini re de fa on ce que le pied arri re de la cuisini re se tro...

Page 27: ...que Serre C bles pour C blage Direct 1 D brancher l alimentation 2 ter les vis du couvercle d acc s inf rieur situ es l arri re de la cuisini re Tirer le bas du couvercle vers soi et l ext rieur pour...

Page 28: ...tuer la mise la terre partir du neutre 1 Tirer les conducteurs travers le serre c bles au pied de la cuisini re Laisser suffisamment de jeu pour raccorder facilement le c blage au bo tier de raccordem...

Page 29: ...isini re de bouger puis agripper l arri re de la cuisini re comme indiqu 3 Tenter d incliner la cuisini re vers l avant avec pr caution En cas de r sistance imm diate cela signifie que le pied de la c...

Page 30: ...fermer d licatement le tiroir pour s assurer qu il est bien engag dans les glissi res des deux c t s Porte du four Il n est pas recommand d enlever la porte du four pour une utilisation normale Toutef...

Page 31: ...ur F9 ou F9 E0 cela peut signifier que le c blage de la prise lectrique est d fectueux D connecter la source de courant lectrique et contacter un lectricien qualifi pour qu il contr le le circuit d al...

Page 32: ...er pi ces et panneaux avant de faire la mise en marche Le non respect de cette instruction peut causer un d c s ou une d charge lectrique 1 D brancher l alimentation 2 Faire glisser la cuisini re vers...

Reviews: