background image

5

COOKTOP USE

Cooktop Controls

Electric igniters automatically light the surface burners when 
control knobs are turned to HI and will automatically reignite if the 
flame is extinguished. All igniters will spark when lighting; 
however, only the selected burner will ignite.

If a crossdraft is present, the flame may be affected and some 
sparking may occur. This is normal.

Before setting a control knob, place filled cookware on the grate. 
Do not operate a burner using empty cookware or without 
cookware on the grate.

To Set:

1. Push in and turn knob counterclockwise to HI.

2. Turn knob to anywhere between HI and LO. Use the following 

chart as a guide when setting heat levels.

Power failure

In case of prolonged power failure, the surface burners can be lit 
manually. Hold a lit match near a burner and turn knob 
counterclockwise to HI. After burner lights, turn knob to setting. 
The vent fan will not work.

NOTE: The downdraft vent will not operate during a power 
failure.

Flame-Sensing™ Reignition

Your cooktop has sealed gas burners with Flame-Sensing™ 
ReIgnition. If any burner flame should go out, the system will 
automatically spark to reignite the burner (all igniters will spark 
when any flame is extinguished; however, only the selected 
burner will reignite). If intermittent sparking occurs, increase 
flame (rotate knob clockwise) until clicking (spark) sound ceases.

Smart Port Burner System

This cooktop is equipped with a Smart Port Burner System. The 
Smart Port Burner System produces a small flame directly under 
each grate finger and a larger flame between each grate finger. 
The visual difference between the ports will be noticeable when 
the burner is used or when adjustments are made to the flame 
length.

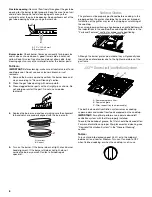
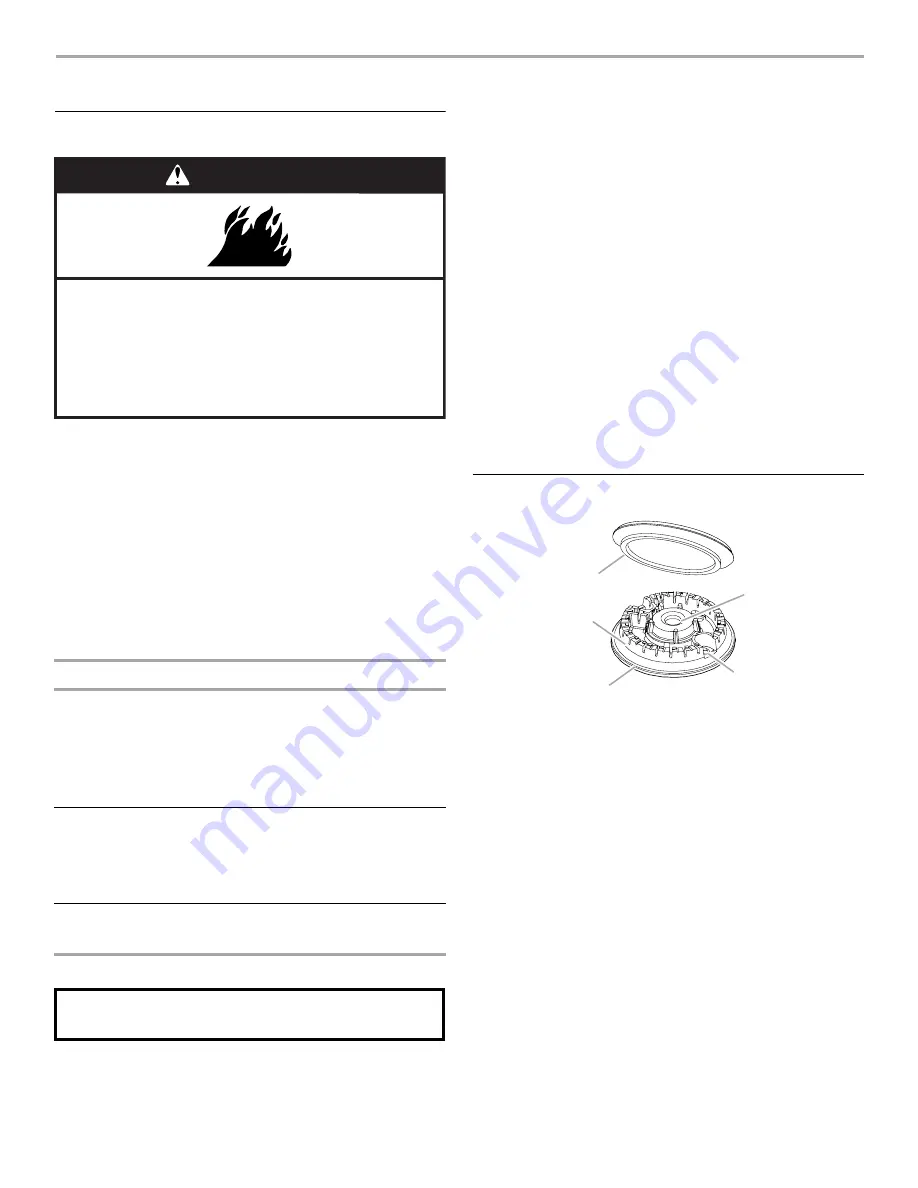
Sealed Surface Burners

IMPORTANT: Do not obstruct the flow of combustion and 
ventilation air around the burner grate edges.

Burner cap: Always keep the burner cap and head in place when 
using a surface burner. A clean burner cap and head will help 
avoid poor ignition and uneven flames. Always clean the burner 
cap and head after a spillover and routinely remove and clean the 
caps according to the “General Cleaning” section.

SETTING

RECOMMENDED USE

HI

Start food cooking.

Bring liquid to a boil.

Hold a rapid boil.

Quickly brown or sear food.

To fry chicken.

Medium
Between HI and LO

Maintain a slow boil.

Fry or sauté foods.

Cook soups, sauces and gravies.

Stew or steam food.

LO

Simmer.

Keep food warm.

WARNING

Fire Hazard

Do not let the burner flame extend beyond the edge of 
the pan.

Turn off all controls when not cooking.

Failure to follow these instructions can result in death 
or fire.

REMEMBER: When cooktop is in use, the entire cooktop 
area may become hot.

A. Burner cap
B. Burner ports

C. Burner base

D. Gas tube opening

E. Igniter head

A

B

C

D

E

Summary of Contents for JGD3430BB

Page 1: ...or service in the U S A call 1 800 JENNAIR 1 800 536 6247 or visit our website at www jennair com In Canada call 1 800 807 6777 or visit our website at www jennair ca Guided utilisationetd entretien...

Page 2: ...CUISSON 19 Nettoyage g n ral 19 D PANNAGE 21 ASSISTANCE OU SERVICE 22 Accessoires 22 Au Canada 22 GARANTIE 23 COOKTOP SAFETY You can be killed or seriously injured if you don t immediately You can be...

Page 3: ...of the cooktop CAUTION Do not store items of interest to children in cabinets above the cooktop children climbing on the cooktop to reach items could be seriously injured Proper Installation The cookt...

Page 4: ...ons See the Assistance or Service section for information on ordering A Surface burner locator B Left rear control knob C Right rear control knob D Left front control knob E Right front control knob F...

Page 5: ...arking occurs increase flame rotate knob clockwise until clicking spark sound ceases Smart Port Burner System This cooktop is equipped with a Smart Port Burner System The Smart Port Burner System prod...

Page 6: ...ight do not service the burner yourself Contact a trained repair specialist SurfaceGrates The grates must be properly positioned before cooking In the proper position the grates should be flush and le...

Page 7: ...Part Number W10355010 not included See Assistance or Service section to order STAINLESS STEEL WITH DuraFinish COATING To avoid damage to stainless steel surfaces do not use soap filled scouring pads...

Page 8: ...se mild detergent Removable Grease Filter The filter is a permanent type and should be cleaned when soiled Cleaning Method Turn off the downdraft ventilation system before removing the filter Remove b...

Page 9: ...Contact a service technician or see Assistance or Service section Surface burner makes popping noises Is the burner wet Let it dry Continuous sparking of igniter Is a cross draft drawing the flame aw...

Page 10: ...s and parts information are available from Jenn Air Brand Home Appliances Customer eXperience Center Accessories To order accessories visit our website at www jennair com cookingaccessories affresh St...

Page 11: ...o Jenn Air within 30 days from the date of purchase 6 Any food loss due to refrigerator or freezer product failures 7 Costs associated with the removal from your home of your major appliance for repai...

Page 12: ...lete model number and serial number You can find this information on the model and serial number label located on the product Dealer name____________________________________________________ Address __...

Page 13: ...AVERTISSEMENT Si les renseignements dans ce manuel ne sont pas exactement observ s un incendie ou une explosion peut survenir causant des dommages au produit des blessures ou un d c s Ne pas entrepos...

Page 14: ...ifi La table de cuisson est munie d une fiche de liaison la terre trois broches pour votre protection contre les risques de choc lectrique et doit tre branch e directement dans une prise de courant bi...

Page 15: ...nt droit F Bouton de commande du ventilateur d vacuation 3 vitesses A E D C B F A Br leur arri re gauche de 9 200 BTU h B Grille de ventilation extraction par le bas C Br leur arri re droit de 12 500...

Page 16: ...t de r gler un bouton de commande placer l ustensile de cuisson rempli sur la grille Ne pas faire fonctionner un br leur avec un ustensile de cuisson vide ou sans ustensile de cuisson sur la grille R...

Page 17: ...la section Nettoyage g n ral Ouverture du tube d arriv e de gaz Pour que la flamme s allume convenablement il faut que le gaz puisse passer librement travers l orifice Garder cette zone propre et ne p...

Page 18: ...a cuisson termin e ou lorsqu on n utilise pas la table de cuisson Pr parationdeconserves lamaison Lors de la pr paration de conserves pendant de longues p riodes alterner l utilisation des br leurs de...

Page 19: ...chaque bouton est la position Off arr t Sur certains mod les ne pas enlever les joints sous les boutons M thode de nettoyage Savon et eau Tirer les boutons directement hors du tableau de commande pou...

Page 20: ...br leur d gager la grille de ventilation et d gager le filtre de la chambre d vacuation en le soulevant Nettoyer le filtre l eau ti de et au d tergent dans l vier ou au lave vaisselle R installer le f...

Page 21: ...it des bruits d clatement Le br leur est il mouill Le laisser s cher G n ration constante d tincelles par l allumeur La flamme est elle cart e de l allumeur par un courant d air Ceci est normal en pr...

Page 22: ...le probl me n est pas attribuable l une des raisons indiqu es dans la section D pannage T l phonez au marchand qui vous a vendu l appareil ou t l phonez Jenn Air en composant le 1 800 807 6777 pour l...

Page 23: ...es 30 jours suivant la date d achat 6 Toute perte d aliments due une d faillance du r frig rateur ou du cong lateur 7 Les co ts associ s au transport du gros appareil m nager du domicile pour r parati...

Page 24: ...rouverez ces renseignements sur la plaque signal tique situ e sur le produit Nom du marchand ______________________________________________ Adresse ____________________________________________________...

Reviews: