background image

3

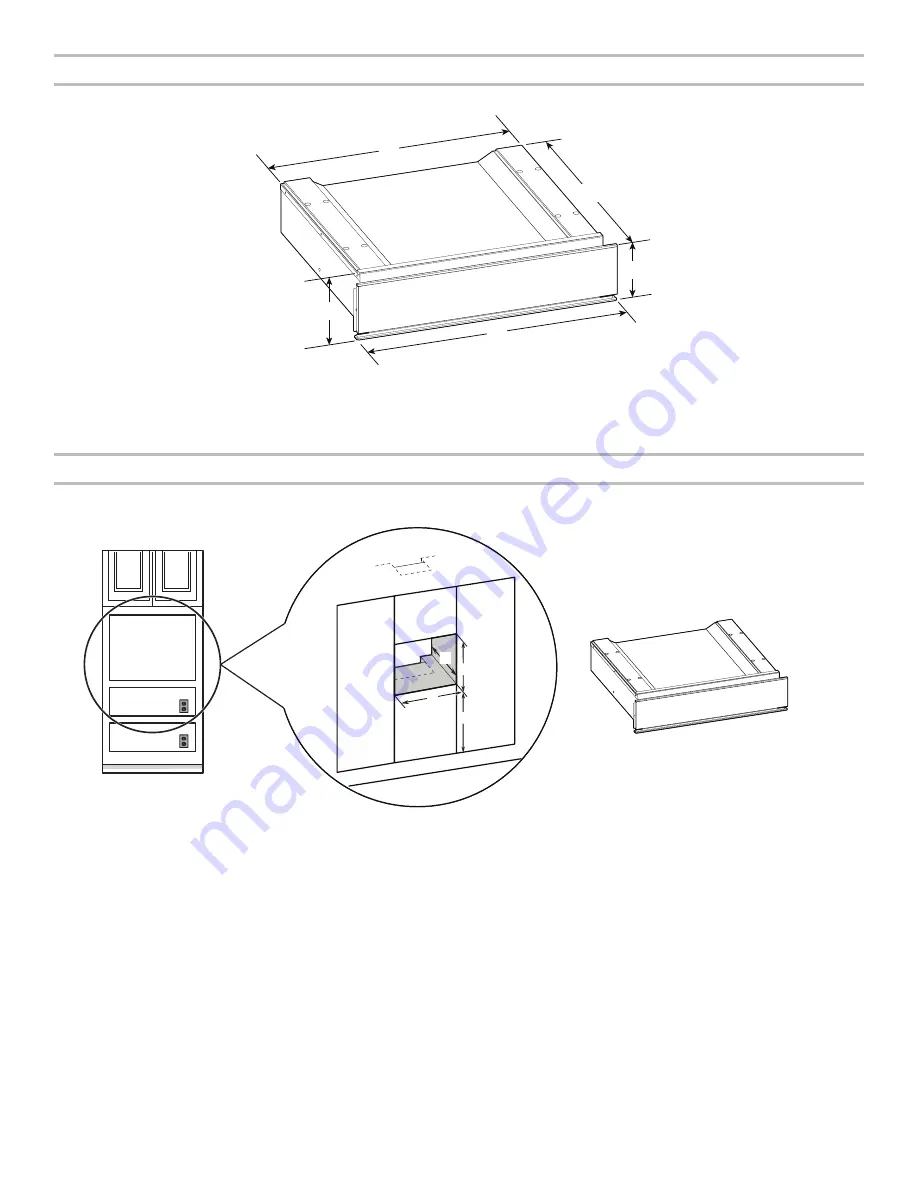
Product Dimensions

Clearance Dimensions

Warming Drawer Installed Below Oven

NOTES:


If installed with an oven, no separator between them.


Warming drawer can be installed under a single oven.


The warming drawer cannot be leveled after being installed.

For outdoor installation, follow the cutout dimensions for a single warming drawer. Install the outdoor warming drawer in a permanent 

fixture.

A

D

B

E

C

A. 21

5

/

8

" (55.0 cm) oven depth

B. 21

13

/

16

" (55.4 cm) recessed width

C. 5

9

/

16

" (14.1 cm) recessed height

D. 23

7

/

16

" (59.5 cm) overall width

E. 4

9

/

16

" (11.7 cm) drawer front height

Front view

B

A

C

D

A. 22

15

/

16

" (58.2 cm) cutout height for both oven and 

warming drawer

B.  31" (78.7 cm) minimum/recommended height from 

floor

C. 21

5

/

8

" (55.0 cm) cutout width

D. 23

5

/

8

" (60.0 cm) minimum cabinet width

Summary of Contents for JJD3024HL

Page 1: ...age de l inspecteur des installations lectriques local W11260097B WARMING DRAWER SAFETY 2 INSTALLATION REQUIREMENTS 2 Tools and Parts 2 Location Requirements 2 Electrical Requirements 5 INSTALLATION I...

Page 2: ...th warming drawer Recessed installation area must provide complete enclosure around the recessed portion of the warming drawer Grounded electrical supply is required See Electrical Requirements sectio...

Page 3: ...the cutout dimensions for a single warming drawer Install the outdoor warming drawer in a permanent fixture A D B E C A 215 8 55 0 cm oven depth B 2113 16 55 4 cm recessed width C 59 16 14 1 cm recess...

Page 4: ...024HM E Depth of cutout minimum 227 16 57 05 cm for JJD3024HM 221 2 57 13 cm for JJD3024HL F Depth to Side Cleat 13 16 2 1 cm for JJD3024HM and JJD3024HL g Recommended outlet location Flush Installati...

Page 5: ...its final location Remove and discard shipping materials tape and film from the warming drawer Remove and set aside racks and other parts from inside warming drawer 2 Check that the warming drawer co...

Page 6: ...packaging materials 4 For warming drawer use and cleaning read the Use and Care Guide 5 Push in and turn the control knob to 160 F 71 C and push the red button The light should illuminate If warming d...

Page 7: ...7 S CURIT DU TIROIR R CHAUD...

Page 8: ...a partie encastr e du tiroir r chaud Une source d lectricit avec liaison la terre est n cessaire Voir la section Sp cifications lectriques La prise lectrique doit tre situ e dans le mur arri re du c t...

Page 9: ...iroir r chaud apr s son installation Pour une installation l ext rieur suivre les dimensions de coupe pour un tiroir r chaud simple Installer le tiroir r chaud d ext rieur sur un dispositif permanent...

Page 10: ...inimale de l ouverture Scie guichet de 22 7 16 po 57 05 cm pour JJD3024HM Scie guichet de 22 1 2 po 57 13 cm pour JJD3024HL F Profondeur du tasseau lat ral 13 16 po 2 1 cm pour JJD3024HM et JJD3024HL...

Page 11: ...chaud Enlever et conserver part les grilles et autres pi ces se trouvant l int rieur du tiroir r chaud 2 V rifier que le bouton de commande du tiroir r chaud est r gl la position Fan ventilateur 3 Pla...

Page 12: ...isation et d entretien 5 Appuyer et tourner le bouton de commande 160 F 71 C puis appuyer sur le bouton rouge Le t moin devrait s allumer Si un tiroir r chaud ne fonctionne pas contr ler ce qui suit L...

Reviews: