background image

9

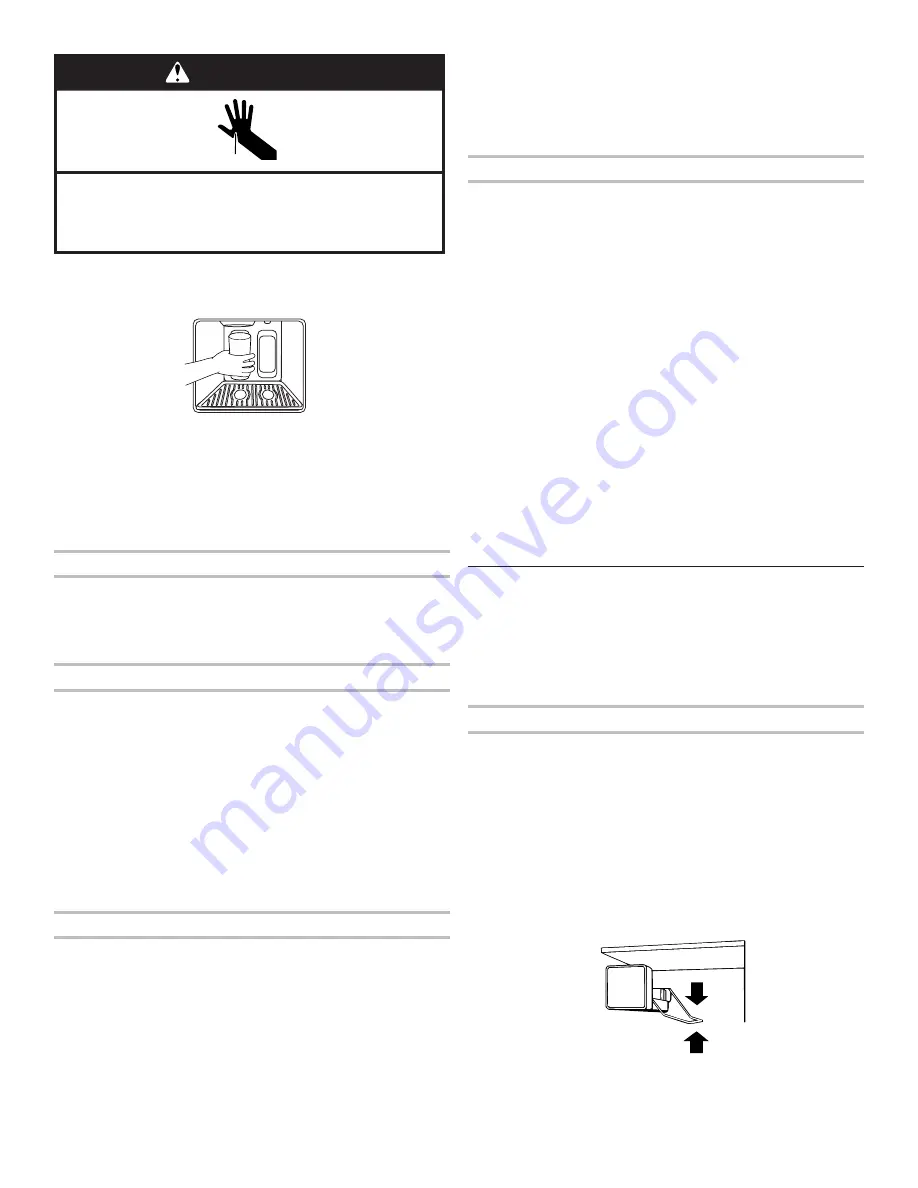
Cut Hazard

Use a sturdy glass when dispensing ice.
Failure to do so can result in cuts.

WARNING

2.

  Press a sturdy glass against the ice dispenser pad. Hold 

the glass close to the dispenser opening so ice does not fall 

outside of the glass.

IMPORTANT:

 You do not need to apply a lot of pressure to 

the pad in order to activate the ice dispenser. Pressing hard 

will not make the ice dispense faster or in greater quantities.

3.  Remove the glass to stop dispensing.

NOTE:

 Ice may continue to dispense for up to 10 seconds 

after removing the glass from the pad. The dispenser may 

continue to make noise for a few seconds after dispensing. 

Dispenser Tray (on some models)

Some models have a tray at the bottom of the dispenser area. 

The tray is designed to catch small spills and is removable for 

easy emptying and cleaning.

NOTE:

 There is no drain in the tray. 

Dispenser Light (on some models)

When you use the dispenser, the light will automatically turn on. 

If you want the light to be on continuously, you may choose either 

ON or AUTO.

ON:

 Press LIGHT to turn the dispenser light on.

AUTO:

 Press LIGHT a second time to select AUTO mode. The 

dispenser light will automatically adjust to become brighter as the 

room brightens and dimmer as the room darkens.

OFF:

 Press LIGHT a third time to turn the dispenser light off.

The dispenser lights are LEDs that cannot be changed. If it 

appears that your dispenser lights are not working, be sure 

that the light sensor is not blocked (in AUTO mode). See 

“Troubleshooting” for more information. 

Dispenser Lock (on some models)

The dispenser can be turned off for easy cleaning or to avoid 

unintentional dispensing by small children and pets.

NOTE:

 The lock feature does not shut off power to the product, 

to the ice maker, or to the dispenser light. It simply deactivates 

the ice and water dispensers. To turn off the ice maker, see “Ice 

Maker and Storage Bin.”


Press and hold LOCK for 3 seconds to lock the dispenser. 

While the dispenser is locking, “LOCKING” will appear on the 

display screen and the blue indicator light around the LOCK 

button will flash. When the dispenser is locked, the indicator 

light will change to red for a few seconds, and then turn off.


Press and hold LOCK a second time to unlock the dispenser. 

While the dispenser is unlocking, “UNLOCKING” will appear 

on the display screen and the red indicator light around the 

LOCK button will flash. When the dispenser is unlocked, the 

indicator light will change to blue for a few seconds, and then 

turn off. 

Water Filter Status Light (on some models)

The water filter status light and display screen help you know 

when to change your water filter. Press the FILTER button to 

check the status of your water filter.

If the filter is new: 

You must press FILTER to view the filter’s status. For a few 

seconds, the status light will be blue and the display screen will 

show what percentage of your filter’s life remains.

If it is almost time to change the filter: 

The status light will automatically illuminate and will remain on, 

appearing yellow. The words “ORDER FILTER” will appear on 

the display screen. Press FILTER to see what percentage of your 

filter’s life remains. You should order the appropriate replacement 

filter. See “Accessories.”

If it is time to change the filter: 

The status light will remain on, changing to red. The words 

“REPLACE FILTER” and “HOLD BUTTON TO RESET” will appear 

on the display screen until the filter has been changed and the 

status light has been reset.

To reset the water filter status light: 

After changing the filter, reset the status light by pressing and 

holding the FILTER button for 3 seconds. The status light will 

blink red and change to blue, and then turn off when the system 

is reset. 

Ice Maker and Storage Bin 

(on some models - Accessory)

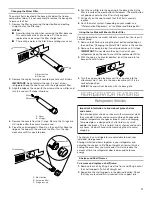
IMPORTANT:

 Flush the water system before turning on the 

ice maker. See “Water and Ice Dispensers.” Allow 24 hours to 

produce the first batch of ice. Discard the first three batches of 

ice produced. Allow 3 days to completely fill the ice container. 

Style 1

To Turn the Ice Maker On/Off:

The On/Off switch for the ice maker is a wire shutoff arm located 

on the side of the ice maker.

1. 

 To turn the ice maker on, simply lower the wire shutoff arm.

NOTE:

 Your ice maker has an automatic shutoff. As ice is 

made, the ice cubes will fill the ice storage bin and the ice 

cubes will raise the wire shutoff arm to the OFF (arm up) 

position.

2. 

 To manually turn the ice maker off, lift the wire shutoff arm to 

the OFF (arm up) position, and listen for the click to make sure 

the ice maker will not continue to operate.

Summary of Contents for JS42NXFXDE

Page 1: ...as caracter sticas funcionamiento rendimiento partes accesorios o servicio t cnico llame al 1 800 JENNAIR 1 800 536 6247 o visite nuestro sitio de internet www jennair com En Canad llame al 1 800 JENN...

Page 2: ...atura controlada 31 Cajones para verduras y tapas 32 Portabotellas 32 CARACTER STICAS DEL CONGELADOR 32 Estante del congelador 32 Canastilla del congelador 32 CARACTER STICAS DE LA PUERTA 33 Recipient...

Page 3: ...NS Plug into a grounded 3 prong outlet Do not remove ground prong Do not use an adapter Do not use an extension cord Disconnect power before servicing Replace all parts and panels before operating Rem...

Page 4: ...water filtration system is connected to your cold water supply the water pressure to the reverse osmosis system needs to be a minimum of 40 psi 276 kPa If the water pressure to the reverse osmosis sys...

Page 5: ...Installing the Produce Preserver on some models CAUTION IRRITANT MAY IRRITATE EYES AND SKIN DANGEROUS FUMES FORM WHEN MIXED WITH OTHER PRODUCTS Do not mix with cleaning products containing ammonia bl...

Page 6: ...s and vapors such as gasoline away from refrigerator Failure to do so can result in death explosion or fire Power On Off Switch If you need to turn the power to your refrigerator On or Off you must re...

Page 7: ...s or temporarily warm room temperatures Press MAX COOL to turn on the Max Cool feature The Max Cool indicator light will remain on for 24 hours unless manually turned off NOTE The temperature display...

Page 8: ...en the freezer door is open To turn off the ice maker see Ice Maker and Storage Bin Your ice maker can produce both crushed and cubed ice The display screen reads CRUSHED or CUBED indicating which typ...

Page 9: ...urn off Press and hold LOCK a second time to unlock the dispenser While the dispenser is unlocking UNLOCKING will appear on the display screen and the red indicator light around the LOCK button will f...

Page 10: ...in or bucket This can cause damage to the ice container and the dispenser mechanism 2 Wash ice bin with a mild detergent rinse well and dry thoroughly Do not use harsh or abrasive cleaners or solvents...

Page 11: ...an operate the ice maker without a water filter Your ice will not be filtered 1 Remove the filter by pressing the eject button and pulling on the cap See Changing the Water Filter earlier in this sect...

Page 12: ...t meat in original wrapping as long as it is airtight and moisture proof Rewrap if necessary See the following chart for storage times When storing meat longer than the times given freeze the meat Fre...

Page 13: ...to close tightly For more information on preparing food for freezing check a freezer guide or reliable cookbook Freezer Basket The freezer basket can be used to store bags of frozen fruits and vegetab...

Page 14: ...the power will be out for 24 hours or less keep the door or doors closed depending on your model to help food stay cold and frozen If the power will be out for more than 24 hours do one of the follow...

Page 15: ...run even longer if the room is warm a large food load is added doors are opened often or if the doors have been left open The refrigerator is noisy Refrigerator noise has been reduced over the years D...

Page 16: ...del is in the ON position New installation Wait 24 hours after ice maker installation for ice production to begin Wait 72 hours for full ice production Large amount of ice recently removed Allow 24 ho...

Page 17: ...closed completely Close the door firmly If it does not close completely see The doors will not close completely Ice bin installed correctly Be sure the ice bin is firmly in position New installation W...

Page 18: ...ealers Installation information Use and maintenance procedures Accessory and repair parts sales Specialized customer assistance Spanish speaking hearing impaired limited vision etc For Further Assista...

Page 19: ...tructions are not followed The disposable cartridge must be changed at least every 6 months Use replacement filter P1RFWB2L Part EDR3RXD1 EDR3RXD1B 2015 suggested retail price of 49 99 U S A 54 95 Can...

Page 20: ...ies only when the major appliance is used in the country in which it was purchased This limited warranty is effective from the date of original consumer purchase Proof of original purchase date is req...

Page 21: ...de California como causantes de c ncer ADVERTENCIA Este producto contiene una o m s sustancias qu micas identificadas por el estado de California como causantes de defectos cong nitos o alg n otro ti...

Page 22: ...u refrigerador Informaci n importante para saber acerca de los estantes y tapas de vidrio No limpie los estantes y tapas de vidrio con agua caliente mientras est n fr os Los estantes y tapas pueden ro...

Page 23: ...llene y deseche dos recipientes llenos de hielo para preparar el filtro de agua para su uso antes de usar el hielo No use con agua que no sea microbiol gicamente segura o que sea de calidad desconoci...

Page 24: ...e minutos Si entra en contacto con la piel enjuague con agua 1 Lave el interior del caj n para verduras con una soluci n de jab n suave para fregar y agua tibia y seque bien 2 Busque el paquete que co...

Page 25: ...o apagar su refrigerador deber quitar el panel de la rejilla superior para acceder al interruptor de encendido Apague el suministro de energ a al refrigerador cuando lo vaya a limpiar o cambiar los f...

Page 26: ...m s alto REFRIGERADOR demasiado caliente Mucho uso o temperatura ambiental muy caliente Control del REFRIGERADOR 1 m s bajo CONGELADOR demasiado fr o No est fijado de acuerdo a las condiciones ambien...

Page 27: ...h Mode los puntos fijos de temperatura permanecen sin cambiarse y las luces interiores se apagan Presione SABBATH MODE Modo de descanso para encender dicha caracter stica Panel del despachador Holiday...

Page 28: ...ara ponerse m s brillante a medida que la habitaci n se ilumine m s y m s tenue a medida que la habitaci n se oscurezca OFF Apagado Presione LIGHT por tercera vez para apagar la luz del despachador La...

Page 29: ...arte de adelante del dep sito de hielo y j lela hacia afuera 4 Vuelva a colocar el dep sito hasta que se detenga o el despachador no funcionar Empuje el brazo de control de alambre hacia la posici n O...

Page 30: ...ci n NOTA Los modelos con despachadores poseen un reposicionador de filtro en la puerta del compartimiento del congelador Los modelos sin despachadores poseen indicadores de Bueno Encargar filtro Reem...

Page 31: ...adaptarlos a sus necesidades individuales de almacenamiento Si usted guarda alimentos similares juntos en el refrigerador y ajusta los estantes para que se adapten a las diferentes alturas de los art...

Page 32: ...a colocar el estante coloc ndolo encima de los soportes y baj ndolo hasta que encaje en su lugar Gu a para la conservaci n de alimentos congelados Los per odos de conservaci n variar n seg n la calid...

Page 33: ...nmediato Para limpiar su refrigerador 1 Quite la rejilla superior Vea Interruptor de Encendido Apagado 2 Presione el interruptor de suministro de energ a en la posici n OFF Apagado 3 Quite todas las p...

Page 34: ...l ha sido dise ada para los viajeros que deseen apagar las luces y la f brica de hielo Al seleccionar esta caracter stica los puntos de ajuste de la temperatura no cambian pero la f brica de hielo est...

Page 35: ...rtas El refrigerador es ruidoso El ruido del refrigerador se ha ido reduciendo a lo largo de los a os Debido a esta reducci n es posible que escuche ruidos intermitentes en su nuevo refrigerador que n...

Page 36: ...stalaci n de la f brica de hielo para que empiece a producir hielo Deje transcurrir 72 horas para la producci n total de hielo Se acaba de sacar una gran cantidad de hielo Deje transcurrir 24 horas pa...

Page 37: ...ierre Conecte el refrigerador al suministro de agua y abra completamente la v lvula de cierre Est la presi n de agua a por lo menos 30 lbs pulg 207 kPa La presi n de agua de la casa determina el flujo...

Page 38: ...on Harbor MI 49022 2692 Favor de incluir un n mero telef nico de d a en su correspondencia En Canad Llame al Centro para la eXperiencia del Cliente de Jenn Air Canada sin costo alguno al 1 800 JENNAIR...

Page 39: ...B2L pieza n EDR3RXD1 EDR3RXD1B Precio minorista sugerido para 2015 49 99 en EE UU 54 95 en Canad Los precios est n sujetos a cambio sin previo aviso El sistema de monitoreo del filtro mide la cantidad...

Page 40: ...o a o desde la fecha de compra cuando este electrodom stico principal sea instalado operado y mantenido de acuerdo a las instrucciones adjuntas o provistas con el producto la marca Jenn Air pagar por...

Page 41: ...o reparaci n de este electrodom stico principal aparte de las declaraciones incluidas en esta garant a Si usted desea una garant a con una duraci n m s prolongada o m s completa que la garant a limita...

Page 42: ...e pour tre l origine de cancers AVERTISSEMENT Ce produit contient au moins un produit chimique connu par l tat de Californie pour tre l origine de malformations et autres d ficiences de naissance AVER...

Page 43: ...renseignements savoir au sujet des tablettes et des couvercles en verre Ne pas nettoyer les tablettes ou couvercles en verre avec de l eau ti de quand ils sont froids Les tablettes et les couvercles...

Page 44: ...n syst me de filtre la grille de la base s assurer que le filtre la grille de la base est bien install et que la capsule est la position horizontale 1 Mettre en marche la machine gla ons Abaisser le b...

Page 45: ...ire vomir S il y a eu contact avec les yeux rincer sous l eau pendant minutes S il y a eu contact avec la peau rincer sous l eau 1 Nettoyer l int rieur d un bac l gumes avec un m lange de liquide vais...

Page 46: ...t vers l ext rieur Pour replacer le panneau de la grille sup rieure 1 Accrocher les supports de panneau sur les boulons de montage qui d passent du sommet du r frig rateur 2 Tirer l g rement le pannea...

Page 47: ...e Pour d sactiver l alarme et le t moin lumineux voir la section R initialisation de l alarme principale La touche ON OFF marche arr t du tableau de commande teint les fonctions du r frig rateur tell...

Page 48: ...ulter la section R initialisation de l alarme principale Over Temperature d passement de la temp rature IMPORTANT Si l alarme de d passement de la temp rature s active les aliments peuvent s ab mer Vo...

Page 49: ...mi re quantit de gla ons Jeter les trois premi res quantit s de gla ons produites Le syst me de distribution ne fonctionne pas lorsque la porte du cong lateur est ouverte Selon votre mod le les distri...

Page 50: ...ine gla ons ou la lampe du distributeur Elle sert simplement d sactiver les distributeurs de gla ons et d eau Pour teindre la machine gla ons voir Machine gla ons et bac d entreposage Appuyer sur LOCK...

Page 51: ...S assurer que la porte est bien ferm e Style 2 Mise en marche arr t de la machine gla ons L interrupteur On Off marche arr t est situ du c t droit dans la partie sup rieure du compartiment de cong lat...

Page 52: ...z ro sur la porte du compartiment cong lateur Les mod les sans distributeur son muni d un indicateur de filtre Good Order Filter Replace Filter Bon commander un filtre remplacer le filtre Apr s avoir...

Page 53: ...lors de leur d pose afin d viter de les faire tomber Les tablettes dans le r frig rateur sont r glables pour satisfaire vos besoins individuels de rangement Le remisage d aliments semblables ensemble...

Page 54: ...r la tablette en la pla ant sur les supports et en l abaissant en place Guide d entreposage des aliments surgel s Les temps de remisage varieront d apr s la qualit et le type d aliments le type d emba...

Page 55: ...e non respect de cette instruction peut causer un d c s une explosion ou un incendie Les sections de r frig ration et de cong lation se d givrent automatiquement Toutefois nettoyer les deux sections e...

Page 56: ...e voyageur qui d sire teindre les lampes et la machine gla ons En s lectionnant cette caract ristique les r glages de temp rature resteront les m mes mais la machine gla ons sera d sactiv e et les lam...

Page 57: ...lateurs L appareil peut fonctionner plus longtemps encore si la temp rature de la pi ce est chaude si une importante quantit de nourriture y est ajout e si les portes sont fr quemment ouvertes ou si e...

Page 58: ...produit pas ou pas suffisamment de gla ons Le r frig rateur est il connect l alimentation en eau et le robinet d arr t d eau est il ouvert Brancher le r frig rateur l alimentation en eau et ouvrir le...

Page 59: ...inutes pour que le moteur du distributeur soit r gl de nouveau avant d tre utilis Le distributeur d eau ne fonctionne pas correctement Porte du cong lateur compl tement ferm e Bien fermer la porte Si...

Page 60: ...age Les techniciens de service d sign s par Jenn Air sont form s pour remplir la garantie des produits et fournir un service apr s la garantie partout au Canada Caract ristiques et sp cifications de n...

Page 61: ...tail en 2015 de 49 99 US 54 95 CAN Les prix sont indiqu s sous r serve de modification Le syst me de contr le du filtre mesure la quantit d eau qui passe par le filtre et vous alerte lorsque vient le...

Page 62: ...compter de la date d achat lorsque ce gros appareil m nager est install utilis et entretenu conform ment aux instructions jointes ou fournies avec le produit la marque Jenn Air paiera pour les pi ces...

Page 63: ...en cas de d pannage ou de r paration n cessaire sur ce gros appareil m nager autre que les responsabilit s nonc es dans la pr sente garantie Si vous souhaitez une garantie plus tendue ou plus compl te...

Page 64: ...W10779525A TM 2015 Whirlpool All rights reserved TM 2015 Whirlpool Tous droits r serv s TM 2015 Whirlpool Todos los derechos reservados 9 15...

Reviews: