6
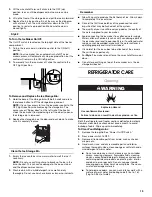
2. Use a sturdy container to depress and hold the water
dispenser lever for 5 seconds, then release it for 5 seconds.
Repeat until water begins to flow. Once water begins to flow,
continue depressing and releasing the dispenser lever
(5 seconds on, 5 seconds off) for an additional 2 minutes.
This will flush air from the filter and water dispensing system.
Additional flushing may be required in some households.
NOTE: As air is cleared from the system, water may spurt out
of the dispenser.
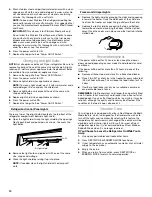
3. Open the freezer door and turn on the ice maker. For Style 1,
lower the wire shutoff arm. For Style 2, move the switch to
the ON (left) position.
■
Allow 24 hours to produce the first batch of ice.
■
Discard the first three batches of ice produced.
■
Depending on your model, you may want to select the
maximum ice feature to increase the production of ice.
Using the Controls
Depending on your model, your refrigerator may have Style 1 or
Style 2 controls. Follow the instructions specific to your model.
IMPORTANT:
■
Wait 24 hours after you turn on the refrigerator before you put
food into it. If you add food before the refrigerator has cooled
completely, your food may spoil.
NOTE: Adjusting the refrigerator and freezer controls to a
lower (colder) setting will not cool the compartments any
faster.
■
If the temperature is too warm or too cold in the refrigerator or
freezer, first check the air vents to be sure they are not
blocked before adjusting the controls.
■
After the refrigerator is turned on, the Over Temperature audio
alarm and indicator light may activate every 1
¹⁄₂
hours until
the refrigerator and freezer temperatures are below 48°F (9°C)
and 15°F (-9°C), respectively, or until the alarm is turned off.
To turn off the audio alarm and indicator light, see “Master
Alarm Reset.
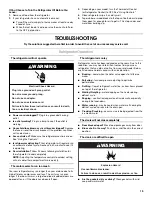
Turning Refrigerator On/Off and Viewing Set Points
The On/Off touch pad on the control panel shuts down
refrigerator functions such as cooling, some lighting, fans and
compressors. To turn the power off completely, use the power
On/Off switch located behind the top grille. See “Power On/Off
Switch.”
■
Press the On/Off touch pad.
Viewing the Celsius Temperatures
■
Press F/C touch pad. To redisplay degrees Fahrenheit, press
F/C again.
NOTE: If the freezer temperature is below zero, the negative
sign next to the freezer display will light up. This is normal.
Adjusting Controls
IMPORTANT:
■
The preset settings should be correct for normal household
usage. The controls are set correctly when milk or juice is as
cold as you like and when ice cream is firm.
NOTE: Wait at least 24 hours between adjustments. Recheck
the temperatures before other adjustments are made.
■
Press the SET TO RECOMMENDED touch pad to reset the
set points to the factory recommended temperatures.
NOTE: The factory recommended set points are 0°F (-18°C)
for the freezer and 37°F (2°C) for the refrigerator.
■
The actual temperature may differ from the display when a
door is open for an extended period of time.
To Adjust Set Point Temperatures:
The set point range for the freezer is -5°F to 5°F (-21°C to -15°C).
The set point range for the refrigerator is 33°F to 45°F
(0°C to 7°C).
■
Press the refrigerator or freezer PLUS (+) or MINUS (-) touch
pad until the desired temperature is reached
Style1
Style 2
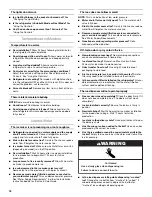
Alarm Functions
Master Alarm Reset
Pressing Alarm Reset once will turn off the audio alarm and
indicator light. The audio alarm will not sound again for the
current condition that caused the alarm until a new condition
occurs or until a Master Alarm Reset is performed.
A Master Alarm Reset can be performed by pressing ON/OFF
twice or by turning the power to the refrigerator off and on again.
See “Power On/Off Switch.” After performing a Master Alarm
Reset, the indicator light will reactivate if the condition that
caused the alarm is still present. See “Over Temperature,” “Call
Service,” or “Door Alarm.”
Style 1
Style 2
CONDITION/REASON:
TEMPERATURE
ADJUSTMENT:
REFRIGERATOR too cold
Not set correctly for conditions
REFRIGERATOR Control
1° higher
REFRIGERATOR too warm
High use or room very warm
REFRIGERATOR Control
1° lower
FREEZER too cold
Not set correctly for conditions
FREEZER Control
1° higher
FREEZER too warm/too little ice
High use or heavy ice use
FREEZER Control
1° lower
Summary of Contents for JS42NXFXDW00
Page 18: ...18 WATER FILTER CERTIFICATIONS...
Page 22: ...22 Notes...


