background image

8

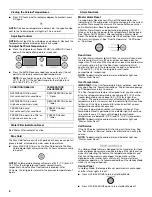
To Dispense Ice:

1. Press the button to select the desired type of ice.

2. Press a sturdy glass against the ice dispenser pad. Hold the 

glass close to the dispenser opening so ice does not fall 
outside of the glass. 

IMPORTANT: You do not need to apply a lot of pressure to the 
pad in order to activate the ice dispenser. Pressing hard will 
not make the ice dispense faster or in greater quantities.

3. Remove the glass to stop dispensing.

NOTE: Ice may continue to dispense for up to 10 seconds 
after removing the glass from the pad. The dispenser may 
continue to make noise for a few seconds after dispensing.

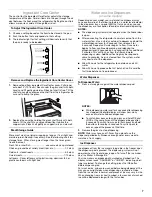
Dispenser Tray with Water Level Indicator 
(on some models)

Your dispenser may include a small tray at the bottom of the 
dispenser. It is designed to catch small spills and allow for easy 
cleaning. The tray can be removed from the dispenser and carried 
to the sink to be emptied or cleaned.
NOTE: There is no drain in the tray. When the tray is full of water 
and needs to be emptied, a small red indicator pops up at the 
back of the tray.

Dispenser Light (on some models)

When you use the dispenser, the light will automatically turn on. 
If you want the light to be on continuously, you may choose either 
ON or AUTO. 
ON: Press LIGHT to turn the dispenser light on. 
AUTO: Press LIGHT a second time to select AUTO mode. The 
dispenser light will automatically adjust to become brighter as the 
room brightens, dimmer as the room darkens.
OFF: Press LIGHT a third time to turn the dispenser light off.
The dispenser lights are LEDs that can not be changed. If it 
appears that your dispenser lights are not working, be sure that 
the light sensor is not blocked (in AUTO mode). See 
“Troubleshooting” for more information. 

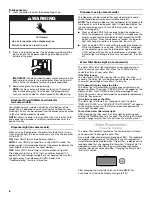
Dispenser Lock (on some models)

The dispenser can be turned off for easy cleaning or to avoid 
unintentional dispensing by small children and pets. 
NOTE: The lock feature does not shut off power to the product, to 
the ice maker, or to the dispenser light. It simply deactivates the 
ice and water dispensers. To turn off the ice maker, see “Ice 
Maker & Storage Bin.”

Press and hold LOCK for 3 seconds to lock the dispenser. 
While the dispenser is locking, “LOCKING” will appear on the 
display screen and the blue indicator light around the LOCK 
button will flash. When the dispenser is locked, the indicator 
light will change to red for a few seconds, then turn off. 

Press and hold LOCK a second time to unlock the dispenser. 
While the dispenser is unlocking, “UNLOCKING” will appear 
on the display screen and the red indicator light around the 
LOCK button will flash. When the dispenser is unlocked, the 
indicator light will change to blue for a few seconds, then turn 
off.

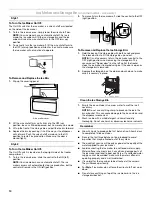
Water Filter Status Light (on some models)

The water filter status light and display screen help you know 
when to change your water filter. Press the FILTER button to 
check the status of your water filter.
If the filter is new:
You must press FILTER to view the filter’s status. For a few 
seconds, the status light will be blue and the display screen will 
show what percentage of your filter’s life remains.
If it is almost time to change the filter:
The status light will automatically illuminate and will remain on, 
appearing yellow. The words “ORDER FILTER” will appear on the 
display screen. Press FILTER to see what percentage of your 
filter’s life remains. You should order the appropriate replacement 
filter. See “Accessories.”
If it is time to change the filter:
The status light will remain on, changing to red. The words 
“REPLACE FILTER” and “HOLD BUTTON TO RESET” will appear 
on the display screen until the filter has been changed and the 
status light has been reset.
To reset the water filter status light:
After changing the filter, reset the status light by pressing and 
holding the FILTER button for 3 seconds. The status light will blink 
red and change to blue, then turn off when the system is reset.

Water Filter Indicator 

(on some models)

The water filter indicator, located on the control panel, will help 
you know when to change the water filter. 
A new water filter should display a reading of 99%. The reading in 
the display will decrease as the filter life is used. A replacement 
water filter should be ordered when “Order Filter” is displayed. It is 
recommended that you replace the filter when “Change Filter” is 
displayed or when water flow to your water dispenser and/or 
icemaker decreases noticeably. See “Changing the Water Filter” 
later in this section.

After changing the water filter, press and hold RESET for 
2 seconds until the status display changes to 99%.

Cut Hazard

Use a sturdy glass when dispensing ice.

Failure to do so can result in cuts.

WARNING

Summary of Contents for JS42PPDUDB00

Page 1: ...visit our website at www jennair ca MANUAL DE USO Y CUIDADO Si tiene preguntas respecto a las caracter sticas funcionamiento rendimiento partes accesorios o servicio t cnico llame al 1 800 JENNAIR 1...

Page 2: ...____________________________________________ Serial number __________________________________________________ Address ________________________________________________________ Phone number_____________...

Page 3: ...s read and obey all safety messages This is the safety alert symbol This symbol alerts you to potential hazards that can kill or hurt you and others All safety messages will follow the safety alert sy...

Page 4: ...Top Grille 1 Insert top grille hooks located on the back of the top grille onto mounting bolts on the side trim 2 Pull grille down slightly to lock into place Turn Power On or Off 1 Remove top grille...

Page 5: ...in the horizontal position 2 Use a sturdy container to depress and hold the water dispenser lever for 5 seconds then release it for 5 seconds Repeat until water begins to flow Once water begins to fl...

Page 6: ...tinue to flash until the temperature is equal to or below 45 F 7 C and 15 F 9 C for the refrigerator and freezer compartments respectively NOTE To deactivate the audio alarm and indicator light see Ma...

Page 7: ...nnecting the refrigerator to a water source flush the water system Use a sturdy container to depress and hold the water dispenser lever for 5 seconds then release it for 5 seconds Repeat until water b...

Page 8: ...ator light around the LOCK button will flash When the dispenser is locked the indicator light will change to red for a few seconds then turn off Press and hold LOCK a second time to unlock the dispens...

Page 9: ...w filter into the opening in the base grille As the filter is inserted the eject button will depress The eject button will pop back out when the filter is fully engaged 7 Pull gently on the cap to che...

Page 10: ...he Ice Storage Bin 1 Hold the base of the storage bin with both hands and press the release button to lift the storage bin up and out NOTE It is not necessary to turn the ice maker control to the OFF...

Page 11: ...t cloth To order the cleaner see Accessories 6 Clean the condenser coils located behind the top grille ventilation panel regularly Coils may need to be cleaned as often as every other month This may h...

Page 12: ...l turn the Thermostat Control or Refrigerator Control to OFF See Using Controls 4 Clean refrigerator wipe it and dry well 5 Tape rubber or wood blocks to the tops of both doors to prop them open far e...

Page 13: ...r not enough ice Refrigerator connected to a water supply and the supply shutoff valve turned on Connect refrigerator to water supply and turn water shutoff valve fully open Kink in the water source l...

Page 14: ...pressure at least 30 psi 207 kPa The water pressure to the home determines the flow from the dispenser See Water Supply Requirements Kink in the home water source line Straighten the water source line...

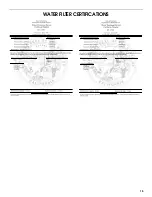
Page 15: ...15 WATER FILTER CERTIFICATIONS...

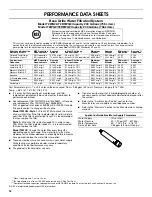
Page 16: ...ssistance or Service section for the Manufacturer s name address and telephone number Refer to the Warranty section for the Manufacturer s limited warranty Application Guidelines Water Supply Paramete...

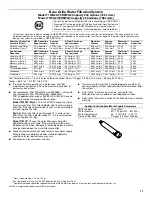
Page 17: ...on for the Manufacturer s name address and telephone number Refer to the Warranty section for the Manufacturer s limited warranty Application Guidelines Water Supply Parameters System tested and certi...

Page 18: ...3 Repairs when your major appliance is used for other than normal single family household use 4 Damage resulting from accident alteration misuse abuse fire flood acts of God improper installation inst...

Page 19: ...___ N mero de serie ________________________________________________ Direcci n_______________________________________________________ N mero de tel fono_____________________________________________ N...

Page 20: ...e el ctrico o lesiones personales al usar su refrigerador siga estas precauciones b sicas ADVERTENCIA INSTRUCCIONES IMPORTANTES DE SEGURIDAD CONSERVAR ESTAS INSTRUCCIONES Conecte a un contacto de pare...

Page 21: ...cerca de la conexi n de agua vea Soluci n de problemas o llame a un plomero competente autorizado Si enciende el refrigerador antes de conectar la tuber a de agua ponga la f brica de hielo en la posic...

Page 22: ...la producci n de la primera tanda de hielo Desh gase de las tres primeras tandas de hielo producido Dependiendo de su modelo puede ser que Ud desee elegir la caracter stica m xima de hielo para incre...

Page 23: ...ra excesiva Call Service Solicite servicio o Door Alarm Alarma de la puerta Door Alarm Alarma de la puerta La luz indicadora Door Alarm parpadear sonar una alarma y las luces interiores se apagar n si...

Page 24: ...rt culos que guarde en la bandeja 2 Oprima el bot n que corresponde a ese ajuste 3 La luz indicadora de ese ajuste se iluminar para verificar que la bandeja est lista para ser cargada C mo remover y v...

Page 25: ...mana para mantener un suministro fresco Despachador de hielo El hielo se distribuye del dep sito de la f brica de hielo en el congelador cuando se presione la almohadilla del despachador El sistema de...

Page 26: ...ostrar qu porcentaje de vida til le queda a su filtro Si ya es casi tiempo de cambiar su filtro La luz de estado se iluminar autom ticamente y permanecer encendida de color amarillo Las palabras ORDER...

Page 27: ...erador Guarde la tapa para usarla con el filtro de reemplazo 3 Con la tapa en la posici n horizontal inserte la tapa en la rejilla de la base hasta que se detenga 4 Gire la tapa hacia la izquierda has...

Page 28: ...si la puerta est abierta o se ha quitado el dep sito 2 Vuelva a colocar el dep sito en la puerta y emp jelo hacia abajo para asegurarse de que est de manera segura en su lugar C mo limpiar el dep sit...

Page 29: ...onja y detergente suave en agua tibia Seque meticulosamente con un pa o suave Para ordenar el limpiador vea la secci n Accesorios 6 Limpie regularmente los serpentines del condensador ubicados detr s...

Page 30: ...uando el ltimo lote de hielo caiga levante el brazo de control de alambre a la posici n OFF Apagado hacia arriba 3 Dependiendo de su modelo coloque el control del termostato o control del refrigerador...

Page 31: ...cnico Est n bloqueados los orificios de ventilaci n Saque cualquier objeto que bloquee los orificios de ventilaci n Hay acumulaci n de humedad en el interior NOTA Es normal que se acumule un poco de h...

Page 32: ...motor del despachador se reposicione antes de usarlo de nuevo El despachador de agua no funciona debidamente Est completamente cerrada la puerta del congelador Cierre la puerta con firmeza Si no se ci...

Page 33: ...s o despu s del sistema Refi rase a la secci n Ayuda o Servicio t cnico para obtener el nombre direcci n y n mero telef nico del fabricante Refi rase a la secci n Garant a para verificar la garant a l...

Page 34: ...sistema Refi rase a la secci n Ayuda o Servicio t cnico para obtener el nombre direcci n y n mero telef nico del fabricante Refi rase a la secci n Garant a para verificar la garant a limitada del fab...

Page 35: ...s de la cobertura de la garant a 3 Reparaciones cuando su electrodom stico principal se use de un modo diferente al dom stico normal de una familia 4 Da os causados por accidente alteraci n uso indebi...

Page 36: ...________________ Num ro de s rie ________________________________________________ Adresse ________________________________________________________ Num ro de t l phone _________________________________...

Page 37: ...les suivantes Pour r duire les risques d incendie de choc lectrique ou des blessures lors de l utilisation du IMPORTANTES INSTRUCTIONS DE S CURIT CONSERVEZ CES INSTRUCTIONS Brancher l appareil sur un...

Page 38: ...eau dans les Instructions d installation En cas de questions au sujet du raccordement en eau consulter D pannage ou faire appel un plombier qualifi agr Si on met en marche le r frig rateur avant son r...

Page 39: ...s trois premi res quantit s de gla ons produites Selon le mod le que vous avez vous pouvez vouloir choisir la caract ristique de production maximale de gla ons pour augmenter la production de gla ons...

Page 40: ...l Service appel de service ou Door Alarm alarme en cas d ouverture prolong e de la porte Alarme en cas d ouverture prolong e de la porte Le t moin lumineux Door Alarm clignote une alarme retentit et l...

Page 41: ...ssi res de support sur la paroi Guide d entreposage des viandes Garder la plus grande partie des viandes dans leur emballage original en v rifiant qu il est herm tique et l preuve de l humidit Envelop...

Page 42: ...r avec indicateur du niveau d eau sur certains mod les Le distributeur peut comporter un petit plateau dans la partie inf rieure du distributeur Il est con u pour r cup rer les l gers renversements et...

Page 43: ...r Filter commander un filtre s affiche Il est recommand de remplacer le filtre lorsque Change filter remplacer le filtre s affiche ou lorsque le d bit d eau votre distributeur et ou la machine gla ons...

Page 44: ...e commande en broche la position OFF lev e 2 Pour un arr t manuel soulever le bras de commande en broche la position OFF lev e et couter le d clic pour s assurer que la machine gla ons ne continuera p...

Page 45: ...r curer ou autres articles de nettoyage abrasifs Ces produits risquent d gratigner ou d endommager les mat riaux Pour aider liminer les odeurs on peut laver les parois int rieures avec un m lange d ea...

Page 46: ...ngel s durant deux quatre jours S il n y a pas de casier frigorifique ni de neige carbonique consommer ou mettre imm diatement en conserve les aliments p rissables NOTER Un cong lateur plein restera f...

Page 47: ...est possible d entendre des bruits intermittents venant de votre nouveau r frig rateur qui n avaient pas t d cel s avec votre ancien mod le Voici une liste des sons normaux accompagn s d une explicat...

Page 48: ...ns est elle allum e S assurer que le bras de commande en broche ou l interrupteur selon le mod le est en position ON S agit il d une nouvelle installation Attendre 24 heures apr s l installation pour...

Page 49: ...d eau compl tement La pression de l eau est elle inf rieure 30 lb po 207 kPa La pression de l eau du domicile d termine l coulement d eau du distributeur Voir Sp cifications de l alimentation en eau D...

Page 50: ...inconnue en l absence d un dispositif de d sinfection ad quat avant ou apr s le syst me Consulter la section Assistance ou service pour obtenir le nom l adresse et le num ro de t l phone du fabricant...

Page 51: ...ce d un dispositif de d sinfection ad quat avant ou apr s le syst me Consulter la section Assistance ou service pour obtenir le nom l adresse et le num ro de t l phone du fabricant Consulter la sectio...

Page 52: ...Dieu installation fautive ou installation non conforme aux codes d lectricit ou de plomberie ou l utilisation de produits non approuv s par Jenn Air 5 Toute perte d aliments due une d faillance du r...

Page 53: ......
Reviews: