background image

11

Care and Cleaning

1.Turn the touch wheel control to the “OFF” position and unplug the power cord.
2. Press the mixer head release button and lift the mixer head up.
3. Remove attachments by pressing them up as far as possible, then turn counter-

clockwise to release. Pull from the attachment post.

4.The bowl and attachments can be washed in warm, soapy water or in a dish-

washer. Attachments are top rack dishwasher safe.

5.Wipe down the mixer head and power base with a damp cloth. DO NOT

immerse the mixer in water. Do not use an abrasive cleaning pad on the 
mixer base.

6. DO NOT use household cleaners that contain bleach or pine cleaners. Do not

use any type of solvent-based cleaner or metal polish on the mixer base. Do
not spray cleaners directly on the mixer. Cleaners should be applied to a clean
cloth before using on the mixer. If these cleaning products DO come in contact
with the mixer, immediately clean with a water-dampened cloth and wipe dry.

Mixing Bowls

• Neither glass nor stainless steel mixing bowls are designed for use in the oven.
• Stainless steel mixing bowls are not suitable for use in microwave ovens. Glass

bowls are microwave safe, however, they should be cooled to room tempera-
ture before use in the stand mixer.

• Both glass and stainless steel bowls may be used in the refrigerator or freezer.

Chilled glass bowls should be allowed to warm to room temperature before
use in the stand mixer.

• For best results, hand wash the mixing bowl. Both glass and stainless steel

bowls may be cleaned in the dishwasher.

Injury Hazard 

– Unplug mixer before cleaning. Failure to do so can result in 

broken bones or cuts.

WARNING

Summary of Contents for JSM900EAAU - Jenn-Air Attrezzi Antique Copper Stand...

Page 1: ...J E N N A I R m i x e R m od e l no j s m 9 0 0 U S E R G U I D E Part No 606 009000 4 05...

Page 2: ...n pause mode and start stop right at your fingertips The Jenn Air mixer s powerful high efficiency 400 watt motor and drive system work in combination with the precision planetary mixing action to han...

Page 3: ...Safety Recall Act Please complete the following for your personal records Model Number ________________________________________________ Serial Number ________________________________________________...

Page 4: ...wing 1 Read all instructions 2 To protect against risk of electrical shock do not put the cord plug or mixer in water or other liquid 3 Close supervision is necessary when any appliance is used by or...

Page 5: ...use the mixer outdoors 12 Do not let the cord hang over the edge of a table or counter Do not let cord contact hot surfaces including stove 13 Do not place on or near a hot gas or electric burner or...

Page 6: ...5 9 8 7 6 5 4 3 2 1...

Page 7: ...hments slide on here and are turned slightly to lock into place 6 Attachments The mixer attachments include a wire whip a flat beater and a dough hook The wire whip is best for light mixtures that nee...

Page 8: ...hment post see page 8 5 Lower the mixer head by pressing the mixer head release button and guiding the mixer head down carefully with your hands 6 Plug power cord into a grounded 3 prong electrical ou...

Page 9: ...se button and guiding the mixer head down carefully with your hands 7 Plug power cord into a grounded 3 prong electrical outlet 8 Your mixer is adjusted at the factory so that the flat beater just cle...

Page 10: ...selected speed 9 To PAUSE press the start stop button again The mixer will stop To restart at the same speed setting simply press start stop again The mixer will resume ramping up to the selected spee...

Page 11: ...5 Mashed potatoes flat beater 4 6 Frosting flat beater 6 7 Egg whites wire whip 8 10 Whipped cream wire whip 8 10 Bread rolls dough hook 1 2 Tips Before adding ingredients to the mixer bowl press the...

Page 12: ...se Do not spray cleaners directly on the mixer Cleaners should be applied to a clean cloth before using on the mixer If these cleaning products DO come in contact with the mixer immediately clean with...

Page 13: ...touch wheel control Make sure the bowl is securely locked into place on the bowl locking plate before operating the mixer The bowl should be level and will lock into place with a slight turn Make sure...

Page 14: ...oil mixture Gradually add remaining flour until soft dough forms Continue kneading with dough hook until dough is smooth and elastic about 3 5 minutes Cover and let rise for 10 15 minutes Divide dough...

Page 15: ...and then mix well on setting 4 Stir in pistachios Turn onto floured surface and divide dough into two pieces Shape each piece into a tube that is approximately 12 long Place rolls on cookie sheet leav...

Page 16: ...n cottage cheese onion fresh dill dill seed 1 egg salt and 2 cups of flour Gradually mix in another 1 4 1 2 cup flour or until a soft dough forms Continue mixing for approximately 3 5 minutes or until...

Page 17: ...et egg whites aside Using the flat beater attachment cream butter shortening and sugar Gradually work up to setting 5 Add egg yolks and resume on setting 2 Beat well on set ting 4 Combine soda and flo...

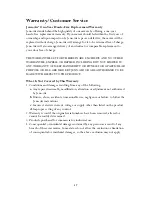
Page 18: ...RPOSE OR USE ARE MADE BY JENN AIR OR ARE AUTHORIZEDTO BE MADEWITH RESPECTTOTHE PRODUCT What Is Not Covered byThisWarranty 1 Conditions and damages resulting from any of the following a Any repair disa...

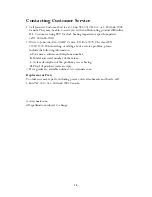
Page 19: ...70 Cleveland TN 37320 2370 When writing or calling about a service problem please include the following information a Your name address and telephone number b Model and serial number of the mixer c A...

Page 20: ...19 Notes...

Page 21: ...r Table des Mati res Instructions de s curit 21 22 Pi ces et caract ristiques 23 24 Assemblage du batteur 25 26 Fonctionnement du batteur 27 Guide de r glage des vitesses 28 Entretien et nettoyage 29...

Page 22: ...ils lectriques sont utilis s les mesures de s curit de base devraient toujours tre observ es y compris les pr cautions suivantes 1 Bien lire toutes les directives 2 Pour viter les risques de choc lect...

Page 23: ...nt 10 L utilisation d accessoires non recommand s ou non vendus par le fabricant de l appareil aux fins d utilisation avec ce mod le est d conseill e et peut causer un incendie un choc lectrique ou de...

Page 24: ...23 9 8 7 6 5 4 3 2 1...

Page 25: ...n place 6 Accessoires Les accessoires du batteur comprennent un fouet fin un fouet plat et un crochet p trisseur Le fouet fin est recommand pour les pr parations l g res dans lesquelles il faut incor...

Page 26: ...la t te du batteur en appuyant sur le bouton de d clenchement et en la guidant soigneusement vers le bas avec les mains 6 Brancher le cordon d alimentation dans une prise de courant trois bornes mise...

Page 27: ...e bouton de d clenchement et en la guidant soigneusement vers le bas avec les mains 7 Brancher le cordon d alimentation dans une prise de courant trois bornes 8 Le batteur est r gl en usine de sorte q...

Page 28: ...isie 9 Pour mettre le batteur en mode ATTENTE appuyez sur le bouton Start stop Marche arr t nouveau Le batteur s arr tera Pour le remettre en marche la m me vitesse il suffit d appuyer encore une fois...

Page 29: ...t de 6 7 Blancs d ufs fouet fin de 8 10 Cr me fouett e fouet fin de 8 10 Pain petits pains mollets crochet p trisseur de 1 2 Conseils Avant d ajouter les ingr dients dans le bol m langer appuyer sur l...

Page 30: ...pulv riser le nettoyant sur le m langeur Appliquer le nettoyant sur un linge propre avant d utiliser sur le m langeur Si ces produitsVENAIENT cependant en contact avec le m langeur les nettoyer imm d...

Page 31: ...de commande tactile S assurer que le bol est solidement fix au plateau de verrouillage avant de mettre le batteur en marche Le bol doit tre de niveau et il s enclenchera en le tour nant l g rement S...

Page 32: ...molle Continuer p trir avec le cro chet p trisseur jusqu ce que la p te soit lisse et lastique de 3 5 minutes Couvrir et laisser lever pendant 10 15 minutes Diviser la p te en deux et placer chaque m...

Page 33: ...diviser en deux Rouler chaque boule de p te en forme de tube d environ 12 po 30 5 cm de long Placer les rouleaux sur la t le biscuits en prenant bien soin de laisser de l espace entre les deux Aplati...

Page 34: ...d aneth un uf le sel et 2 tasses de farine la vitesse n 1 Ajouter graduellement entre 1 4 et 1 2 tasse de farine suppl mentaire en m langeant jusqu l obtention d une p te molle Continuer m langer pen...

Page 35: ...se n 5 Ajouter les jaunes d ufs et r duire la vitesse au n 2 Bien m langer la vitesse n 4 Combiner le bicarbonate de sodium et la farine et incorporer au m lange cr meux en alternant avec le lait la v...

Page 36: ...UN USAGE PARTICULI ER N EST FOURNIE OU AUTORIS E PAR JENN AIR POUR CE PRODUIT Ne sont pas couverts par cette garantie 1 Les dommages ou d rangements dus a Toute r paration d montage modification alt r...

Page 37: ...ir l informa tion suivante a Nom adresse et num ro de t l phone du client b Num ro de mod le et num ro de s rie du m langeur c Description claire du probl me observ d Preuve d achat facture de vente 3...

Page 38: ...r i o Tabla de contenido Instrucciones sobre seguridad 38 39 Piezas y caracter sticas 40 41 Montaje de la licuadora 42 43 Funcionamiento de la licuadora 44 Gu a de control de velocidades 45 Cuidado y...

Page 39: ...s las palabras y los r tulos de seguridad Controles importantes de seguridad Cuando utilice aparatos el ctricos debe seguir siempre ciertas medidas b sicas de seguridad incluyendo las siguientes 1 Lea...

Page 40: ...nte no venda o no aconseje que se puedan utilizar con este modelo porque se puede provocar un incendio generar una descarga el ctrica o causar lesiones a las personas 11 No utilice la batidora a la in...

Page 41: ...40 9 8 7 6 5 4 3 2 1...

Page 42: ...re esta pata y se hacen girar ligeramente para trabarlos en el lugar 6 Accesorios La batidora incluye los accesorios siguientes un batidor de alambre un batidor plano y un gancho para amasar El batido...

Page 43: ...s accesorios Ver p gina 43 5 Oprima el bot n de liberaci n y baje el cabezal de la batidora gui ndolo hacia abajo cuidadosamente con las manos 6 Enchufe el cord n el ctrico a un toma corriente de 3 or...

Page 44: ...ezal de la batidora gui ndolo hacia abajo cuidadosamente con las manos 7 Enchufe el cord n el ctrico a un toma corriente de 3 orificios que cuente con una conexi n a tierra 8 Su batidora fue ajustada...

Page 45: ...ad deseada 9 Para HACER UNA PAUSA oprima nuevamente el bot n start stop La batidora se va a detener Para volver a comenzar a la misma velocidad s lo tiene que volver a oprimir el bot n start stop La b...

Page 46: ...lano 4 6 Capa dulce para decorar la torta batidor plano 6 7 Clara de huevo batidor de alambre 8 10 Crema chantill batidor de alambre 8 10 Panes bollos gancho para amasar 1 2 Consejos Antes de agregar...

Page 47: ...plicados sobre un pa o limpio antes de usarlos en la batidora Si estos productos ENTRAN en contacto con la batidora l mpiela inmediatamente con un pa o h medo con agua y seque con un pa o seco Bol de...

Page 48: ...amente tra bado en el platillo de fijaci n antes de poner la batidora en funcionamiento El bol debe estar nivelado y para trabarlo debe hacerlo girar levemente Aseg rese de que el accesorio de la bati...

Page 49: ...e la harina hasta formar una masa suave Continuar amasando con el gancho hasta que la masa se torne suave y el stica aproximadamente 3 5 minutos Cubrir y dejar elevar durante 10 15 minutos Dividir la...

Page 50: ...i nada y dividir la masa en dos Trabajar la masa para darle la forma de un cilindro de aproximadamente 12 pulgadas 30 5 cm de largo Colocar los cilindros sobre una chapa para hornear galletas dejando...

Page 51: ...esco la cebolla el eneldo fresco las semillas de eneldo 1 huevo la sal y 2 tazas de harina Agregar gradualmente 1 4 1 2 taza de harina o la cantidad suficiente como para formar una masa suave Continua...

Page 52: ...lmente hasta alcanzar la posici n 5 Agregar las yemas de huevo y batir en velocidad 2 hasta combinar todos los ingredi entes Batir bien en velocidad 4 Combinar la harina con el polvo de hornear y usan...

Page 53: ...OSE A CUALQUIER GARANT A DE COMERCIABILIDAD O ARREGLO PARA UN PROP SITO O USO PARTICULAR Lo que no cubre esta garant a 1 Situaciones y da os resultantes de cualquiera de las siguientes eventualidades...

Page 54: ...2370 Cuando llame o escriba acerca de un problema de servicio por favor incluya la siguiente informaci n a Su nombre direcci n y n mero telef nico b N mero de modelo y n mero de serie de la licuadora...

Page 55: ...Notas...

Page 56: ...W W W J E N NA I R C O M...

Reviews: