background image

9

9

9

REFRIGERATOR FEATURES

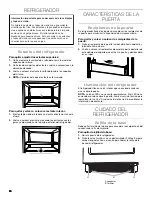
Refrigerator Shelves 

To Remove or Adjust Upper Shelves:

1.

Remove the shelf by lifting it up and out of the shelf brackets.

2.

Remove the two shelf brackets and reposition them in the 
desired location.

3.

Replace the shelf by inserting it into the shelf brackets.

NOTE:

 Be sure the shelf is level.

To Remove and Replace Lower Shelf:

1.

The very bottom glass shelf slides straight out. 

2.

Replace the shelf by aligning the edges with the guides and 
pushing it in toward the back of the refrigerator. 

DOOR FEATURES

Door Bins

Your refrigerator has two door bin locations for maximum storage 
capacity. 

To Remove and Replace the Door Bins:

1.

Remove the door bin by tilting it forward and pulling it out.

2.

Replace the bin by placing the rear of the bin under the 
support on the door and sliding into place.

Lighting the Refrigerator

The refrigerator has an interior light that comes on any time the 
door is opened. 

NOTE: 

The light is an LED which does not need to be replaced. If 

the LED does not illuminate when the door is opened, call Service 
to replace the light. See Assistance or Service for contact 
information.

REFRIGERATOR CARE

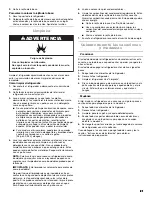
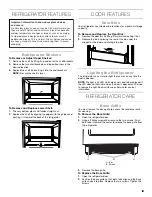
Base Grille

You must remove the base grille to access the condenser coils 
for cleaning. 

To Remove the Base Grille:

1.

Open the refrigerator door.

2.

Using a Phillips screwdriver, remove the two screws. Push 
both tabs in toward the center to release the base grille from 
the refrigerator.

3.

Remove the base grille.

To Replace the Base Grille:

1.

Open the refrigerator door.

2.

Position the base grille so that both tabs align and the base 
grille snaps into place. Replace the two screws. Tighten the 
screws.

Important information to know about glass shelves 
and covers:

Do not clean glass shelves or covers with warm water when 
they are cold. Shelves and covers may break if exposed to 
sudden temperature changes or impact, such as bumping. 
Tempered glass is designed to shatter into many small, 
pebble-size pieces. This is normal. Glass shelves and covers 
are heavy. Use both hands when removing them to avoid 
dropping.

A. Tabs
B. Screws

B

A

A

Summary of Contents for JUR24FRERS

Page 1: ...L DE USO Y CUIDADO Si tiene preguntas respecto a las caracter sticas funcionamiento rendimiento partes accesorios o servicio t cnico llame al 1 800 JENNAIR 1 800 536 6247 o visite nuestro sitio de int...

Page 2: ...CARACTER STICAS DEL REFRIGERADOR 20 Estantes del refrigerador 20 CARACTER STICAS DE LA PUERTA 20 Recipientes de la puerta 20 Iluminaci n del refrigerador 20 CUIDADO DEL REFRIGERADOR 20 Rejilla de la...

Page 3: ...bol and either the word DANGER or WARNING These words mean follow instructions instructions DANGER WARNING IMPORTANT SAFETY INSTRUCTIONS WARNING To reduce the risk of fire electric shock or injury whe...

Page 4: ...e Opening Dimensions Height dimensions are shown with the leveling legs extended to the minimum height NOTE When leveling legs are fully extended add 15 mm to the height dimensions See Product Dimensi...

Page 5: ...our refrigerator be provided Use an outlet that cannot be turned off by a switch Do not use an extension cord NOTE Before performing any type of installation cleaning or removing a light bulb unplug r...

Page 6: ...g legs 4 Open the door again to make sure that it closes as easily as you like If not tilt the refrigerator slightly more to the rear by turning both front leveling screws to the left It may take seve...

Page 7: ...running Using the Controls The control panel is located at the top of the compartment and facing front The control of the refrigerator has no mechanical parts or buttons When disconnected the control...

Page 8: ...BATH for 3 seconds to turn off the feature and turn on the display Door Open If the door is open longer than 5 minutes an alarm will sound every 2 minutes until the door is closed or any control is pr...

Page 9: ...e light is an LED which does not need to be replaced If the LED does not illuminate when the door is opened call Service to replace the light See Assistance or Service for contact information REFRIGER...

Page 10: ...rim pieces dispenser covers or door gaskets If unintentional contact does occur clean plastic part with a sponge and mild detergent in warm water Dry thoroughly with a soft cloth 5 Replace the removab...

Page 11: ...erator cool try to get everything you need out of the refrigerator at once keep food organized so it is easy to find and close the door as soon as the food is removed Has a large amount of food just b...

Page 12: ...procedures Accessory and repair parts sales Specialized customer assistance Spanish speaking hearing impaired limited vision etc Referrals to local dealers repair parts distributors and service compan...

Page 13: ...ly use or use inconsistent with published user operator or installation instructions 2 In home Instruction on how to use your product 3 Service to correct improper product maintenance or installation...

Page 14: ...lesi n a usted y a los dem s Todos los mensajes de seguridad ir n a continuaci n del s mbolo de advertencia de seguridad y de la palabra PELIGRO o ADVERTENCIA Estas palabras significan Para reducir e...

Page 15: ...altura m nima NOTA Cuando las patas niveladoras est n totalmente extendidas agregue 15 mm a las medidas de altura Vea Medidas del producto Si el piso de la abertura no est nivelado con el piso de la...

Page 16: ...recomienda que use un circuito separado s lo para su refrigerador Use un tomacorriente que no se pueda apagar con un interruptor No use un cable el ctrico de extensi n NOTA Antes de realizar cualquier...

Page 17: ...puerta y verifique si se cierra con la facilidad que usted desea Si no es as gire ambos tornillos niveladores delanteros hacia la izquierda para inclinar levemente el refrigerador m s hacia la parte p...

Page 18: ...artimiento y la parte frontal El control del refrigerador no tiene piezas mec nicas o botones Cuando se desenchufa el panel de control no muestra nada y puede resultar dif cil de localizar Control On...

Page 19: ...tos sonar una alarma cada 2 minutos hasta que la puerta se cierre o se presione cualquiera de los controles Modo de bloqueo El modo Lock Bloqueo desactiva todas las opciones para evitar cualquier camb...

Page 20: ...el soporte que est en la puerta y desliz ndolo en su lugar Iluminaci n del refrigerador El refrigerador tiene una luz interior que se enciende cada vez que se abre la puerta NOTA La luz es LED y no ne...

Page 21: ...s de acero inoxidable No permita que el limpiador de acero inoxidable entre en contacto con ninguna parte de pl stico tales como las piezas del marco las tapas del despachador o las juntas de la puert...

Page 22: ...que necesite del refrigerador de una sola vez Mantenga los alimentos organizados para encontrarlos con facilidad y cierre la puerta una vez que los haya sacado Se acaba de agregar una gran cantidad de...

Page 23: ...raci n Asistencia especializada para el consumidor habla hispana problemas de audici n visi n limitada etc Recomendaciones con distribuidores locales compa as que dan servicio y distribuidores de part...

Page 24: ...del refrigerador congelador si la pieza se rompiera debido a defectos de material o de mano de obra Sistema de refrigeraci n sellado incluye compresor evaporador condensador secador y tubos conectore...

Page 25: ...reparaci n de este electrodom stico principal aparte de las declaraciones incluidas en esta garant a Si usted desea una garant a con una duraci n m s prolongada o m s completa que la garant a limitad...

Page 26: ...s potentiels de d c s et de blessures graves vous et d autres Tous les messages de s curit suivront le symbole d alerte de s curit et le mot DANGER ou AVERTISSEMENT Ces mots signifient AVERTISSEMENT r...

Page 27: ...selon laquelle les pieds de nivellement sont d ploy s la hauteur minimale REMARQUE Lorsque les pieds de nivellement sont compl tement d ploy s ajouter 15 mm aux dimensions de hauteur Voir Dimensions...

Page 28: ...mmand d utiliser un circuit distinct pour alimenter uniquement votre r frig rateur Utiliser une prise murale qui ne peut pas tre mise hors circuit l aide d un commutateur Ne pas utiliser un c ble de r...

Page 29: ...lle ferme comme vous le d sirez Sinon incliner le r frig rateur un peu plus vers l arri re en tournant les deux vis de nivellement avant vers la gauche Plusieurs tours peuvent tre n cessaires et il co...

Page 30: ...et en marche ou s arr te Utilisation des commandes Le tableau de commande se trouve au sommet du compartiment face l avant La commande du r frig rateur ne comporte aucune pi ce ni aucun bouton m caniq...

Page 31: ...nt 3 secondes pour activer la caract ristique Apr s le compte rebours de 3 secondes la caract ristique s active et tous les autres affichages s teignent Appuyer sur SABBATH Sabbat pendant 3 secondes p...

Page 32: ...e porte Le r frig rateur comporte deux emplacements pour balconnets de porte pour une capacit de rangement maximale D pose et r installation des balconnets de porte 1 Enlever le balconnet de porte en...

Page 33: ...s parois int rieures avec un m lange d eau ti de et de bicarbonate de sodium 2 c soupe pour 1 pinte 26 g 0 95 L d eau 4 Laver les surfaces ext rieures en acier inoxydable et surfaces ext rieures peint...

Page 34: ...rmales pr voir que le moteur fonctionne peu pr s 40 80 du temps Dans des conditions plus chaudes pr voir un fonctionnement encore plus fr quent Vient on d ajouter une grande quantit d aliments au r fr...

Page 35: ...oir Utilisation de la commande La porte est difficile ouvrir Le joint est il sale ou collant Nettoyer le joint et la surface avec laquelle il est en contact Frotter en appliquant une fine couche de pa...

Page 36: ...compagnies de service de r paration et distributeurs de pi ces de rechange locaux Les techniciens de service d sign s par Jenn Air sont form s pour remplir la garantie des produits et fournir un servi...

Page 37: ...d un vice de mat riau ou de fabrication Syst me de r frig ration scell y compris le compresseur l vaporateur le condenseur le s choir et les conduits de connexion LE SEUL ET EXCLUSIF RECOURS DU CLIEN...

Page 38: ...n cas de d pannage ou de r paration n cessaire sur ce gros appareil m nager autre que les responsabilit s nonc es dans la pr sente garantie Si vous souhaitez une garantie plus tendue ou plus compl te...

Page 39: ...39 39 39 Notes...
Page 40: ...Jenn Air Used under license in Canada All rights reserved Usada en Canad bajo licencia Todos los derechos reservados Utilis sous licence au Canada Tous droits r serv s 01 15 Printed in Mexico Impreso...

Reviews: