background image

INSTALLATION

6

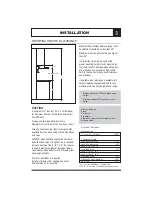
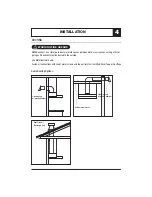
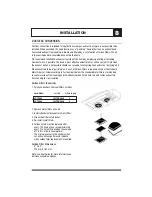
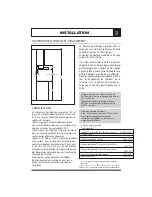
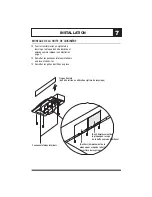
MOUNTING THE RANGEHOOD

1. This range hood is mounted under a 

kitchen cabinet unit.

2. Select preferred duct location on rear or 

top of unit. For ductless conversion, no 
ducting is required, however front cover 
panel must be removed prior to installation.
(See page 7)

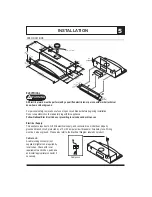
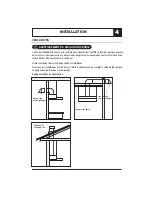
3. An optional spacer plate is provided to 

cover the gap between the back of the 
hood and the wall. If using this plate, screw 
it onto the hood prior to installation.

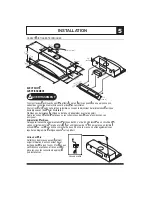
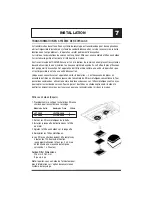
4. Begin installation by temporarily removing 

the mesh filter panels.

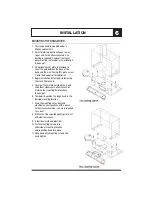
5. Unscrew the two interior side panels and 

slide them sideways to allow access for 
marking the mounting hole locations.
(See page 7)

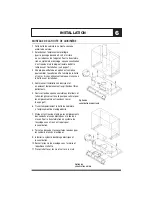
6. Temporarily position the range hood in the 

desired mounting location.

7. Mark the mounting holes, duct and 

electrical access locations with a pencil.
For ductless conversion, no hole is required 
for a duct.

8. Drill/cut out the required openings for duct 

and electrical access.

9. Install duct work and electrical.

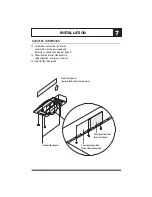
10. Fasten mounting screws into 

underside of mounting location,
and reposition hood into place.

11. Hang hood onto mounting screws and 

hand tighten.

Summary of Contents for JXT5830

Page 1: ...CONTENTS Safety Instructions 1 Mounting Heights 3 Ducting 4 Specifications 5 Installation 6 8 Form No A 06 04 Part No 8110P264 60 2004 Maytag Appliances Sales Co Litho U S A Model Number JXT5830 JXT5...

Page 2: ......

Page 3: ...H S S...

Page 4: ...Utensil Bar 2 Metallic Filters 3 36 2 Halogen Light Bulbs pre installed 1 Rectangular Starting Collar 1 5 Round Plastic Cap 1 Hardware Packet Containing 1 Damper 1 5 Round Starting Collar 1 Packet of...

Page 5: ...otal available duct run when using elbows transitions and caps ALWAYS when possible reduce the number or transitions and turns If long duct run is required increase duct size from 6 to 7 or 8 If a red...

Page 6: ...ages All exhaust must be ducted to the outside Use Metal ductwork only Fasten all connections with sheet metal screws and tape all joints w certified Silver Tape or DuctTape WARNING FIRE HAZARD Some D...

Page 7: ...RGHV DQG RUGLQDQFHV OHFWULFDO 6XSSO 7KLV DSSOLDQFH UHTXLUHV 9 HOHFWULFDO VXSSO DQG FRQQHFWHG WR DQ LQGLYLGXDO SURSHUO JURXQGHG EUDQFK FLUFXLW SURWHFWHG E D RU DPSHUH FLUFXLW EUHDNHU RU WLPH GHOD IXVH...

Page 8: ...n installation by temporarily removing the mesh filter panels 5 Unscrew the two interior side panels and slide them sideways to allow access for marking the mounting hole locations See page 7 6 Tempor...

Page 9: ...d removed as shown See diagram page 7 13 Reposition the interior side panels to original location and screw into place 14 Reinstall the filter panels interior side panels Cover panel position for duct...

Page 10: ...ired on top of the standard Metal Filter set Order according to Part numbers below The standard Metal Filters are intended to capture residue from cooking and the optional Carbon Filters help to purif...

Page 11: ...es de s curit 1 Hauteurs de montage 3 Canalisation 4 Caract ristiques techniques 5 Installation 6 8 Form No A 04 03 Pi ce No IS9900 0303A 2004 Maytag Appliances Sales Co Litho tats Unis Num ro de mod...

Page 12: ...HV 77 17 21 3RXU XWLOLVDWLRQ GH YHQWLODWLRQ JpQpUDOH VHXOHPHQW 1 XWLOLVH SDV FHW DSSDUHLO SRXU pYDFXHU GHV YDSHXUV HW GHV PDWpULDX H SORVLIV RX GDQJHUHX DLWHV DWWHQWLRQ HQ XWLOLVDQW GHV SURGXLWV RX GH...

Page 13: ...ATION TECHNIQUE CACH E D ES VENTILATEURS CANALIS S DOIVENT TOUJOURS VACUER L AIR L EXT RIEUR 6 2 4 33 4 0 52 2 5 2 3 2 315 3 54 3 15 3 5 43 2 4 4 4 4 4 0OUR R DUIRE LES RISQUES D INCENDIE ET POUR VACU...

Page 14: ...s m talliques 3 36 2 Ampoules halog nes pr install es 1 Bague de d marage rectangulaire de 12 7cm 5po 1 Embout rond en plastique 1 Paquet contenant les pi ces 1 Capuchon 1 Bague de d marage ronde de 1...

Page 15: ...LOLVH 728 2856 XQ QRPEUH PLQLPDO GH WUDQVLWLRQV HW GH FRXUEHV 3RXU XQ ORQJ WUDFp GH FRQGXLWV DXJ PHQWH OHV GLPHQVLRQV GHV FRQGXLWV GH FP SR j FP j FP RX SR H FDV pFKpDQW SULYLOpJLH OHV ORQJV UpGXFWHXU...

Page 16: ...ven tilation doivent tre canalis es vers l ext rieur Utilisez seulement des syst mes de conduits m talliques Fixez tous les assemblages l aide de vis t lerie et rubaner tous les raccords l aide de rub...

Page 17: ...HV RUGRQQDQFHV HQ YLJXHXU OLPHQWDWLRQ HOHFWULTXH HW DSSDUHLO QHFHVVLWH XQH DOLPHQWDWLRQ HOHFWULTXH GH 9 HW GH EUDQFKHH D XQ FLUFXLW GH GHUL YDWLRQ FRUUHFWHPHQW PLV D OD WHUUH HW SURWHJH SDU XQ GLVMRQF...

Page 18: ...vant temporairement les grilles des filtres d flecteurs 5 Devissez les deux panneaux lat raux interieurs et faites les glisser sur le cot pour pouvoir marquer les emplacements des trous dans le mur Se...

Page 19: ...age 7 13 Remettez les panneaux lat raux int rieurs en place et vissez les 14 Remettez les grilles des filtres en place Panneaux lat raux int rieurs Duct Emplacement de la plaque pour usage de la hotte...

Page 20: ...filtres au charbon au dessus de l ensemble de filtres m talliques conventionnels Pour passer des commandes utilisez le num ro de pi ce ci dessous Les filtres m talliques sont con us pour capter les r...

Page 21: ...es de Seguridad 1 Altura de Montado 3 Tuber a de Extracci n 4 Especificaciones 5 Instalaci n 6 8 Form No A 04 03 Part No IS9900 0303A 2004 Maytag Appliances Sales Co Litho U S A N mero de Modelo JXT58...

Page 22: ...55 D 1XQFD GHMH OD XQLGDG VREUH VXSHUILFLHV VLQ YLJLODU HQ IXQFLRQDPLHQWR DV FRVDV TXH KLHUYHQ SURGXFHQ KXPRV GHUUDPHV JUDVRVRV TXH VH SXHGHQ HQFHQGHU DOLHQWH ORV DFHLWHV D IXHJR OHQWR R D WHPSHUDWXUD...

Page 23: ...H VHJXULGDG FRPR ODV TXH SXEOLFD OD 1DWLRQDO LUH 3URWHFWLRQ VVRFLDWLRQ 1 3 PHULFDQ 6RFLHW IRU HDWLQJ 5HIULJHUDWLRQ DQG LU RQGLWLRQLQJ QJLQHHUV 6 5 ODV DXWRULGDGHV GH ORV FyGLJRV ORFDOHV F XDQGR FRUWH...

Page 24: ...icos 3 36 2 Bombillas de luz hal genas instaladas de f brica 1 Aro de inicio rectangular 1 Casquete pl stico redondo de 5 1 Paquete de instalaci n que incluye 1 Regulador de tiro 1 Aro de inicio redon...

Page 25: ...FDOFXODU HO WRWDO GH WXEHUtD FXDQGR VH XVDQ FRGRV WUDQVLFLRQHV FDVTXHWHV 6 035 TXH VHD SRVLEOH UHGX FD HO Q PHUR GH WUDQ VLFLRQHV YXHOWDV 6L VH QHFHVLWD XQD WXEHUtD GH H WUDFFLyQ PX ODUJD DXPHQWH HO...

Page 26: ...os hacia el exterior Use tuber as met licas solamente Asegure todas las conexiones con tornillos para metal laminado y selle todas las junturas con cinta adhe siva certificada Silver Tape o DuctTape A...

Page 27: ...LVWUR OHFWULFR VWD XQLGDG UHTXLHUH XQ VXPLQLVWUR HOHFWULFR GH 9 TXH HVWH FRQHFWDGD X XQ FLUFXLWR LQGLYLG XDO GH GHULYDFLRQ TXH HVWH GHELGDPHQW FRQHFWDGR D WLHUUD HEH HVWDU SURWHJLGR SRU XQ LQWHUUXSWRU...

Page 28: ...e los dos paneles laterales interiores y desl celos lateralmente para obtener acceso para marcar la ubicaci n de los orificios de montado en el interior de la campana 6 Coloque la campana temporalment...

Page 29: ...l diagrama en p gina 7 13 Vuelva a poner los paneles laterales interiores en su posici n original y atorn llelo 14 Vuelva a instalar los paneles del filtro Paneles laterales interiores Posici n del pa...

Page 30: ...er su pedido refi rase al n mero de repuesto detallado m s adelante Los Filtros Met licos est ndar est n dise ados para capturar los residuos generados al cocinar y los Filtros de Carb n opcionales ay...

Reviews: