background image

6

2. Use a sturdy container to depress and hold the water 

dispenser lever for 5 seconds, then release it for 5 seconds. 
Repeat until water begins to flow. Once water begins to flow, 
continue depressing and releasing the dispenser lever 
(5 seconds on, 5 seconds off) for an additional 2 minutes. This 
will flush air from the filter and water dispensing system. 
Additional flushing may be required in some households.
NOTE: As air is cleared from the system, water may spurt out 
of the dispenser.

3. Open the freezer door and turn on the ice maker. For Style 1

lower the wire shutoff arm. For Style 2, move the switch to the 
ON (left) position.

Allow 24 hours to produce the first batch of ice. 

Discard the first three batches of ice produced. 

Depending on your model, you may want to select the 
maximum ice feature to increase the production of ice.

Using the Controls

Depending on your model, your refrigerator may have Style 1 or 
Style 2 controls. Follow the instructions specific to your model. 
IMPORTANT: 

Wait 24 hours after you turn on the refrigerator before you put 
food into it. If you add food before the refrigerator has cooled 
completely, your food may spoil. 

NOTE: Adjusting the refrigerator and freezer controls to a 
lower (colder) setting will not cool the compartments any 
faster.

If the temperature is too warm or too cold in the refrigerator or 
freezer, first check the air vents to be sure they are not 
blocked before adjusting the controls.

After the refrigerator is turned on, the Over Temperature audio 
alarm and indicator light may activate every 1

¹⁄₂

 hours until the 

refrigerator and freezer temperatures are below 48°F (9°C) and 
15°F (-9°C), respectively, or until the alarm is turned off. To 
turn off the audio alarm and indicator light, see “Master Alarm 
Reset.

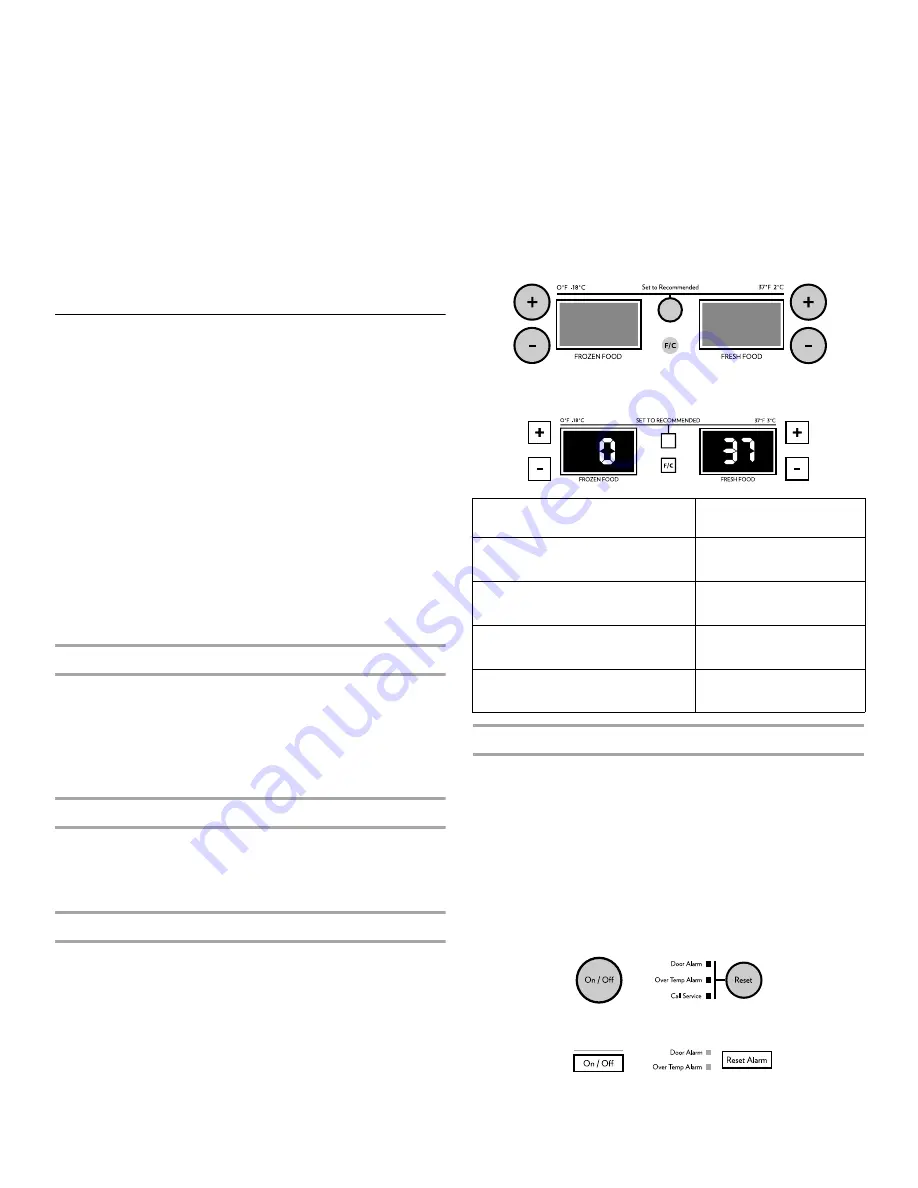
Turning Refrigerator On/Off and Viewing Set Points

The On/Off touch pad on the control panel shuts down refrigerator 
functions such as cooling, some lighting, fans and compressors. 
To turn the power off completely, use the power On/Off switch 
located behind the top grille. See “Power On/Off Switch.”

Press and hold the ON/OFF touch pad for 3 seconds. The 
LED will light up to indicate that cooling is Off. Press the touch 
pad again to turn on cooling. The LED will turn off.

Viewing the Celsius Temperatures

Press F/C touch pad. To redisplay degrees Fahrenheit, press 
F/C again.

NOTE: If the freezer temperature is below zero, the negative 
sign next to the freezer display will light up. This is normal.

Adjusting Controls 

IMPORTANT:

The preset settings should be correct for normal household 
usage. The controls are set correctly when milk or juice is as 
cold as you like and when ice cream is firm.

NOTE: Wait at least 24 hours between adjustments. Recheck 
the temperatures before other adjustments are made.

Press the SET TO RECOMMENDED touch pad to reset the set 
points to the factory recommended temperatures.

NOTE: The factory recommended set points are 0°F (-18°C) 
for the freezer and 37°F (2°C) for the refrigerator.

The actual temperature may differ from the display when a 
door is open for an extended period of time.

To Adjust Set Point Temperatures:

The set point range for the freezer is -5°F to 5°F (-21°C to -15°C). 
The set point range for the refrigerator is 33°F to 45°F 
(0°C to 7°C).

Press the refrigerator or freezer PLUS (+) or MINUS (-) touch 
pad until the desired temperature is reached

Style1

Style 2 

Alarm Functions

Master Alarm Reset

Pressing Alarm Reset once will turn off the audio alarm and 
indicator light. The audio alarm will not sound again for the current 
condition that caused the alarm until a new condition occurs or 
until a Master Alarm Reset is performed.
A Master Alarm Reset can be performed by pressing ON/OFF 
twice or by turning the power to the refrigerator off and on again. 
See “Power On/Off Switch.” After performing a Master Alarm 
Reset, the indicator light will reactivate if the condition that caused 
the alarm is still present. See “Over Temperature,” “Call Service,” 
or “Door Alarm.” 
Style 1

Style 2

CONDITION/REASON:

TEMPERATURE 
ADJUSTMENT:

REFRIGERATOR too cold
Not set correctly for conditions

REFRIGERATOR Control
1° higher

REFRIGERATOR too warm
High use or room very warm

REFRIGERATOR Control
1° lower 

FREEZER too cold
Not set correctly for conditions

FREEZER Control 
1° higher 

FREEZER too warm/too little ice 
High use or heavy ice use

FREEZER Control 
1° lower

Summary of Contents for SIDE BY SIDE

Page 1: ...visit our website at www jennair ca MANUAL DE USO Y CUIDADO Si tiene preguntas respecto a las caracter sticas funcionamiento rendimiento partes accesorios o servicio t cnico llame al 1 800 JENNAIR 1...

Page 2: ...30 Compartimiento de uso general 30 Recipientes de la puerta 30 Despachadores de agua y hielo 31 Sistema de filtraci n de agua 32 F brica de hielo y dep sito 33 CUIDADO DE SU REFRIGERADOR 34 Limpieza...

Page 3: ...essages This is the safety alert symbol This symbol alerts you to potential hazards that can kill or hurt you and others All safety messages will follow the safety alert symbol and either the word DAN...

Page 4: ...n pull straight out Place the panel on a soft surface To replace the top grille panel 1 Hook the panel brackets onto the mounting bolts extending from the top of the refrigerator 2 Pull the grille pan...

Page 5: ...ons about your water pressure see Troubleshooting or call a licensed qualified plumber Reverse Osmosis Water Supply IMPORTANT The pressure of the water supply coming out of a reverse osmosis system go...

Page 6: ...old the ON OFF touch pad for 3 seconds The LED will light up to indicate that cooling is Off Press the touch pad again to turn on cooling The LED will turn off Viewing the Celsius Temperatures Press F...

Page 7: ...turning off the lights and ice maker By selecting this feature the temperature set points and Deli drawer settings remain unchanged the ice maker will be disabled and the interior lights will turn off...

Page 8: ...uct Adjust the Temperature There are three temperature settings Deli Produce Meats Cold to Coldest and the Quick Chill setting Select the appropriate setting for the food being stored 1 Choose a setti...

Page 9: ...perly FREEZER FEATURES Freezer Shelf 1 Remove the shelf by lifting it up and pulling it straight out 2 Replace the shelf by putting it over the supports and lowering it into place Frozen Food Storage...

Page 10: ...ter dispenser lever for 5 seconds then release it for 5 seconds Repeat until water begins to flow Once water begins to flow continue depressing and releasing the dispenser lever 5 seconds on 5 seconds...

Page 11: ...d time to unlock the dispenser While the dispenser is unlocking UNLOCKING will appear on the display screen and the red indicator light around the LOCK button will flash When the dispenser is unlocked...

Page 12: ...ling on the cap See Changing the Water Filter earlier in this section 2 Remove the cap by turning it counterclockwise until it stops IMPORTANT Do not discard the cap It is part of your refrigerator Ke...

Page 13: ...first batch of ice Allow 3 days to completely fill ice container Discard the first three batches of ice produced to avoid impurities that may be flushed out of the system The quality of your ice will...

Page 14: ...Close the light shield by raising it up into place NOTE If needed clean the light shield with a damp soft cloth Freezer and Crisper Lights Remove the light shield by grasping the sides and squeezing...

Page 15: ...e motor seems to run too much Your new refrigerator may run longer than your old one due to its high efficiency compressor and fans The unit may run even longer if the room is warm a large food load i...

Page 16: ...on system connected to your cold water supply This can decrease water pressure See Water Supply Requirements in either the Installation Instruction booklet or the Use Care Guide The ice cubes are holl...

Page 17: ...water may not be cool Discard the first glass of water Refrigerator connected to a cold water pipe Make sure the refrigerator is connected to a cold water pipe See Water Supply Requirements ASSISTANCE...

Page 18: ...18 WATER FILTER CERTIFICATIONS...

Page 19: ...or cold water use only Do not use with water that is microbiologically unsafe or of unknown quality without adequate disinfection before or after the system Refer to the Warranty section for the Manuf...

Page 20: ...not use with water that is microbiologically unsafe or of unknown quality without adequate disinfection before or after the system Refer to the Warranty section for the Manufacturer s name address and...

Page 21: ...es or to correct house wiring or plumbing 3 Service calls to repair or replace appliance light bulbs air filters or water filters Consumable parts are excluded from warranty coverage 4 Damage resultin...

Page 22: ...22 Notes...

Page 23: ...que pueden ocasionar la muerte o una lesi n a usted y a los dem s Todos los mensajes de seguridad ir n a continuaci n del s mbolo de advertencia de seguridad y de la palabra PELIGRO o ADVERTENCIA Est...

Page 24: ...panel sobre una superficie blanda Para volver a colocar el panel de la rejilla superior 1 Enganche los soportes del panel sobre los pernos de montaje que se extienden desde la parte superior del refri...

Page 25: ...f brica de hielo Si usted tiene preguntas acerca de la presi n de agua vea Soluci n de problemas o llame a un plomero competente autorizado Suministro de agua de smosis inversa IMPORTANTE La presi n...

Page 26: ...el panel de control apaga las funciones del refrigerador tales como el enfriamiento parte de la iluminaci n los ventiladores y los compresores Para apagar completamente la electricidad use el interru...

Page 27: ...ormaci n sobre c mo llamar para solicitar servicio t cnico NOTA Para desactivar la alarma sonora y la luz indicadora vea Restablecimiento de la alarma maestra Max Cold Fr o m ximo La funci n de Max Co...

Page 28: ...rador Los estantes de su refrigerador son ajustables para adaptarlos a sus necesidades individuales de almacenamiento Si usted guarda alimentos similares juntos y ajusta los estantes para que se adapt...

Page 29: ...a a envolverlas si fuera necesario Consulte el cuadro siguiente respecto a per odos de conservaci n Para guardar la carne por un tiempo m s prolongado que los per odos indicados cong lela Pescado o ma...

Page 30: ...ner m s informaci n respecto a la preparaci n de alimentos para su congelaci n consulte una gu a de congeladores o un buen libro de cocina Canastilla del congelador La canastilla del congelador se pue...

Page 31: ...n salido Para cambiar de onzas a tazas presione y sostenga ICE Hielo y LOCK Bloqueo a la vez hasta que el despachador suene despu s de 3 segundos Para cambiar de tazas a litros presione y sostenga los...

Page 32: ...l filtro de agua Un filtro de agua nuevo debe mostrar una lectura de 99 La lectura en la pantalla disminuir a medida que pase la vida til del filtro Deber encargar un filtro de agua de repuesto cuando...

Page 33: ...de en la posici n horizontal NOTA La tapa no estar alineada con la rejilla de la base F brica de hielo y dep sito en algunos modelos Accesorio Estilo 1 C mo encender y apagar la f brica de hielo El in...

Page 34: ...del agua que suministre a su f brica de hielo Evite la conexi n de su f brica de hielo a un suministro de agua blanda Los qu micos para ablandar el agua como la sal pueden da ar ciertos componentes d...

Page 35: ...locar la rejilla superior Vea la secci n Interruptor de On Off Encendido Apagado Luz del panel de control del refrigerador Hay dos o tres focos de luz ubicados en la parte superior del compartimiento...

Page 36: ...reposicione el cortacircuitos Si el problema contin a llame a un electricista Est n encendidos los controles Aseg rese de que los controles del refrigerador est n encendidos Vea Uso de los controles...

Page 37: ...el refrigerador a un suministro de agua y se ha abierto la v lvula de cierre Conecte el refrigerador al suministro de agua y abra completamente la v lvula de cierre Hay un estrechamiento en la tuber a...

Page 38: ...a un suministro de agua y se ha abierto la v lvula de cierre Conecte el refrigerador al suministro de agua y abra completamente la v lvula de cierre Est la presi n de agua a por lo menos 30 lbs pulg...

Page 39: ...a siguiente informaci n acerca de su electrodom stico para ayudarle a obtener asistencia o servicio t cnico si alguna vez llegara a necesitarlo Deber tener a mano el n mero completo del modelo y de la...

Page 40: ...mpe o real puede variar El producto es para uso con agua fr a nicamente No use con agua que no sea microbiol gicamente segura o que sea de calidad desconocida sin desinfectarla adecuadamente antes o d...

Page 41: ...e variar El producto es para uso con agua fr a nicamente No use con agua que no sea microbiol gicamente segura o que sea de calidad desconocida sin desinfectarla adecuadamente antes o despu s del sist...

Page 42: ...e la tuber a de la casa 3 Visitas de servicio t cnico para reparar o reemplazar focos para electrodom sticos filtros de aire o filtros de agua Las piezas de consumo est n excluidas de la cobertura de...

Page 43: ...de s curit vous signale les dangers potentiels de d c s et de blessures graves vous et d autres Tous les messages de s curit suivront le symbole d alerte de s curit et le mot DANGER ou AVERTISSEMENT C...

Page 44: ...ext rieur Placer le panneau sur une surface souple Pour replacer le panneau de la grille sup rieure 1 Accrocher les supports du panneau aux crous de montage qui d passent du sommet du r frig rateur 2...

Page 45: ...er le distributeur d eau et la machine gla ons Si vous avez des questions au sujet de la pression de votre eau voir la section D pannage ou appeler un plombier qualifi agr Alimentation en eau par osmo...

Page 46: ...arr t du tableau de commande d sactive les fonctions du r frig rateur telles que le refroidissement une partie de l clairage le ventilateur et le compresseur Pour interrompre compl tement l alimentat...

Page 47: ...atures du r frig rateur et du cong lateur descendent en dessous de 48 F 9 C et 15 F 9 C respectivement REMARQUE Pour d sactiver l alarme sonore et le t moin lumineux voir R armement de l alarme princi...

Page 48: ...que l affichage du t moin lumineux passe 99 Style 2 R initialisation du filtre La commande de r initialisation du filtre eau permet de r initialiser la caract ristique de suivi de l tat du filtre eau...

Page 49: ...ck Chill refroidissement rapide La s lection de Quick Chill refroidissement rapide abaisse la temp rature du bac pour sp cialit s alimentaires pendant une heure REMARQUE La temp rature du bac pour sp...

Page 50: ...ent selon la qualit et le type d aliment le type d emballage ou de pellicule utilis s doivent tre herm tiques et r sistant l humidit et la temp rature de remisage Les cristaux de glace l int rieur d u...

Page 51: ...sation du distributeur ou une option de verrouillage pour viter une distribution non intentionnelle REMARQUES Le syst me de distribution ne fonctionne pas lorsque la porte du cong lateur est ouverte A...

Page 52: ...ndre la lampe du distributeur Les lampes du distributeur sont des DEL qui ne peuvent pas tre remplac es Si les lampes du distributeur ne fonctionnent pas s assurer que le d tecteur de lumi re n est pa...

Page 53: ...Ne pas jeter la capsule Elle fait partie du r frig rateur Garder la capsule pour l utiliser avec le filtre de rechange 3 Aligner l ar te sur le couvercle avec la fl che sur le nouveau filtre et tourn...

Page 54: ...machine gla ons L interrupteur ON OFF est situ du c t droit dans la partie sup rieure du compartiment de cong lation 1 Pour mettre en marche la machine gla ons faire glisser la commande la position O...

Page 55: ...pas utiliser d essuie tout tampons r curer ou autres articles de nettoyage abrasifs Ces produits risquent d gratigner ou d endommager les mat riaux Pour aider liminer les odeurs on peut laver les par...

Page 56: ...it tre interrompu pendant 24 heures ou moins garder la ou les porte s selon votre mod le ferm e s pour aider les aliments demeurer froids et congel s Si le courant doit tre interrompu pendant plus de...

Page 57: ...e importante quantit de nourriture y est ajout e si les portes sont fr quemment ouvertes ou si elles ont t laiss es ouvertes Le r frig rateur est bruyant Le bruit des r frig rateurs a t r duit au cour...

Page 58: ...d eau Redresser la canalisation d eau La machine gla ons est elle allum e S assurer que le bras de commande en broche ou l interrupteur selon le mod le est en position ON S agit il d une nouvelle ins...

Page 59: ...kPa La pression de l eau du domicile d termine l coulement d eau du distributeur Voir Sp cifications de l alimentation en eau D formation du conduit de canalisation d eau du domicile Redresser la can...

Page 60: ...d achat ou d installation Inscrivez les renseignements suivants au sujet de votre appareil m nager pour vous aider obtenir assistance ou service en cas de besoin Vous devrez conna tre le num ro de mo...

Page 61: ...e rendement r el peut varier Le produit doit tre utilis pour l eau froide seulement Ne pas utiliser pour le filtrage d une eau microbiologiquement pollu e ou de qualit inconnue en l absence d un dispo...

Page 62: ...peut varier Le produit doit tre utilis pour l eau froide seulement Ne pas utiliser pour le filtrage d une eau microbiologiquement pollu e ou de qualit inconnue en l absence d un dispositif de d sinfec...

Page 63: ...er ou remplacer les ampoules lectriques les filtres air ou les filtres eau de l appareil Les pi ces consomptibles ne sont pas couvertes par la garantie 4 Les dommages imputables accident modification...

Page 64: ...of Jenn Air U S A Used under license by Maytag Limited in Canada Marca registrada Marca de comercio de Jenn Air U S A Usada bajo licencia por Maytag Limited en Canad Marque d pos e Marque de commerce...

Page 65: ......

Reviews: