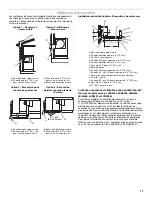
background image

5

Cutout Dimensions

Venting Requirements

IMPORTANT: This cooktop must be exhausted outdoors unless 
using the Jenn-Air

®

 Duct Free Filter Accessory Kit. See “Venting 

Methods” section.

Do not terminate the vent system in an attic or other enclosed 
area.

Use a Jenn-Air

®

 vent cap.

Vent system must terminate to the outside.

Use only a 6" (15.2 cm) round metal vent. Rigid metal vent is 
recommended. For best performance, do not use plastic or 
metal foil vent.

Before making cutouts, make sure there is proper clearance 
within the wall or floor for the exhaust vent.

Do not cut a joist or stud unless absolutely necessary. If a joist 
or stud must be cut, then a supporting frame must be 
constructed.

The size of the vent should be uniform.

The vent system must have a damper. If roof or wall cap has a 
damper, do not use damper supplied with the range hood.

Use vent clamps to seal all joints in the vent system.

Use caulking to seal exterior wall or roof opening around the 
cap.

Determine which venting method is best for your application.

For Best Performance:

Use 26-gauge minimum galvanized or 25-gauge minimum 
aluminum metal vent. Poor quality pipe fittings can reduce 
airflow. Flexible metal vent is not recommended.

NOTE: Local codes may require a heavier gauge material.

Metal duct may be reduced to 30-gauge galvanized steel or 
26-gauge aluminized steel if allowed by local codes. This 
reduction is based on information in the International 
Residential Codes Section M1601.1 (2006 edition).

Do not install 2 elbows together.

Use no more than three 90° elbows.

If an elbow is used, install it as far away as possible from the 
hood’s vent motor exhaust opening.

Make sure there is a minimum of 18" (45.7 cm) of straight vent 
between the elbows if more than one elbow is used.

Elbows too close together can cause excess turbulence that 
reduces airflow.

Do not use a 5" (12.7 cm) elbow in a 6" (15.2 cm) or 3

¹⁄₄

" x 10" 

(8.3 x 25.4 cm) system.

Do not reduce to a 5" (12.7 cm) system after using 
6" (15.2 cm) or 3

¹⁄₄

" x 10" (8.3 x 25.4 cm) fittings.

Avoid forming handmade crimps. Handmade crimps may 
restrict airflow.

Use a Jenn-Air

®

 vent cap for proper performance. If an 

alternate wall or roof cap is used, be certain the cap size is not 
reduced and that it has a backdraft damper.

Use vent clamps to seal all joints in the vent system.

Use caulking to seal exterior wall or roof opening around the 
cap.

The length of vent system and number of elbows should be kept 
to a minimum to provide efficient performance.
The maximum equivalent length of the vent system is 
60 ft (18.3 m). For altitudes above 4,500 ft (1272 m), reduce 
recommended vent run by 20% for best performance.
Cold Weather Installations

An additional backdraft damper should be installed to minimize 
backward cold air flow and a thermal break installed to minimize 
conduction of outside temperatures as part of the vent system. 
The damper should be on the cold air side of the thermal break.
Makeup Air

Local building codes may require the use of makeup air systems 
when using ventilation systems greater than specified CFM of air 
movement. The specified CFM varies from locale to locale. 
Consult your HVAC professional for specific requirements in your 
area.

A. 28

⁷⁄₈

" (73.4 cm) maximum on 30" (76.2 cm) models

34½" (87.6 cm)  maximum on 36" (91.4 cm) models

B. 21

¹⁄₈

" (53.7 cm)maximum on both 30" (76.2 cm) and 36" (91.4 cm) 

models

C. 8

⁵⁄₈

" (21.9 cm)  on 30" (76.2 cm) models

15

⁷⁄₁₆

" (39.2 cm) on 36" (91.4 cm) models

D. 6

⁵⁄₁₆

" (16.0 cm) on both 30" (76.2 cm) and 36" (91.4 cm) models

E. 2" (5.1 cm) minimum space to front edge of cooktop

F. Floor exhaust option

G. 6

¹⁄₈

" (15.6 cm) for 6" vent system

H. 8

⁵⁄₈

" (21.9 cm) on 30" (76.2 cm) models

15

⁷⁄₁₆

" (39.2 cm) on 36" (91.4 cm) models

I. 16" (40.6 cm) on both 30" (76.2 cm) and 36" (91.4 cm) models

J. Wall exhaust option

A

B

C

D

E

F

G

H

I

J

Summary of Contents for W10197059B

Page 1: ...Blower Optional 8 Install Cooktop 10 Make Electrical Connection 10 Complete Installation 11 S CURIT DE LA TABLE DE CUISSON 13 EXIGENCES D INSTALLATION 14 Outillage et pi ces 14 Exigences d emplacement...

Page 2: ...instructions are not followed Your safety and the safety of others are very important We have provided many important safety messages in this manual and on your appliance Always read and obey all safe...

Page 3: ...overning codes and ordinances When installing cooktop use minimum dimensions given To eliminate the risk of burns or fire by reaching over the heated surface units cabinet storage space located above...

Page 4: ...ecommended minimum cabinet to motor clearance G 16 41 6 cm H 4 11 8 cm A B C D E G F H A B C A B C D E G H F A 30 76 2 cm on 30 76 2 cm models 36 91 4 cm on 36 91 4 cm models B Combustible area above...

Page 5: ...ed Elbows too close together can cause excess turbulence that reduces airflow Do not use a 5 12 7 cm elbow in a 6 15 2 cm or 3 x 10 8 3 x 25 4 cm system Do not reduce to a 5 12 7 cm system after using...

Page 6: ...lete installation instructions For more information on the Jenn Air Duct Free Filter Accessory Kit contact your Jenn Air dealer or call 1 800 JENNAIR 1 800 536 6247 Option 1 Roof Venting Option 2 Wall...

Page 7: ...s and ordinances A copy of the above code standards can be obtained from National Fire Protection Association One Batterymarch Park Quincy MA 02269 CSA International 8501 East Pleasant Valley Road Cle...

Page 8: ...LLATION INSTRUCTIONS Prepare Cooktop Decide on the final location for the cooktop 1 Open product as instructed on product packaging 2 Remove shipping materials and tape from cooktop 3 Remove vent gril...

Page 9: ...d ratchet 6 Reinstall the four plastic plugs To rotate blower motor NOTE The Top label location on the blower motor is at the 9 o clock position 1 Using a ratchet with a socket and supporting the moto...

Page 10: ...Power Supply to 4 Wire Cable from Cooktop IMPORTANT Use the 4 wire cable from home power supply in the U S where local codes do not allow grounding through neutral New Branch circuit installations 19...

Page 11: ...d household cleaner and warm water to clean cooktop before use Dry thoroughly with a soft cloth For more information see the Cooktop Care section of the Use and Care Guide 5 Read Cooktop Use in the co...

Page 12: ...12 Notes...

Page 13: ...cas de non respect des instructions Votre s curit et celle des autres est tr s importante Nous donnons de nombreux messages de s curit importants dans ce manuel et sur votre appareil m nager Assurez...

Page 14: ...es dispositions de tous les codes et r glements en vigueur Lors de l installation de la table de cuisson utiliser les dimensions minimums indiqu es Afin de supprimer le risque de br lures ou d incendi...

Page 15: ...41 6 cm H 4 11 8 cm A B C D E G F H A B C A B C D E G H F A 30 76 2 cm sur les mod les de 30 76 2 cm 36 91 4 cm sur les mod les de 36 91 4 cm B Zone de mati re combustible au dessus du plan de travai...

Page 16: ...lation de l air Ne pas utiliser un coude de 5 12 7 cm dans un syst me de 6 15 2 cm ou 3 x 10 8 3 x 25 4 cm Ne pas r duire le syst me une longueur de 5 12 7 cm apr s avoir utilis des raccords de 6 15 2...

Page 17: ...tion concernant la trousse accessoire de filtration sans conduit Jenn Air contacter votre concessionnaire Jenn Air ou composer le 1 800 JENNAIR 1 800 536 6247 Option 1 D charge travers le toit Option...

Page 18: ...ous les codes et r glements locaux Pour obtenir un exemplaire des normes et codes ci dessus contacter National Fire Protection Association One Batterymarch Park Quincy MA 02269 CSA International 8501...

Page 19: ...tre conforme aux codes locaux et aux pratiques de c blage accept es par l industrie INSTRUCTIONS D INSTALLATION Pr paration de la table de cuisson D terminer l emplacement final de la table de cuisson...

Page 20: ...serr s 5 Resserrer chaque crou l aide de la douille de de la rallonge et de la cl cliquet 6 R installer les 4 bouchons d obturation en plastique Pour faire pivoter le moteur du ventilateur REMARQUE L...

Page 21: ...tions de raccordement lectrique pour terminer l installation correspondant votre type de raccordement lectrique Options de raccordement lectrique C ble 4 conducteurs depuis le point de distribution du...

Page 22: ...l es S il reste une pi ce passer en revue les diff rentes tapes pour d couvrir laquelle aurait t oubli e 2 V rifier la pr sence de tous les outils 3 Jeter recycler tous les mat riaux d emballage 4 Uti...

Page 23: ...23 Notes...

Page 24: ...r serv s Registered Trademark TM Trademark of Jenn Air U S A Used under license by Maytag Limited in Canada Marque d pos e TM Marque de commerce de Jenn Air U S A Emploi sous licence par Maytag Limite...

Reviews: