background image

6

Burner ports: Check burner flames occasionally for proper size 
and shape. A good flame is blue in color, not yellow. Keep this 
area free of soil and do not allow spills, food, cleaning agents or 
any other material to enter the burner ports.

To Clean:

IMPORTANT: Before cleaning, make sure all controls are off and 
cooktop is cool. Do not use oven cleaners, bleach or rust 
removers.

1. Remove the burner cap from the burner base and clean 

according to “General Cleaning” section.

2. Clean the gas tube opening with a damp cloth.

3. Replace burner bases and burner caps.

IMPORTANT: 

Be sure that the igniter electrode aligns with the slot or 
notch in the burner base. The igniter electrode is ceramic 
and could break during installation of the burner base.

Be sure that the cap is properly positioned on the burner 
and that you have placed the cap on the correct burner. 
The ring on the bottom of the cap will align with the tabs 
on the burner. Do not interchange caps.

4. Turn on the burner. If the burner does not light, check burner 

cap and base alignment. See “Burner installation” in the 
“Sealed Surface Burners” section. If the burner still does not 
light, do not service the burner yourself. Contact a trained 
repair specialist.

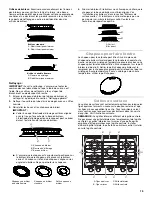
Melt Cap

For melting chocolate or butter or an even more delicate simmer, 
the melt cap can be used in place of the standard burner cap. 
The melt cap should only be used on the small burner (right rear). 
Remove the small burner cap and replace it with the larger melt 
cap for delicate simmering. For less delicate simmering, use the 
small cap.

Surface Grates

The surface grates are positioned correctly when the thick ribs 
form a frame around the outer edge and the thin ribs are located 
across the middle. All burners will be centered with the burner 
openings in the grates. See the following illustration.

NOTE: The end grates are different than the center grate. Do not 
use the end grate in the center grate position. End grates have a 
tab that prevents interchanging the center and end grates. Install 
the end grate first with the tab facing the center burner. Then 
install the center grate.

Standard burner

A. Low flame
B. High flame

Dual flame burner

A. Simmer flame
B. High flame

A. Burner cap
B. Igniter electrode

C. Burner base

Dual flame burner cap

Standard burner cap

Small burner cap

A

B

A

B

A

B

C

A. Correct
B. Incorrect

A. Thick ribs
B. Thin ribs

C. End grates
D. Center grate

A

B

B

A

A

B

A

C

C

A

D

B

Summary of Contents for W10676382C

Page 1: ...800 JENNAIR 1 800 536 6247 or visit our website at www jennair com In Canada call 1 800 JENNAIR 1 800 536 6247 or visit our website at www jennair ca Guide d utilisation et d entretien Au Canada pour...

Page 2: ...ral 16 D PANNAGE 17 ASSISTANCE OU SERVICE 18 Au Canada 18 Accessoires 18 GARANTIE 19 COOKTOP SAFETY You can be killed or seriously injured if you don t immediately You can be killed or seriously inju...

Page 3: ...of the cooktop CAUTION Do not store items of interest to children in cabinets above the cooktop children climbing on the cooktop to reach items could be seriously injured Proper Installation The cookt...

Page 4: ...ORTANT See Sealed Surface Burners in the Cooktop Use section for proper burner base and cap positioning Do not interchange burner caps A Surface burner grate B Dual burner C Surface burner cap and bas...

Page 5: ...ustion and ventilation air around the burner grate edges Burner cap Always keep the burner cap in place when using a surface burner A clean burner cap will help avoid poor ignition and uneven flames A...

Page 6: ...If the burner still does not light do not service the burner yourself Contact a trained repair specialist Melt Cap For melting chocolate or butter or an even more delicate simmer the melt cap can be u...

Page 7: ...ce or Service section to order Liquid detergent or all purpose cleaner Rinse with clean water and dry with a soft lint free cloth Vinegar for hard water spots COOKTOP CONTROLS To avoid damage to the c...

Page 8: ...Are the burner ports clogged See the Sealed Surface Burners section Are the burner caps positioned properly See the Sealed Surface Burners section Is propane gas being used The cooktop may have been...

Page 9: ...es For further assistance If you need further assistance you can write to Jenn Air with any questions or concerns at Jenn Air Brand Home Appliances Customer eXperience Center 553 Benson Road Benton Ha...

Page 10: ...rranty 1 Commercial non residential or multiple family use or use inconsistent with published user operator or installation instructions 2 In home Instruction on how to use your product 3 Service to c...

Page 11: ...AVERTISSEMENT Si les renseignements dans ce manuel ne sont pas exactement observ s un incendie ou une explosion peut survenir causant des dommages au produit des blessures ou un d c s Ne pas entrepos...

Page 12: ...ifi La table de cuisson est munie d une fiche de liaison la terre trois broches pour votre protection contre les risques de choc lectrique et doit tre branch e directement dans une prise de courant bi...

Page 13: ...s la section Utilisation de la table de cuisson pour des instructions sur le positionnement appropri du chapeau et de la base des br leurs Ne pas permuter les chapeaux de br leur A Grille du br leur d...

Page 14: ...arder le chapeau de br leur en place lorsqu un br leur de surface est utilis Un chapeau de br leur propre aide emp cher le mauvais allumage et les flammes irr guli res Toujours nettoyer le chapeau du...

Page 15: ...soi m me le br leur scell Contacter un technicien de r paration qualifi Chapeau pour faire fondre Le chapeau pour faire fondre peut tre utilis la place du chapeau de br leur standard pour faire fondr...

Page 16: ...pas utiliser de tampons r curer savonneux de nettoyants abrasifs de cr me polir pour table de cuisson de tampons en laine d acier de chiffons de lavage r ches d essuie tout abrasifs ou d claircissant...

Page 17: ...s affresh r f rence W10355010 non fourni Voir la section Assistance ou service pour commander D PANNAGE Essayer les solutions sugg r es ici d abord afin d viter le co t d une visite de service non n c...

Page 18: ...e commander des pi ces de rechange nous vous recommandons d utiliser seulement des pi ces sp cifi es par l usine Les pi ces de rechange sp cifi es par l usine conviendront et fonctionneront bien parce...

Page 19: ...ce doit tre fourni par une compagnie de service d sign e par Jenn Air Cette garantie limit e est valide uniquement aux tats Unis ou au Canada et s applique exclusivement lorsque le gros appareil m nag...

Page 20: ...S DOMMAGES FORTUITS OU INDIRECTS LE SEUL ET EXCLUSIF RECOURS DU CLIENT DANS LE CADRE DE LA PR SENTE GARANTIE LIMIT E CONSISTE EN LA R PARATION PR VUE PAR LA PR SENTE JENN AIR N ASSUME AUCUNE RESPONSAB...

Reviews: