background image


E-5 


WARNING


DO NOT INGEST BATTERY, CHEMICAL BURN HAZARD 

This product contains a coin/button cell battery. If the coin/button cell battery is swallowed, 

it can cause severe internal burns in just 2 hours and can lead to death. 

Keep new and used batteries away from children. If the battery compartment does not 

close securely, stop using the product and keep it away from children. 

If you think batteries might have been swallowed or placed inside any part of the body, 

seek immediate medical attention. 

BATTERY CARE: 


Use only the size and type of battery specified. 

  If the unit is not to be used for an extended period of time, remove the battery. Old or leaking 

battery can cause damage to the unit and may void the warranty. 


Do not try to recharge battery not intended to be recharged; they can overheat and rupture (Follow 
battery manufacturer’s directions). 


Do not dispose of battery in fire, battery may leak or explode. 


GETTING STARTED 

Please be sure the outlet you plug this unit into is working and provides uninterrupted power. 
1.  Insert the plug of the AC power cord into a 120V~ 60Hz outlet. 
2.  The unit will turn on, and 12:00AM is showing on the display. 
 

IMPORTANT 

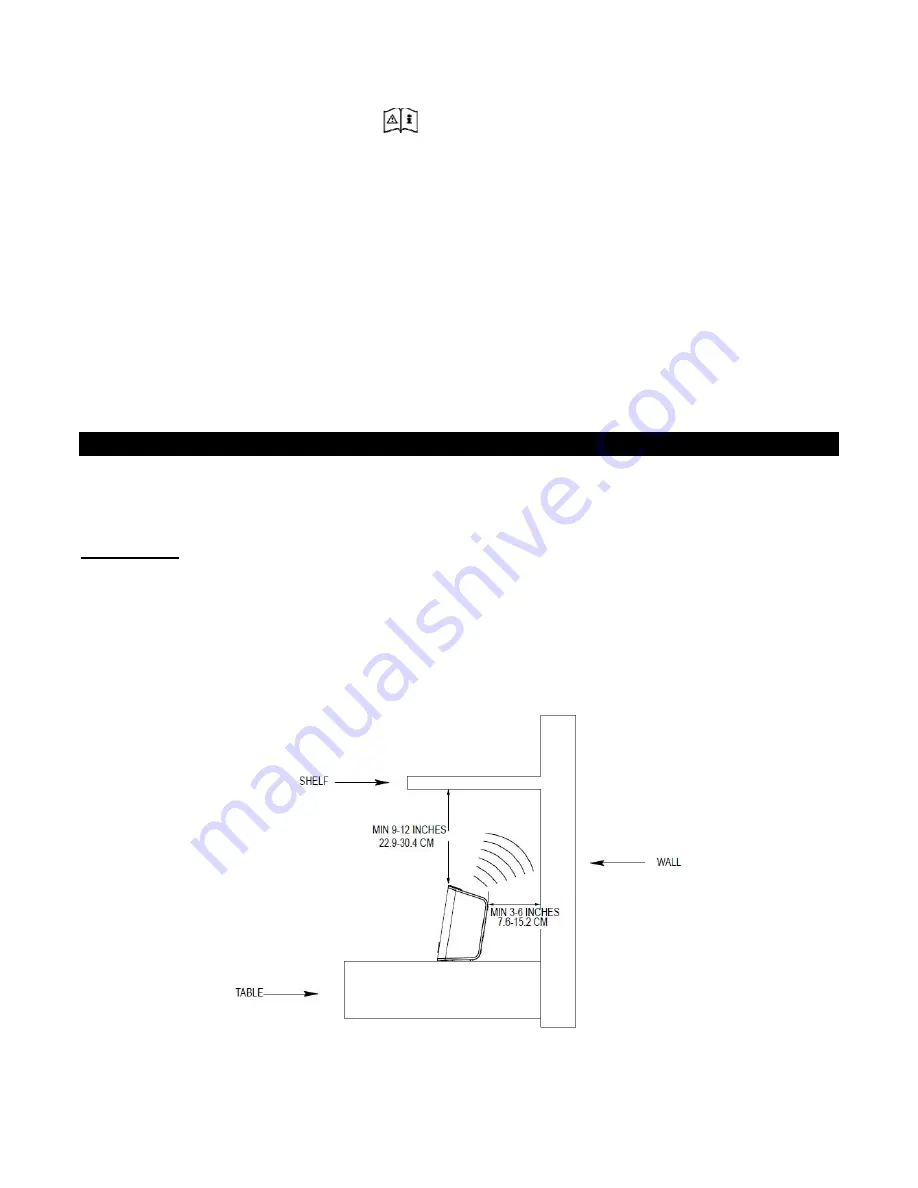
There is a sensor located on top of the unit that picks up any movement or objects near the top or back 
of the unit.  Please be sure to place the radio on a surface with a no obstructions 9-12 inches above or 
3-6 inches behind the unit. This will help maximize the area for recognizing the motion of your hand and 
also reduce the chances of the unit false triggering. If the unit begins beeping and the display functions 
erratically, it may be either too close to an object above or behind the unit. If this happens, please make 
sure there are 9-12 inches of clearance above and 3-6 inches behind the unit to avoid the false 
triggering. 


Summary of Contents for JCR-231

Page 1: ...DIGITAL AM FM DUAL ALARM CLOCK RADIO WITH WAVE SENSOR JCR 231 USER MANUAL PLEASE READ THIS USER MANUAL COMPLETELY BEFORE OPERATING THIS UNIT AND RETAIN THIS BOOKLET FOR FUTURE REFERENCE...

Page 2: ...unding type plug A polarized plug has two blades with one wider than the other A grounding type plug has two blades and a third grounding prong The wider or the third prong is provided for your safety...

Page 3: ...following two conditions 1 This device may not cause harmful interference and 2 This device must accept any interference received including interference that may cause undesired operation Note This e...

Page 4: ...damage or loss in the future After all we want you listening for a lifetime We Want You Listening For a Lifetime Used wisely your new sound equipment will provide a lifetime of fun and enjoyment Sinc...

Page 5: ...NOTE The unit will operate without a battery installed but your time and alarm settings will be lost and will have to be reset in the event of a power interruption or failure IMPORTANT Be sure that th...

Page 6: ...and rupture Follow battery manufacturer s directions Do not dispose of battery in fire battery may leak or explode GETTING STARTED Please be sure the outlet you plug this unit into is working and pro...

Page 7: ...nto your unit Zone 1 Atlantic Std Time UTC 4 hrs Zone 2 Eastern Std Time UTC 5 hrs factory preset Zone 3 Central Std Time UTC 6 hrs Zone 4 Mountain Std Time UTC 7 hrs Zone 5 Pacific Std Time UTC 8 hrs...

Page 8: ...be stored after 5 seconds 8 Press and hold the VOLUME ALARM 2 BUTTON 5 at standby mode 9 Alarm 2 LED indicator and the digits of time will flash 10 Repeat steps 3 to 7 to set the alarm 2 To view and c...

Page 9: ...ons if a station gets skipped With strong signals the tuner may stop before it reaches the actual broadcast frequency so you may need to manually tune for the best reception PRESET RADIO STATIONS This...

Page 10: ...either ends 2 Press the ON OFF SOURCE BUTTON 1 to turn on the JCR 231 3 Tap the SOURCE BUTTON 1 to select AUX mode 4 Start playing your external audio device 5 Slowly increase the volume control of t...

Page 11: ...your hand over the IR SENSOR 11 again within 1 second to show the ALARM 2 time 2 Activating the SNOOZE function when the alarm is sounding Wave your hand over the IR SENSOR 11 once to activate the sn...

Page 12: ...or to turn it on again DIMMER CONTROL Tap the DIMMER BUTTON 8 repeatedly to select the high low brightness of the LED DISPLAY 10 Notes Every time you power up the unit the LED brightness will revert b...

Page 13: ...ttery This unit is using CR2032 backup battery and standard life time is 12 months and recommend change the backup battery every 12 months to ensure it is functional RESETTING THE UNIT In very rare in...

Page 14: ...htness to HIGH At Spectra environmental and social responsibility is a core value of our business We are dedicated to continuous implementation of responsible initiatives with an aim to conserve and m...

Page 15: ...CTRA at the address shown below IF THE UNIT IS RETURNED WITHIN THE WARRANTY PERIOD shown above please include a proof of purchase dated cash register receipt so that we may establish your eligibility...

Reviews: