background image

REMOTE CONTROL

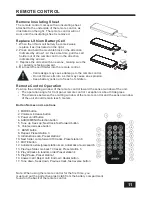
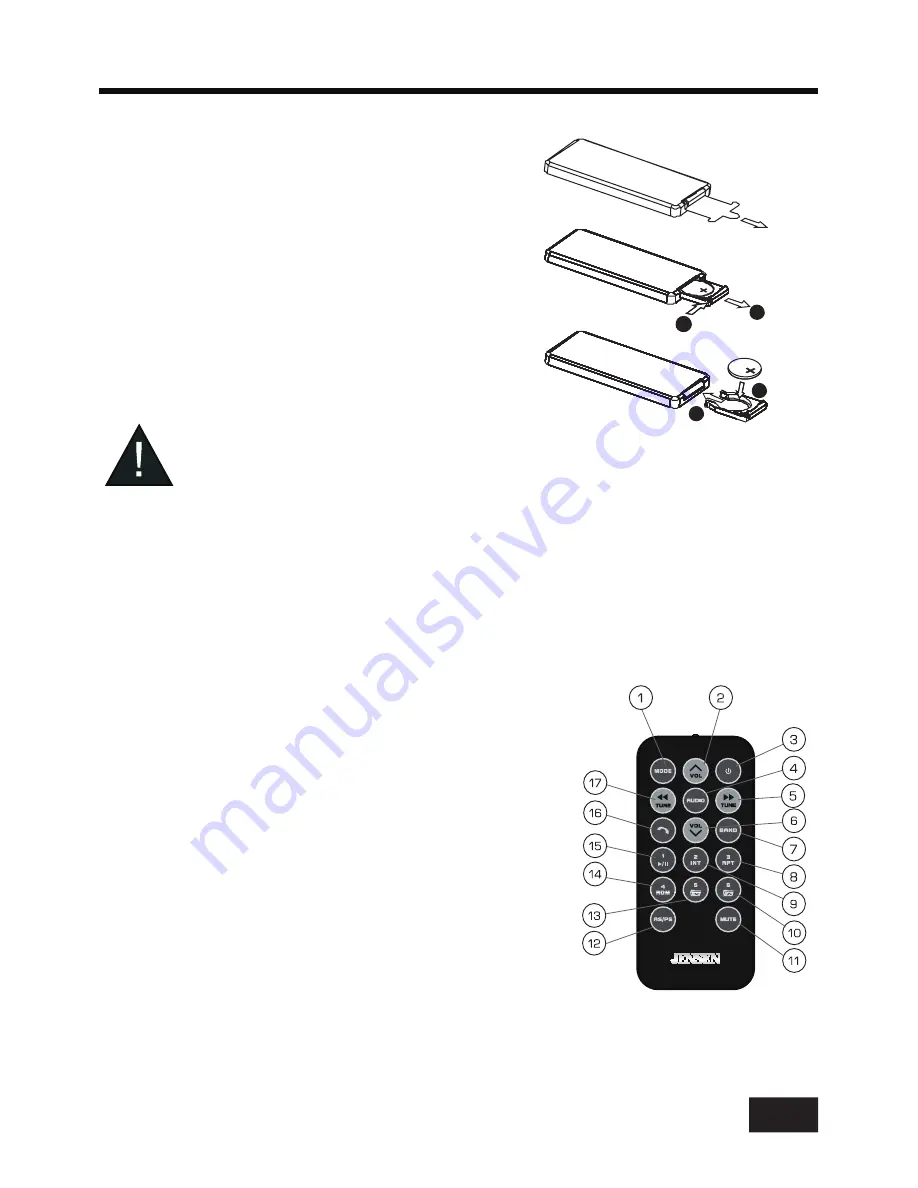
Remove Insulating Sheet

The remote control comes with an insulating sheet
attached to the underside of the remote control, as
illustrated on the right. The remote control will not
work until the insulating sheet is removed.

Replace Lithium Battery Cell

1. When the lithium cell battery becomes weak,
    replace it as illustrated on the right.
2. Press and hold the movable block in the direction
    indicated by arrow 1. At the same time, pull the cell
    holder out of the remote control in the direction
    indicated by arrow 2.

3. Replace the old cell with a new one, making sure the

    (+) polarity is facing upward.
4. Re-insert the cell holder into the remote control.

                    - Cell leakage may cause damage to the remote control.
                    - Do not throw cells into  as this may cause an explosion.
                    - Keep battery cells out of reach of children.

Remote Control Operation

Position the emitting window of the remote control toward the sensor window of the unit.

‡

The operation angle for front panel remote control  reception is about 30 degrees.

‡

The distance between the emitting window of the remote control and the sensor window

       of the unit should remain less 5 meters.

11

3

4

1

2

Button Names and Locations

  1. MODE button
  2. Volumem increase button
  3. Power on/off button
  4. AUDIO/MENU Selection button
  5. Tune up, Seek up; Next track, fast forward button
  6.  Volume decrease button
  7.  BAND button
  8. Repeat, Preset station 3
  9. Introduction scan, Preset station 2
10. Next folder, Jump forward 10 tracks, Preset station 6
11. MUTE button
12. Automatica store/preset station scan, Automatica music search
13. Previous folder, Go back 10 tracks, Preset station 5
14. Play all tracks in random order Preset station 4
15. Play/ Pause, Preset station 1
16. Answer call / Reject call / End call / Redial button
17. Tune down, Seek down; Previous track, fast reverse button

Note: When using the remote control for the first time, you
must pull out the portective plastic tab from the battery compartment
found on the back of the remote control.

Summary of Contents for JDM118BT

Page 1: ...INSTALLATION MANUAL USER S MANUAL AM FM Receiver with Bluetooth and Detachable front panel...

Page 2: ...area and Europe area Frequency 7 Change Bands BAND 7 Manual Tuning 7 Auto Seek Tuning 7 To Store Recall Preset Stations 1 6 7 Automatic Store Station Preset station scan AS PS 7 Local DX 7 Stereo Mono...

Page 3: ...reprogramming The unit is designed to be installed in a level horizontal position For optimal performance avoid installing the unit at an angle Never use excessive force when removing or attaching the...

Page 4: ...e wire harness and the antenna 3 Lift the left or right top corner of the plastic outer trim ring then pull it out to remove it 4 Insert the two bracket keys into the left and right side of the chassi...

Page 5: ...ide of the main unit and draw the unit out of the mounting sleeve Wiring Connections WIRING DIAGRAM CAUTION 12V DC NEGATIVE GROUND Front Left CH RCA Output white Rear Left CH RCA Output white Front Ri...

Page 6: ...s 6 button 11 DISP clock setting button 12 tune down seek down track down fast reverse button 13 tune up seek up track up fast forward button 14 MUTE button 15 4 button AS automatic store preset stati...

Page 7: ...de press the button to receive the incoming call BT AUTO In this mode the bluetooth handsfree systems will receive the incoming call automatically after hearing telephone ringing about 6 seconds elect...

Page 8: ...e release button to release the front panel and remove it then use a thin object with a pointed end to depress the RESET button Mute on off In power on mode briefly press the MUTE button to toggle mut...

Page 9: ...the overall sound quality To Store Recall Preset Stations The radio can be stored 6 preset stations for each band FM1 FM2 FM3 AM1 and AM2 for a to tal of 30 preset stations To memorize a station Turn...

Page 10: ...H IirsW VeconGV RI HacK Wrack SresV DgaiQ WR VWoS Whe inWroGucWioQ Vcan DnG Sla WhH FurrenW Wrack Repeating the track 3resV WhH RPT EuWWoQ WR WogglH EeWZeeQ 53T ALL 3la DlO Wrack 53T L5 ConWinuously r...

Page 11: ...input mode on or off USB OPERATION AUXILIARY INPUT OPERATION 9 Select the track or file for playback in MP3 format a Press the AS button on the front panel or press the AS PS button on the remote cont...

Page 12: ...ng telephone number displays in the LCD To receive the call press the button Reject a Call Press and hold the button to reject an incoming call End a Call To end an active call press the button Switch...

Page 13: ...ntrol toward the sensor window of the unit The operation angle for front panel remote control reception is about 30 degrees The distance between the emitting window of the remote control and the senso...

Page 14: ...00KHz Step 87 5 108 0 MHz 50KHz Step Usable Sensitivity 30 dBu I F Frequency 10 7 MHz AM USA Europe Frequency Range 530 1710 KHz 10KHz Step 522 1620 KHz 9KHz Step Usable Sensitivity 20 dBu I F Frequen...

Page 15: ...off adjust volume to a desired level 5 The operation keys do not work The built in micro computer is not working properly due to noise Press the RESET button to restore the program to zero Radio 1 Muc...

Page 16: ...uraged to try to correct the interference by one or more of the following measures Reorient or relocate the receiving antenna Increase the separation between the equipment and receiver Connect the equ...

Reviews: