background image

JHD1510

9

SATELLITE RADIO OPERATION

Switching to Sirius Satellite Radio 

(Requires optional Sirius tuner)

Press the 

MODE

 button (4) to change the mode to Sirius radio mode. 

Accessing your Sirius RADIO ID

To display your Sirius radio ID, use the 

TUNE/SEEK |<< 

button to tune to channel “000”. The 

screen will display “Sirius ID” on the top bar with the SID displayed in the middle of the LCD 

screen. The Sirius radio ID is 12 characters long. 

Selecting a Band

In Sirius mode, press the 

BAND/WB

 button (15) to access the Sirius user-preset channel 

groups in the following order: SR1, SR2, SR3.

Category Tuning

1.

Press the 

S-MOD/ENTER

 button (2) to access Category mode. 

2.

While the category is flashing, press 

TUNE/SEEK |<< / >>|

 buttons (18, 19) to choose a 

category.

3.

Press the 

S-MOD/ENTER

 button to confirm category selection and tune to the first 

channel in the selected category. The category icon will stop flashing.

4.

Press the 

TUNE/SEEK


|<< / >>| 

buttons (18, 19) to choose desired channels in that 

category. (The lowest channel number within the chosen category will always be the 

default first channel tuned.)

5.

Press and hold

 the 

S-MOD/ENTER

 button to return to channel tuning mode.

Channel Up/Down Tuning

Press the 

TUNE/SEEK


|<< / >>| 

buttons (18, 19) to search for a channel. 

Press and hold

 the 

TUNE/SEEK

 buttons to fast search.

Storing Preset Channels

The preset buttons (5-10) can be used to store 6 channels, allowing convenient access to your 

favorite channels.

Programming Channels 

1.

Select the channel you want to store in memory.

2.

Press and hold

 a preset button (5-10) until the corresponding preset button number 

appears. 

3.

Repeat steps 1 and 2 to program additional channels.

Preset Recall

Press one of the six preset buttons (5-10) to directly select a preset channel stored in the 

current band.

Preset Scan

Press 

AS/PS 

(14) to scan stations stored in all three user-preset channel groups (SR1, SR2 

and SR3). The unit will pause for 10 seconds at each preset station. Press 

AS/PS 

again to stop 

scanning when the desired station is reached.

Preset Tuning

Press and hold

 the 

AS/PS 

button


(14) to access Preset Tuning Mode. In Preset Tuning Mode, 

you can use the 

TUNE/SEEK |<< / >>|

 buttons (18, 19) to access all 18 preset stations in 

sequential order. 

Press and hold

 the 

AS/PS 

button


again


to deactivate Preset Tuning Mode.

Alternate Display Mode

Press the 

DISP/SCROLL

 button (12) to change the display information between single and 

dual line text display. In dual line mode, both artist and title are available for viewing.

Press and hold

 the

 DISP/SCROLL

 button to scroll the Artist/Song Title information.

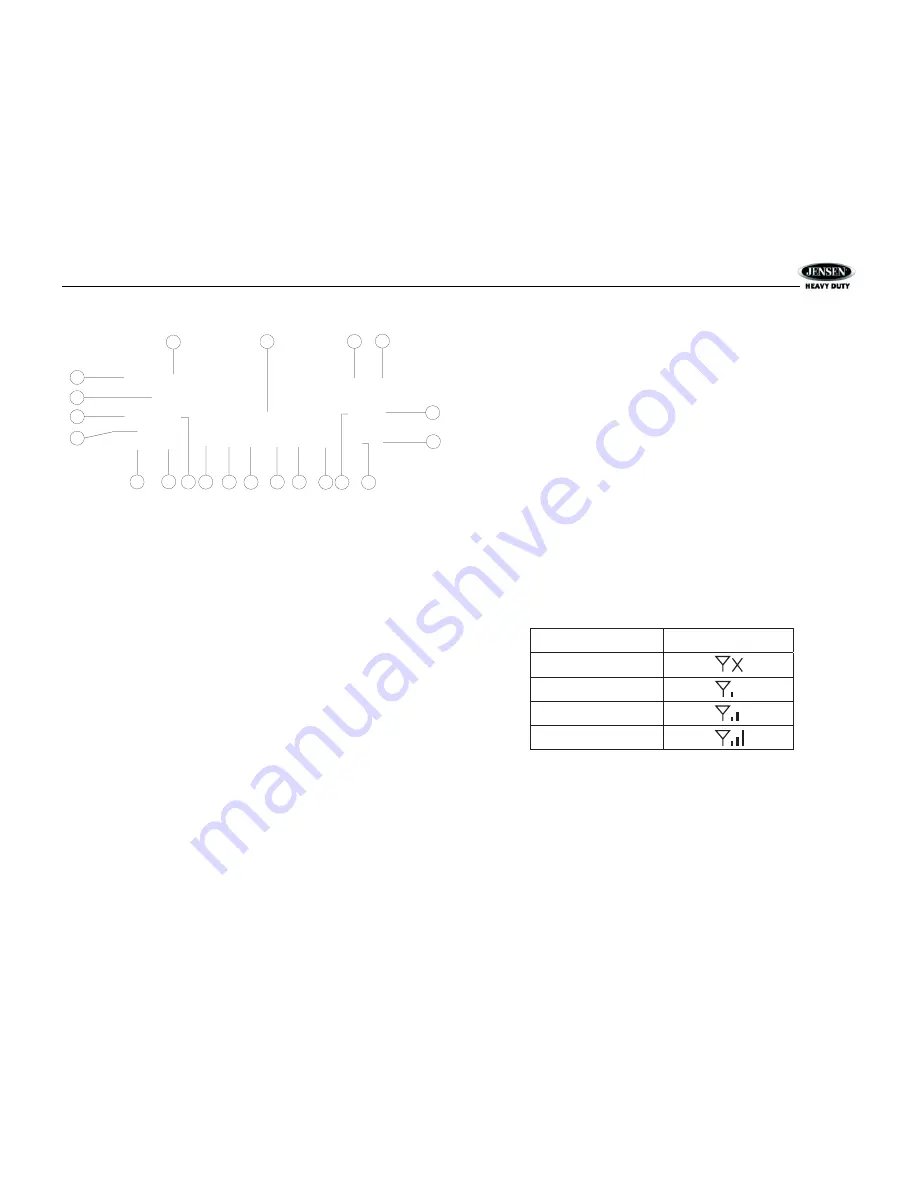
Satellite Signal Strength

The display will indicate satellite reception strength as shown below.

Channel Lock

While tuned to the channel to be locked, 

press and hold

 the 

MODE

 button (4) to access the 

Channel Lock function. “Enter Code” is displayed on the LCD. Using the 1-6 digit buttons, enter 

your 4-digit code (the default code is 1111). “Channel Locked” appears on the LCD, confirming 

that the channel has been locked. The next time the channel is sequentially accessed, the 

“Channel Locked” message will appear, followed by “Enter Code”. To retrieve the locked 

channel, enter your 4-digit code. To change the channel lock code, 

press and hold

 the 

PTY/TA


button (13). Enter Current Code > New Code > Confirm. The LCD will display “New Code 

Stored”. 

3

2

4

5

11

6

12

7

13

8

14

9

15

10

16

17

1

18

20

19

21

Signal Strength

Strength Display

No Signal

Weak

Good

Excellent

Summary of Contents for JHD1510 - Heavy Duty AM/FM/Weather Band Receiver

Page 1: ...JHD1510 Installation and Operation Manual AM FM RBDS WB AUX IN iPod Ready SIRIUS Ready Heavy Duty Radio ...

Page 2: ... ii CONTENTS System 1 Safety Information 2 Installation 3 Wiring 4 Basic Operation 5 Tuner Operation 7 Satellite Radio Operation 9 iPod Operation 10 Care and Maintenance 11 Troubleshooting 11 Specifications 12 ...

Page 3: ...le Balance and Fader Controls Output Power 45W x 4 Clock 12 24 Hour Selectable Public Announcement PA Feature with Optional Microphone IR Wireless Remote Control Ready sold separately 2 Channel Pre amp Line Level Outputs 2 Wire Power with Non Volatile Memory and Interior Power Clock Time Support Auxiliary Audio Input Front 3 5mm Stereo Jack Rear RCA Content List Jensen Heavy Duty Radio Hardware Ki...

Page 4: ...ed Parking in direct sunlight can produce very high temperatures inside your vehicle Give the interior a chance to cool down before operating the unit Use the Proper Power Supply This product is designed to operate with a 12 volt DC negative ground battery system WARNING TO REDUCE THE RISK OF FIRE OR ELECTRIC SHOCK DO NOT EXPOSE THIS EQUIPMENT TO RAIN OR MOISTURE TO REDUCE THE RISK OF FIRE OR ELEC...

Page 5: ...ly inserted into the dashboard opening bend as many of the tabs outward as necessary to firmly secure the sleeve to the dashboard 4 Place the radio in front of the dashboard opening so the wiring can be brought through the mounting sleeve 5 Follow the wiring diagram carefully and make certain all connections are secure and insulated with crimp connectors or electrical tape to ensure proper operati...

Page 6: ...gnition wire or a 12 volts switched power source A A 15 AMP FUSE RED 250 FEMALE SPADE TERMINAL BLUE WIRE 14 PIN SOCKET VIEW A A 14 PIN CONNECTOR LEFT REAR SPEAKER RIGHT REAR SPEAKER RIGHT REAR SPEAKER LEFT REAR SPEAKER LEFT FRONT SPEAKER LEFT FRONT SPEAKER NO CONNECTION RIGHT FRONT SPEAKER RIGHT FRONT SPEAKER POWER ANTENNA DESCRIPTION GRAY BLACK WHITE BLACK GREEN BLACK VIOLET BLACK WIRE COLOR BLAC...

Page 7: ...ed for the following reasons initial installation of the unit when all wiring is completed function buttons do not operate error symbol on the display Use a ball point pen or thin metal object to press the RESET button 21 This may be necessary should the unit display an error code Audio Menu Press the AUDIO MENU button 3 to access the audio menu You can navigate through the audio menu items by pre...

Page 8: ...to compensate for the characteristics of human hearing Auxiliary Input To access an auxiliary device 1 Connect the portable audio player to either the AUX IN on the front panel 17 or at the rear of the unit 2 Press the MODE button 4 to select AUX mode The rear AUX audio source will play by default until a device is inserted into the front jack 3 Press MODE again to cancel AUX mode and go to the ne...

Page 9: ...ear when data is received RBDS The current radio station is broadcasting RBDS data TA Traffic Alert mode is activated When a station broadcasting TA is received the TA icon disappears and the Traffic message displays on the LCD PTY Program Type data is being sent When flashing PTY search is in progress NOTE Radio stations broadcasting RBDS may not be available in your listening area Traffic Alert ...

Page 10: ... your area How many stations can I expect to receive Since the broadcasts are local weather and information the transmission power is usually very low much less than standard AM or FM stations so you will usually receive only one station unless you are on the edge of two or more broadcast signals The most you will receive will be two or three and that is rare Is it possible I won t receive any sta...

Page 11: ...s 1 and 2 to program additional channels Preset Recall Press one of the six preset buttons 5 10 to directly select a preset channel stored in the current band Preset Scan Press AS PS 14 to scan stations stored in all three user preset channel groups SR1 SR2 and SR3 The unit will pause for 10 seconds at each preset station Press AS PS again to stop scanning when the desired station is reached Prese...

Page 12: ... appear on the LCD Press 3 RPT again to stop repeat playback Random Play During playback press the 4 RDM button 7 to play all songs in the current category in random order Random play will begin once the current song has finished playing RANDOM will appear on the LCD Press 4 RDM again to stop random playback Selecting Tracks During playback press the TUNE SEEK button 18 19 to play the previous or ...

Page 13: ...mploy this wire and resistor but it may be necessary to check them for correct operation Another method of suppression is the use of additional noise suppressors These can be obtained from most professional mobile electronics retailers Interference Radio reception in a moving environment is very different from reception in a stationary environment home It is very important to understand the differ...

Page 14: ...n 25 dB AM MW Frequency Range USA 530 1710 kHz Frequency Range Europe 522 1620 kHz Sensitivity S N 20dB 36 dB General Operating Voltage DC 12 Volts Grounding System Negative Ground Speaker Impedance 4 8 ohms per channel Tone Controls Bass at 100 Hz 10 dB Treble at 10 kHz 10 dB Power Output 45W x 4 Idle Standby Current 75mA Current Drain 15 Ampere max Dimensions 80 W x 183 D x 58 H ...

Page 15: ...JHD1510 13 ...

Page 16: ...ASA Electronics Corporation www asaelectronics com 2007 ASA Electronics Corporation v 081707 ...

Reviews: