background image

7

BASIC OPERATION

Power On/Off 

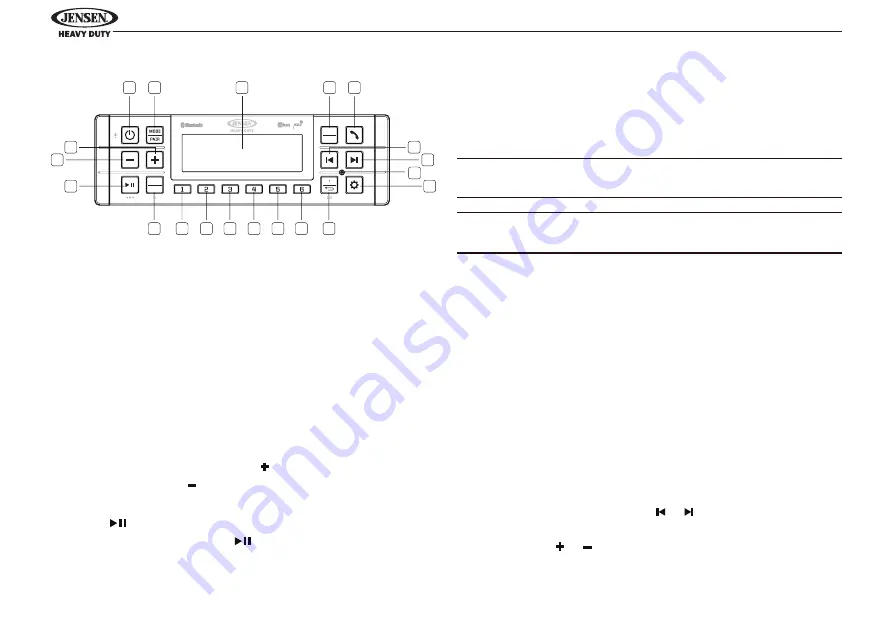
Press the 

POWER

 button (1) to turn the unit on. The unit will 

resume at the last mode (Tuner, BT, etc.) after turn on. Press 

and hold the 

POWER

 button (1) to enter standby mode.

Dimmer Control 

A short press of the 

POWER

 button (1) will switch the 

dimmer on/off. While the dimmer is off, the unit will be at 

full brightness for daylight viewing. While dimmer is on, the 

backlight will dim for night viewing. The dimmer brightness 

level can be adjusted in the system settings.

Volume Control

To increase the volume, press the   button (20). To decrease 

the volume, press the


 button(19).

Play/Pause/Mute

Press the   button (18) on the control panel to pause or 

mute the audio output. Press   button again to unmute or 

restore the audio output to the previous level.

Mode

Press the 

MODE

 button (2) to select a different mode of 

operation, as indicated on the display panel. Available modes 

include the following: FM > AM > Weatherband > BT Audio. 

FM is the default source mode on initial power up. 

NOTE: DAB+ Digital Radio mode will be skipped when the 
Region menu option is set to “USA/Russia/Japan.” 
 
NOTE: Weatherband mode will be skipped when the Region 
menu option is set to “Europe/Russia/Japan.”  

Reset

The 

RESET

 button (8) should be activated for the following 

reasons:

•  Initial installation of the unit when all wiring is completed.
•  Function buttons do not operate.
•  Error symbol on the display.
Use a ballpoint pen or thin metal object to press the reset 

button. This may be necessary should the unit display an error 

code.

Audio Menu

Press the 

SETTINGS 

button (9) to access the audio menu. You 

can navigate through the audio menu items by pressing the 

SETTINGS

 button repeatedly or   or   buttons (6, 7). Once the 

desired menu item appears on the display, adjust that option 

by pressing the   or 


buttons (20, 19) within 5 seconds. The 

unit will automatically exit the audio menu after five seconds 

1

16

17

15

14

13

12

11

10

2

3

4

5

6

7

8

9

20

19

18

JHD62  

BAND

PTY

PS AS

ENTER

TIMER

Summary of Contents for JHD62

Page 1: ...JHD62 AM FM RBDS WB USB BT DAB Heavy Duty Radio Installation and Operation Manual JHD62 BAND PTY PS AS ENTER TIMER...

Page 2: ...ntroduction 3 Safety Information 4 Installation 4 Wiring 6 Basic Operation 7 Tuner Operation 10 Bluetooth Operation 13 App Operation 16 Care and Maintenance 16 Troubleshooting 17 Specifications 18 FCC...

Page 3: ...0 presets RBDS Radio Broadcast Data Service with PTY search Rear USB port for device charging 1 amp output Stereo pre amp line level output 2V RMS Amplifier remote trigger 12VDC Audio settings volume...

Page 4: ...sure the kit works with your vehicle Before you Begin 1 Disconnect the battery negative terminal 2 Remove Transport Screws Important Notes Before final installation test the wiring connections to mak...

Page 5: ...be on and the vehicle battery must be reconnected If the unit does not operate recheck all wiring until the problem is corrected Once proper operation is achieved turn the accessory switch off discon...

Page 6: ...release the unit Sleeve Removal Key Removal Key Reconnect Battery When wiring is complete reconnect the battery negative terminal WIRING DETAILA SHOWN FROM WIRE INSERTION VIEW BT ANTENNA DAB ANTENNA...

Page 7: ...able modes include the following FM AM Weatherband BT Audio FM is the default source mode on initial power up NOTE DAB Digital Radio mode will be skipped when the Region menu option is set to USA Russ...

Page 8: ...conds of inactivity The following items can be adjusted LCD Dimmer 1 10 Adjust LCD backlight LCD Contrast 1 10 Adjust LCD contrast Bluetooth Devices Press to ENTER TIMER button 4 to enter sub menu Pre...

Page 9: ...unit to factory default set up values System Info Display firmware version NOTE Bluetooth Device menu options are only available while the Bluetooth feature is ON and the radio is in Bluetooth Audio m...

Page 10: ...hold ENTER TIMER button to reset work timer Press RETURN button 10 to exit work timer display If timer is exited while running TIMER flashes every 10 seconds for 2 seconds in place of clock in footer...

Page 11: ...ld the BAND PTY button 17 for 2 seconds to list the following Program Type PTY options ANY News Information Sports Talk Rock Classic Rock Adult Hits Soft Rock Top 40 Country Oldies Soft Nostalgia Jazz...

Page 12: ...l usually receive only one station unless you are on the edge of two or more broadcast signals The most you will receive will be two or three and that is rare Is it possible I won t receive any statio...

Page 13: ...then press and hold a preset button from 1 6 on the number buttons for two seconds The preset number will appear on the LCD Recall a Store Service Press a preset button from 1 6 on the number buttons...

Page 14: ...NLOCK The JHD62 can store up to 5 devices for Bluetooth connection The devices are stored in FIFO First in First Out order To prevent a device from being bumped from the list when more than 5 devices...

Page 15: ...ack NOTE If a Bluetooth device is disconnected due to the power being turned off or if the device is disconnected inadvertently the unit will automatically search for the matching Bluetooth device whe...

Page 16: ...s installed on Android operating system close the app before Bluetooth pairing otherwise there may be errors on Bluetooth connection CARE AND MAINTENANCE Keep the product away from dust and dirt which...

Page 17: ...ct a station manually ERROR 01 on LCD Database or decoder error Change to another mode employ this wire and resistor but it may be necessary to check them for correct operation Another method of suppr...

Page 18: ...22 1620kHz 522 1620kHz 522 1629kHz Sensitivity S N 20dB 25dB V General Frequency band s for Bluetooth 2 4GHz Maximum radio frequency power transmitted for Bluetooth 4dBm Operating Voltage DC 12 volts...

Page 19: ...s and can radiate radio frequency energy and if not installed and used in accordance with the instructions may cause harmful interference to radio communications However there is no guarantee that int...

Page 20: ...ASA Electronics Corporation www asaelectronics com www jensenheavyduty com 2023 ASA Electronics Corporation...

Reviews: