background image

JMS2012

8

SIRIUS RADIO OPERATION

NOTE: SIRIUS is available in the US for subscribers with addresses in the continental 

US and is available in Canada for subscribers with a Canadian address. Required 

subscription plus compatible SIRIUS tuner and antenna are required and sold 

separately. To subscribe to SIRIUS Satellite Radio on the internet, visit sirius.com, or 

call 888-539-7474. Have your SIRIUS ID ready (SIRIUS ID is located on the back of the 

SIRIUS tuner or by tuning to Channel 0). SIRIUS programming is subject to change. Visit 

sirius.com for the most complete and up-to-date channel lineup and product 

information. “SIRIUS” and the SIRIUS dog logo and related marks are trademarks of 

Sirius Satellite Radio Inc. All rights reserved.

Switching to SIRIUS Mode

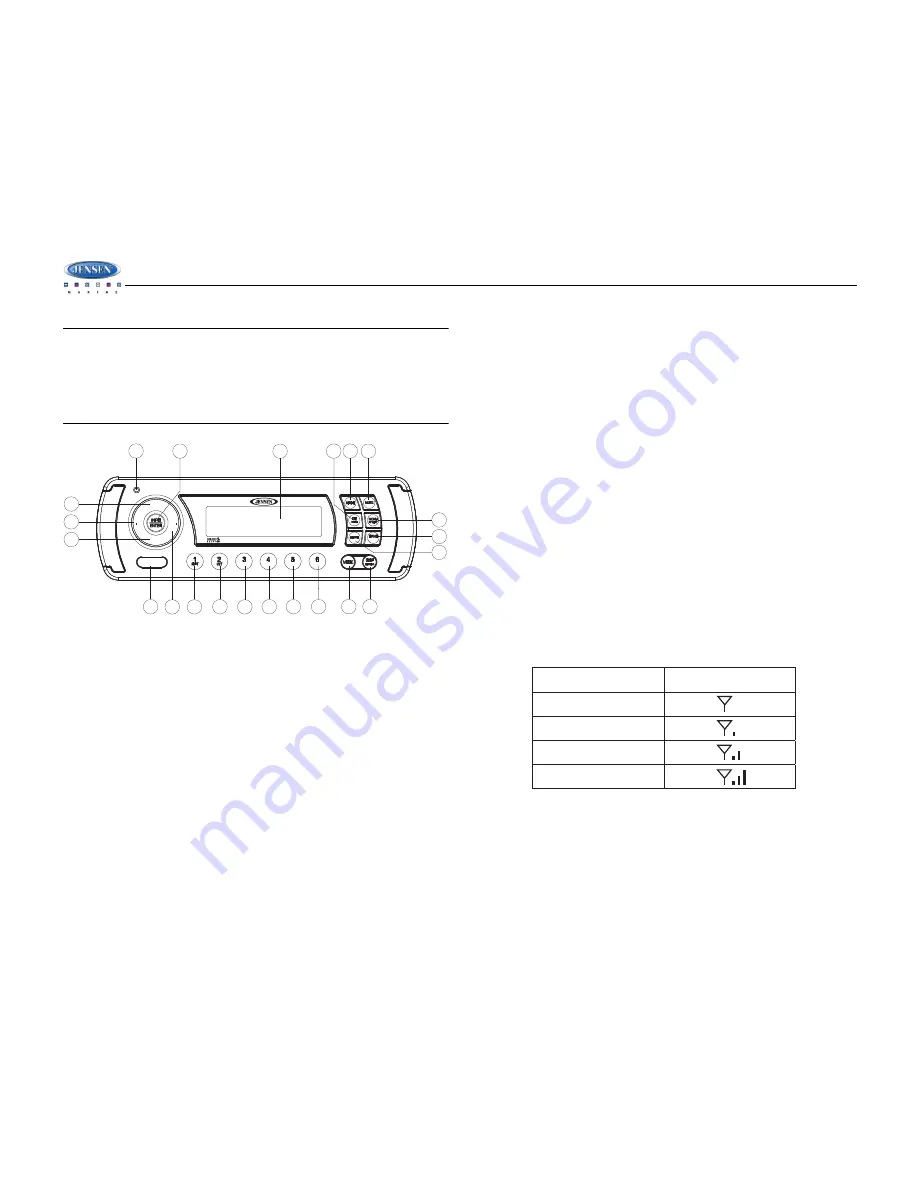
Press the 

MODE

 button (20) to change the mode to Sirius radio mode. 

Accessing your SIRIUS ID

1.

In Sirius mode, 

press and hold

 the 

INFO/ENTER

 button (4) to select DIRECT mode.

2.

Press the 

INFO/ENTER

 button for each digit to enter “000” in the Channel field.

3.

Entry of the last digit will display the Sirius ID number for your tuner.

4.

The Sirius ID number will scroll twice and then freeze with the first 11 digits on the display. 
Press the 

DISP/SCROLL

 button (21) to display the remaining digit.

Selecting a Band

In Sirius mode, press the 

BAND

 button (16) to access the Sirius user-preset channel groups in 

the following order: SAT 1, SAT 2, SAT 3.

Category Tuning

1.

Press the 

MENU/PTY/CAT

 button (12) to enter category mode.

2.

Press the 

SEEK/CAT - /+

 buttons (13, 14) to change the category. 

3.

Press the 

VOL+/- 

buttons (2) to view channels within the selected category.

4.

Press the 

INFO/ENTER

 button (4) to select the desired channel in that category.

Channel Up/Down Tuning

Press the 

SEEK/CAT - /+

 buttons (13, 14) to search for a channel. 

Press and hold

 the 

SEEK/

CAT


-/+

 buttons to fast search.

Storing Preset Channels

The preset buttons 1-6 can be used to store 6 channels, allowing convenient access to your 
favorite channels.

Programming Channels 

1.

Select the channel you want to store in memory.

2.

Press and hold

 a preset button (5-10) until the corresponding preset button number 

appears. 

3.

Repeat steps 1 and 2 to program additional channels.

Quick Tuning

Press one of the six preset buttons (5-10) to select a preset channel directly.

Channel Direct Access Searching

1.

Press and hold

 the 

INFO/ENTER

 button (4) to access Direct Tune mode. “CHANNEL  : _ 

_ _” appears on the display for a few seconds.

2.

Use the 

VOL +/- 

buttons (2) to select a number for each position.

3.

Press the 

INFO/ENTER

 button after each entry to confirm the first two digits. 

4.

Press the 

INFO/ENTER

 button after the third digit to tune to the selected channel.

Alternate Display Information

Press 

DISP/SCROLL

 button (21) to change the display information in the following order: 

CATEGORY > SONG TITLE > ARTIST NAME > CHANNEL NAME > CATEGORY.

Satellite Signal Strength

The display will indicate reception strength as shown below.

JMS2010

40WX4

SEEK

CAT-

<<

SEEK

CAT+

>>

VOL+

UP

DOWN

VOL-

POWER

WB

RND

3

2a

4

11

12

13

14

15

16

17

18

19

1

20 21

2b

5

6

7

8

9

10

Signal Strength

Strength Display

No Signal

Weak

Good

Excellent

X

Summary of Contents for JMS2012

Page 1: ...eration Manual MARINE AUDIO SYSTEM JMS2010 40WX4 SEEK CAT SEEK CAT VOL UP DOWN VOL POWER WB RND iPhone iPod iPod classic iPod nano iPod shuffle and iPod touch are trademarks of Apple Inc registered in the U S and other countries ...

Page 2: ...de for iPod and Made for iPhone mean that an electronic accessory has been designed to connect specifically to iPod or iPhone respectively and has been certified by the developer to meet Apple performance standards Apple is not responsible for the operation of this device or its compliance with safety and regulatory standards Please note that the use of this accessory with iPod or iPhone may affec...

Page 3: ...NFORMATION When Boating Keep the volume level Iow enough to be aware of your surroundings Protect from Water Do not submerge the product directly in water as this can cause electrical shorts fire or other damage Protect from High Temperatures Exposure to direct sunlight for an extended period of time can produce very high temperatures inside your vessel Give the interior a chance to cool down befo...

Page 4: ...g structures 2 Place the radio in front of the dashboard opening so the wiring can be brought through the opening 3 Follow the wiring diagram carefully and make certain all connections are secure to ensure proper operation 4 After completing the wiring connections turn the unit on to confirm operation vessel accessory switch must be on If the unit does not operate recheck all wiring until the prob...

Page 5: ...JMS2012 3 WIRING WIRING HARNESS A WIRING HARNESS A ...

Page 6: ...e from 7 to 7 Treble Level Use the VOL buttons to adjust the Treble level range from 7 to 7 Balance Use the VOL buttons to adjust the Balance between the left and right speakers from L12 full left to R12 full right Fader Use the VOL buttons to adjust the Fader between the rear and front speakers from R12 full rear to F12 full front System Menu 1 Press and hold the MENU PTY CAT button 12 for more t...

Page 7: ...able audio player to the AUX IN connectors on the back of the unit 2 Press the MODE button 20 to select Auxiliary mode 3 Press MODE again to cancel Auxiliary mode and go to the next mode Liquid Crystal Display LCD The current frequency and activated functions are shown on the LCD panel 19 NOTE LCD panels may take longer to respond when subjected to cold temperatures for an extended period of time ...

Page 8: ... band The unit will pause for ten seconds at each preset station Press AS PS again to stop scanning when the desired station is reached RBDS Operation This unit is equipped to display RBDS Radio Broadcast Data Service information when broadcast by the radio station NOTE Radio stations broadcasting RBDS may not be available in your listening area Program Type PTY In FM radio mode press the MENU PTY...

Page 9: ...reset button will access the frequency Note that one frequency cannot be accessed using a preset button The frequency can only be reached using the tuning controls Use the SEEK buttons 13 14 or the preset buttons to tune to each of the seven channels until you find the weatherband station broadcasting in your area How many stations can I expect to receive Since the broadcasts are local weather and...

Page 10: ...utton 12 to enter category mode 2 Press the SEEK CAT buttons 13 14 to change the category 3 Press the VOL buttons 2 to view channels within the selected category 4 Press the INFO ENTER button 4 to select the desired channel in that category Channel Up Down Tuning Press the SEEK CAT buttons 13 14 to search for a channel Press and hold the SEEK CAT buttons to fast search Storing Preset Channels The ...

Page 11: ... 17 to pause the iPod player Pause will appear on the LCD Press MUTE again to resume playback Repeat Play During playback press the 1 RPT button 8 to repeat the current song RPT will appear on the LCD Press 1 RPT again to stop repeat playback Intro Play During playback press the 2 INT button 6 to play the first ten seconds of each song INT will appear on the LCD Press 2 INT again to stop intro pla...

Page 12: ...ire and resistor but it may be necessary to check them for correct operation Another method of suppression is the use of additional noise suppressors These can be obtained from most electronic supply shops Interference Radio reception in a moving environment is very different from reception in a stationary environment home It is very important to understand the difference AM reception will deterio...

Page 13: ... Separation 25 dB AM MW Frequency Range USA 530 1710 kHz Frequency Range Europe 522 1620 kHz Sensitivity S N 20dB 20 dB General Operating Voltage DC 12 Volts Grounding System Negative Ground Speaker Impedance 4 8 ohms per channel Tone Controls Bass at 100 Hz 10 dB Treble at 10 kHz 10 dB Power Output 40W x 4 Current Drain 15 Ampere max Dimensions 178 x 20 5 x 68 5mm ...

Page 14: ...ASA Electronics Corporation www asaelectronics com www jensenmarinedirect com 2011 ASA Electronics Corporation v 011711 ...

Reviews: