background image


21

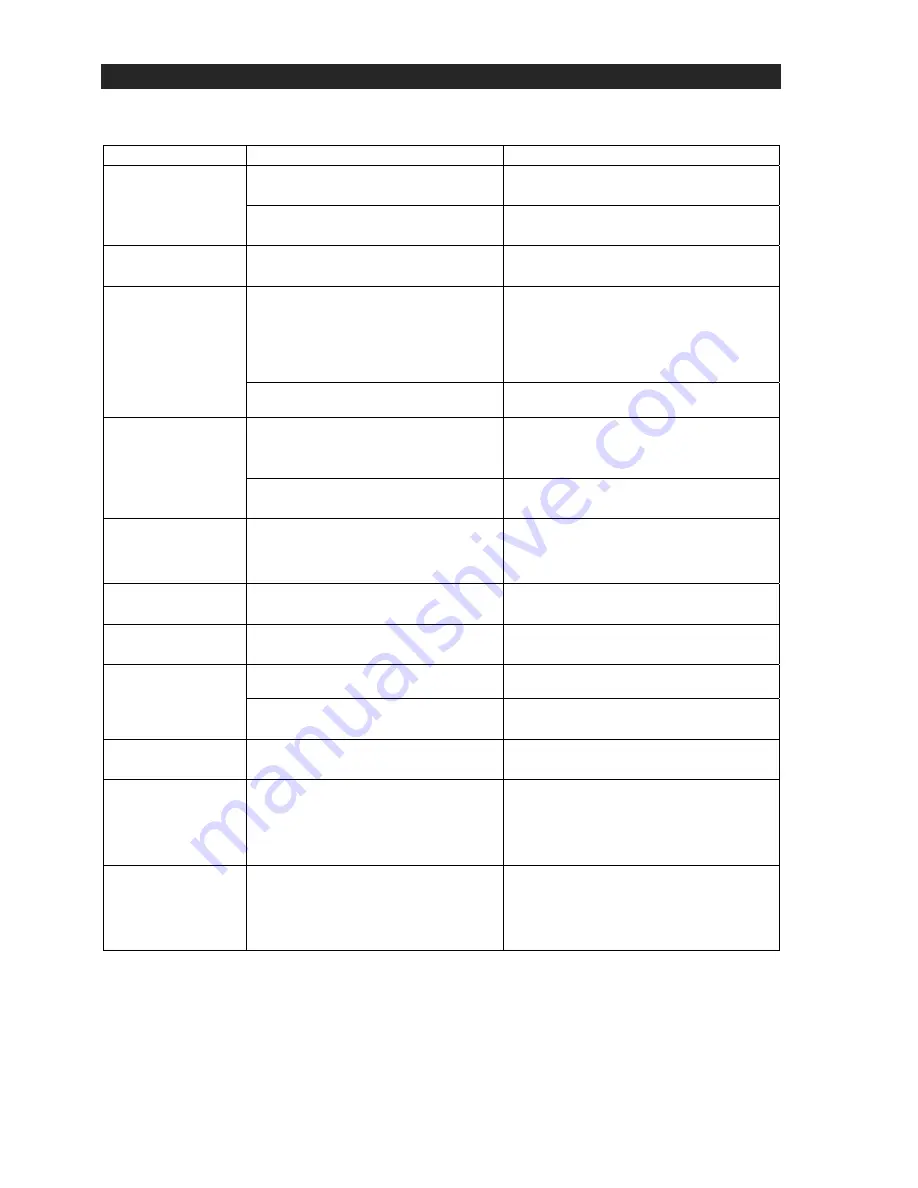
TROUBLESHOOTING GUIDE 

SHOULD YOU EXPERIENCE DIFFICULTIES IN THE USE OF THIS PLAYER PLEASE REFER TO THE 

FOLLOWING CHART OR CALL 1-800-777-5331 FOR CUSTOMER SERVICE. 


PROBLEM


POSSIBLE CAUSE


SOLUTION


The unit is disconnected from the 
AC outlet. 

Reconnect to the AC outlet.   
 

The unit does not 
respond (no 
power) 

AC outlet is not functioning. 

Plug another device into the same 
outlet to confirm the outlet is working. 

AM band is too 
noisy 

The reception at the set location is 
poor. 

Slightly rotate the unit for the best 
reception. 

You have tuned to a mono 

station or the station is too 

weak. 

Select another FM station or extend 

or rotate the wire antenna for best 

reception. 


FM STEREO 

indicator does not 

light up 

FM MONO MODE is set. 

Set the FM MODE to STEREO. 

Volume level is set to high. 

Decrease the volume. 

Sound is distorted 

Sound source is distorted. 

Try a different audio source such as a 
music CD. 

The tape does not 
move. 

The cassette tape is not inserted 

properly. The tape has reached the 
end. 

Insert the cassette tape correctly. 
Flip the cassette. 

No sound from 
tape.  

The tape heads are dirty. 

Clean the tape heads. 

Tape sound is 
distorted or faint. 

The tape heads are dirty. 

Clean the tape heads. 

CD Mode is not selected. 

Slide the FUNCTION switch to select 
CD mode. 

CD Player does 
not play. 

CD is not installed or installed 
incorrectly. 

Press the CD onto spindle, printed side

facing up. 

CD skips while 
playing 

Disc is dirty or scratched. 

Wipe with cloth or another disc. 

Unit gets warm 
after extended 
play at high 
volume 

This is normal. 

Turn the unit off for a period of time or 

lower volume. 

CD1/CD2 does 
not work after 
pushing in the CD 
tray 

The “OPEN/CLOSE” button was 

not pressed to close the CD. 

The “OPEN/CLOSE” button must be 

pressed to closed the CD tray. Do not 

push on the CD tray to close it. 

Summary of Contents for JTA-980

Page 1: ...STEREO TURNTABLE MUSIC SYSTEM WITH CD PLAYER CD RECORDER AND CASSETTE USER MANUAL JTA 980 PLEASE READ THIS USER MANUAL COMPLETELY BEFORE OPERATING THIS UNIT AND RETAIN THIS BOOKLET FOR FUTURE REFERENC...

Page 2: ...a safe level Start your volume control at a low setting Slowly increase the sound until you can hear it comfortably and clearly and without distortion Once you have established a comfortable sound lev...

Page 3: ...URE REFERENCE THIS SET HAS BEEN DESIGNED AND MANUFACTURED TO ASSURE PERSONAL SAFETY IMPROPER USE CAN RESULT IN ELECTRIC SHOCK OR FIRE HAZARD THE SAFEGUARDS INCORPORATED IN THIS UNIT WILL PROTECT YOU I...

Page 4: ...TH THE APPARATUS WHEN A CART IS USED USE CAUTION WHEN MOVING THE CART APPARATUS COMBINATION TO AVOID INJURY FROM TIP OVER 13 UNPLUG THIS APPARATUS DURING LIGHTNING STORMS OR WHEN UNUSED FOR LONG PERIO...

Page 5: ...NOT BE EXPOSED TO DRIPPING OR SPLASHING AND THAT NO OBJECTS FILLED WITH LIQUIDS SUCH AS VASES SHALL BE PLACED ON APPARATUS 21 MAINS PLUG IS USED AS DISCONNECT DEVICE AND IT SHOULD REMAIN READILY OPERA...

Page 6: ...ocedures in a way other than those specified herein may result in hazardous radiation exposure This unit should not be adjusted or repaired by anyone except qualified service personnel ON PLACEMENT Do...

Page 7: ...quipment does cause harmful interference to radio or television reception which can be determined by turning the equipment off and on the user is encouraged to try to correct the interference by one o...

Page 8: ...NECTING THE AC POWER CORD After connecting the speakers unwind the AC power cord fully and connect it to any convenient household 120V 60Hz AC outlet NOTE The product is designed to operate on normal...

Page 9: ...ON 21 FM STEREO LED INDICATOR 22 BASS BOOST ON OFF BUTTON 23 TUNING KNOB 24 REMOTE IR SENSOR 25 VOLUME CONTROL KNOB 26 LED DIAL POINTER 27 CD2 CD TRAY 28 CD2 CD TRAY OPEN CLOSE BUTTON 29 CD2 CD PLAY P...

Page 10: ...FUNCTION 12 CD PROGRAM BUTTON PRESS TO ACTIVATE CD PROGRAMMING FUNCTION 13 FINALIZE BUTTON PRESS TO FINALIZE THE CD R RW DISC AFTER RECRODING 14 TRACK SEPARATION IN CD RECRODING MODE PRESS TO SEPARAT...

Page 11: ...ent door Battery Precautions Replacement of batteries must be done by an adult Do not mix old and new batteries Do not mix alkaline standard carbon zinc or rechargeable nickel cadmium batteries The su...

Page 12: ...ignal FM For best FM reception the FM lead wire antenna located on the back of the set should be fully unwound and extended PLAYING COMPACT DISC NOTE This player will not only play commercial CDs but...

Page 13: ...Down button is pressed it will go back to the beginning of the track the same track number is display and remain in the PLAY or PAUSE mode 3 After step 2 press the Skip Down button again it will go t...

Page 14: ...revious track only when you press the Skip button during PLAY or PAUSE mode Random Play Mode using the Remote Control Press the RANDOM button at remote control to activate the shuffle play function an...

Page 15: ...tray 2 Load a recordable CD R RW disc into CD 2 tray Press the REC button and then the CD PLAY PAUSE button on CD 2 until the recording indicator shows on LCD display 3 After few seconds the LCD will...

Page 16: ...To enable recording in different modes you must press the CD 2 STOP button to exit before you switch from one mode to another mode B RECORDING SETTING I RECORDING LEVEL The preset recording level of...

Page 17: ...rt the un finalize process and wait until busy disappears from the LCD display 4 NO TOC indicator total track numbers and playing time will appear on the LCD display after the un finalize process is c...

Page 18: ...tone arm rest before operating and replace again when finished 1 Press the PHONO function button to enter the PHONO mode 2 Place the record on the platter over the center spindle use the 45 RPM recor...

Page 19: ...dually increase the volume to a comfortable listening level AUXILIARY INPUT This unit provides an auxiliary audio signal input jack for connecting external audio devices like MP3 players CD players an...

Page 20: ...elp to protect the internal parts of the unit from entry of water and possible moisture damage CASSETTE CARE Two common causes of trouble experienced when using cassettes are 1 Tape Jamming Leading to...

Page 21: ...st should be carefully wiped off the disc s recorded surface with a soft cloth Unlike conventional records compact discs have no grooves to collect dust and microscopic debris so gently wiping with a...

Page 22: ...volume Sound is distorted Sound source is distorted Try a different audio source such as a music CD The tape does not move The cassette tape is not inserted properly The tape has reached the end Inse...

Page 23: ...Unit 22Watts At Spectra environmental and social responsibility is a core value of our business We are dedicated to continuous implementation of responsible initiatives with an aim to conserve and ma...

Page 24: ...lure to provide reasonable care and necessary maintenance as outlined in the user manual 3 Warranty of all SPECTRA products applies to residential use only and is void when products are used in a nonr...

Reviews: