background image


JWM1A 


INSTALLATION 

It’s a good idea to read all of the instructions before beginning the installation. We recommend 

having your Jensen JWM1A installed by a reputable RV dealership 

Tools and Supplies 

You will need these tools and supplies to install your JWM1A: 


Phillips screwdriver 


Wire cutters and strippers 


Tools to remove existing radio (screwdriver, socket wrench set or other tools) 


Electrical tape 


Crimping tool 


Volt meter/test light 


Crimp connections 


16 gauge wire for power connections 


16 – 18 gauge speaker wire 

Disconnecting the Battery 

To prevent a short circuit, be sure to turn off the ignition and remove the negative (-) battery cable 

prior to installation. 


NOTE: If the JWM1A is to be installed in a vehicle equipped with an on-board drive or 

navigation computer, do not disconnect the battery cable. If the cable is disconnected, the 

computer memory may be lost. Under these conditions, use extra caution during 

installation to avoid causing a short circuit. 

Selecting the Mounting Location 

Select a mounting location, taking care to avoid the following: 


Places exposed to heat-radiating appliances such as electric heaters 


Adjacent to other equipment that radiates heat 


Poorly-ventilated or dusty places 


Moist or humid locations 

Mounting the Radio 


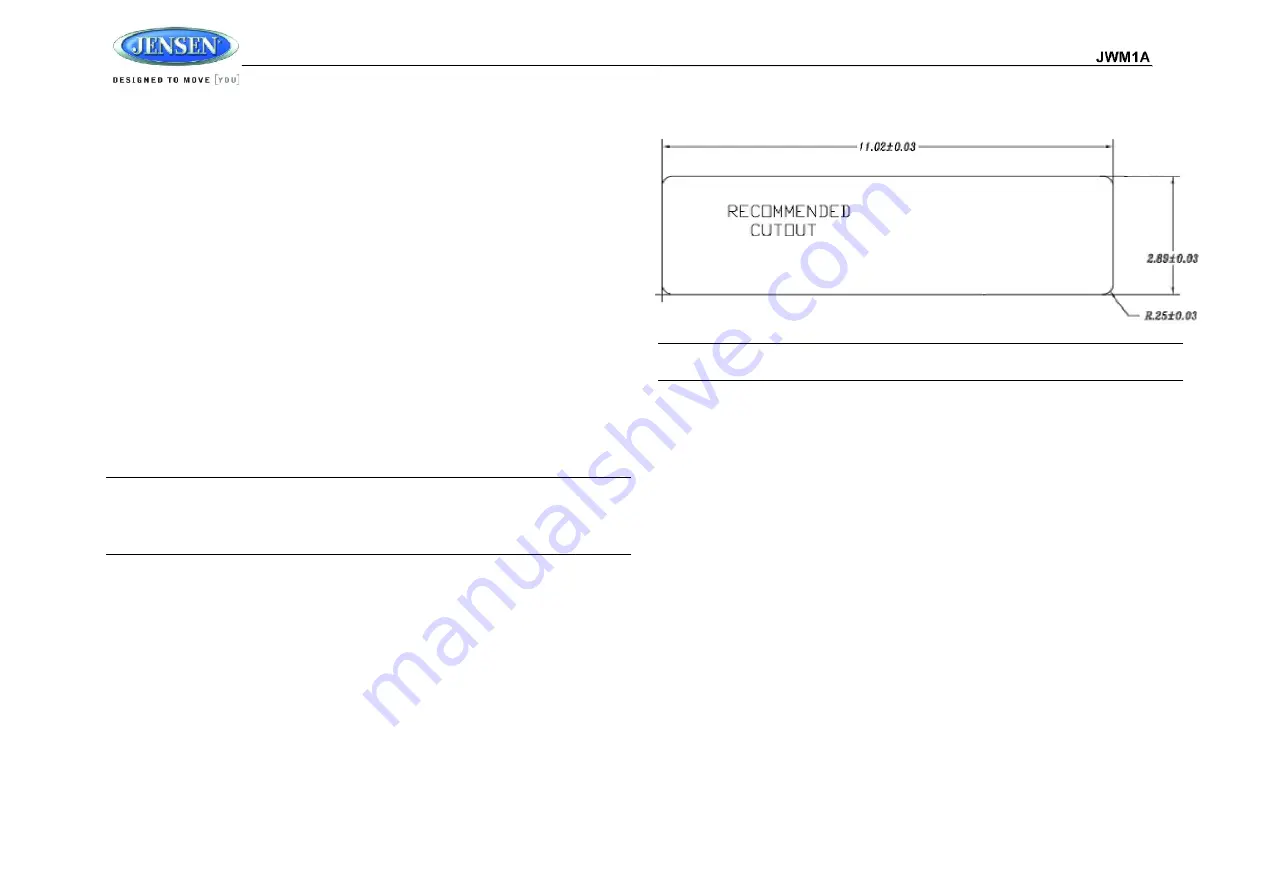
Use the mounting hole diagram to measure and cut a mounting hole 


Route power, speakers, AV, and antenna cables through the hole and connect 


Check and ensure correct operation 


Mount the unit using four M3x20mm (3/32 x 0.75”) screws 


Attach Trim ring 


NOTE: Before cutting the mounting hole, make sure the area behind the mounting location 
is clear of wires, fuel and vacuum or brake lines. 


Summary of Contents for JWM1A

Page 1: ...JWM1A MOBILE AUDIO SYSTEM Owner s Manual ...

Page 2: ...JWM1A ii CONTENTS Introduction 3 Installation 4 Wiring 5 Basic Operation 6 Tuner Operation 7 Bluetooth Operation 8 APP Operation 9 Specifications 9 ...

Page 3: ... 4 Speaker Output 2 zones Precautions Use the Proper Power Supply This product is designed to operate with a 12 volt DC negative ground battery system the standard system in a North American vehicle Use Authorized Service Centers Do not attempt to disassemble or adjust this precision product contact a professional for assistance Avoid Moisture To reduce the risk of fire or electric shock do not ex...

Page 4: ...e equipped with an on board drive or navigation computer do not disconnect the battery cable If the cable is disconnected the computer memory may be lost Under these conditions use extra caution during installation to avoid causing a short circuit Selecting the Mounting Location Select a mounting location taking care to avoid the following Places exposed to heat radiating appliances such as electr...

Page 5: ... A N A 2 N A N A 3 N A N A 4 N A N A 5 N A N A 6 GRAY RIGHT A SPEAKER 7 GRAY BLACK RIGHT A SPEAKER 8 N A N A 9 WHITE BLACK LEFT A SPEAKER 10 WHITE LEFT A SPEAKER 11 N A N A 12 N A N A 13 N A N A 14 BLUE AMP REMOTE 12VDC 100MA 15 RED 12VDC SWITCHED 16 BLACK GROUND 17 VIOLET RIGHT B SPEAKER 18 VIOLET BLACK RIGHT B SPEAKER 19 LIGHT GREEN BLACK LEFT B SPEAKER 20 LIGHT GREEN LEFT B SPEAKER ...

Page 6: ...will automatically turn off the JWM1A in the designated number of minutes To set the Sleep Time press VOL repeatedly to change the sleep time from 0 off 15 30 or 60 minutes Setting the alarm Alarm ON OFF Press VOL to turn on and off the alarm The ALARM icon will show on the display Alarm Hour The number representing the hours will flash Press VOL to adjust the alarm hour Alarm MIN The number repre...

Page 7: ...buttons to tune the frequency one step higher or lower Press and hold to seek tune to next strong station Preset Stations Six numbered preset buttons store and recall stations for each AM and FM band Store Preset Stations Select a band if needed then select a station Hold a preset button for one second The current station will be stored and the corresponding preset number will appear in the displa...

Page 8: ...IO is displayed on the LCD Selecting Tracks During playback press the tune up 1 or tune down 2 to play the previous or next track Pausing Playback During playback press the number button 1 to pause the BT AUDIO player Press number button 1 again to resume playback If you change to another mode the mobile phone audio will pause Press the button 12 to return to BT mode and resume mobile phone audio ...

Page 9: ...uner Tuner Range 530 1710 kHz Sensitivity 30 μV Amplifier Output Power 4 x 6 Watts per Channel Output Impedance Compatible with 4 8 ohms speakers 4 ohm load minimum Total System Power 24 Watts Maximum Specifications subject to change without notice FCC Warnings Changes or modifications not expressly approved by the party responsible for compliance could void the user s authority to operate the equ...

Page 10: ......

Reviews: