background image

JWM40

19

CARE AND MAINTENANCE

Keep the product dry. If it does get wet, wipe it dry immediately. Liquids might

contain minerals that can corrode the electronic circuits.

Keep the product away from dust and dirt, which can cause premature wear of

parts.

Handle the product gently and carefully. Dropping it can damage circuit boards

and cases, and can cause the product to work improperly.

Wipe the product with a dampened cloth occasionally to keep it looking new. Do

not use harsh chemicals, cleaning solvents, or strong detergents to clean the

product.

Use and store the product only in normal temperature environments. High

temperature can shorten the life of electronic devices, damage batteries, and

distort or melt plastic parts.

Ignition

The most common source of noise in reception is the ignition system. This is a result
of the radio being placed close to the ignition system (engine). This type of noise can
be easily detected because it will vary in intensity of pitch with the speed of the
engine.
Usually, the ignition noise can be suppressed considerably by using a radio
suppression type high voltage ignition wire and suppressor resistor in the ignition
system. (Most vessels employ this wire and resistor but it may be necessary to check
them for correct operation.) Another method of suppression is the use of additional
noise suppressors. These can be obtained from most CB/A radio or electronic supply
shops.

Interference

Radio reception in a moving environment is very different from reception in a
stationary environment (home). It is very important to understand the difference.
AM reception will deteriorate when passing under a bridge or when passing under
high voltage lines. Although AM is subject to environmental noise, it has the ability to
receive at great distance. This is because broadcasting signals follow the curvature of
the earth and are reflected back by the upper atmosphere.
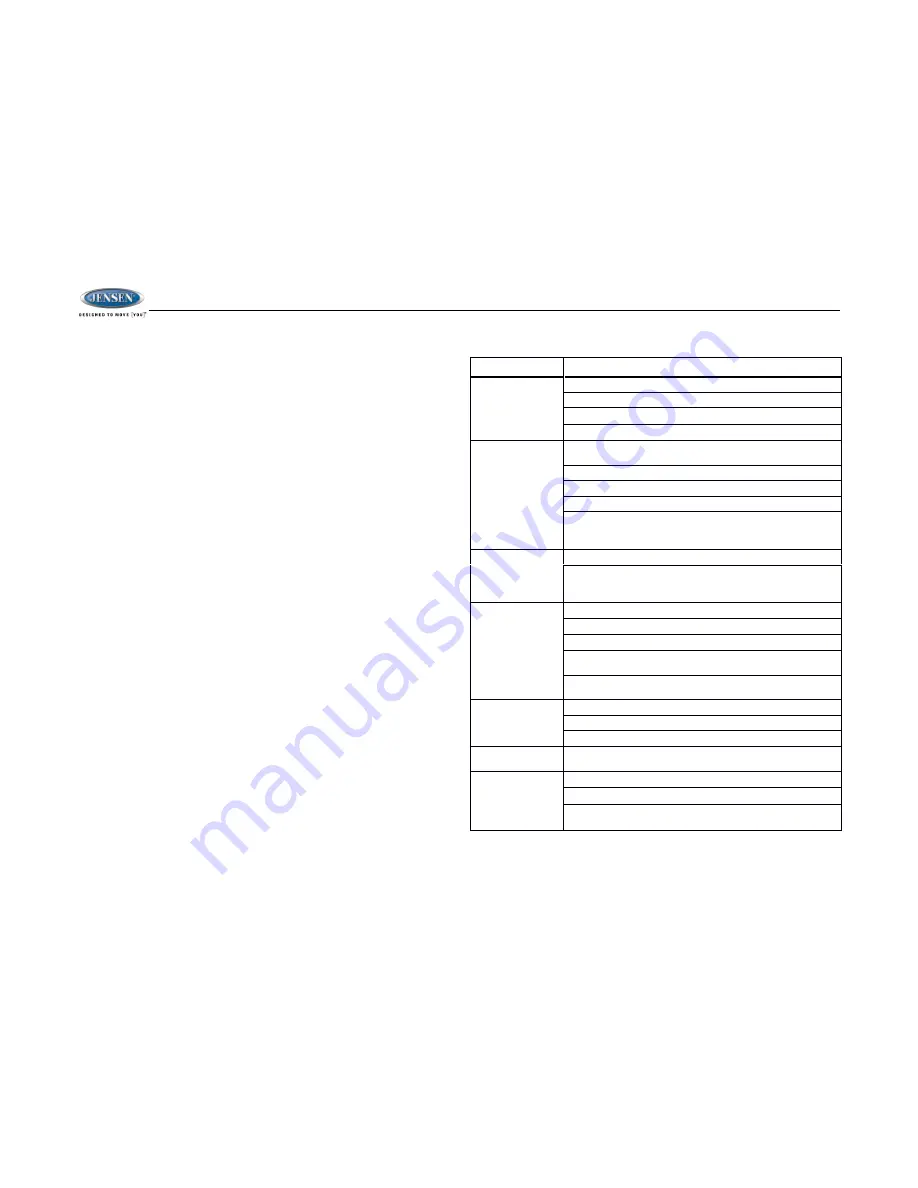
TROUBLESHOOTING

Symptom

Solution

Radio will not turn
ON or No front panel
operation

Try the reset button.
Check fuse.
Check 12V+ on accessory wire to radio (RED wire)
Check Ground.

Radio turns ON, but
no sound

Verify Volume, Fader/Balance, Mute controls are set correctly (see
owner's manual).
Try the reset button.
Verify proper speaker selection.
Verify proper speaker connections.
Check for shorts or open circuits on speaker wires.

If short on “A” channel, “B” channels will continue to function.

If short on “B” channels, “A” channel will continue to function.

CD/DVD does not
load fully

Make sure unit has power and no other CD/DVD is currently inside.
Make sure transport screw has been removed from rear of unit. Disc
will load for several seconds and then eject if transport screw has not

been removed.

CD/DVD does not
play correctly

Check to make sure disc is inserted correctly.
Verify disc is free from dirt, scratches, etc.
Check with factory CDs.
Inspect radio's chassis to verify shipping screw(s) have been
removed.
Check factory original CDs for compatibility warnings (due to various

copy-protection, multimedia content, etc.).

No AM or FM
reception

Verify you are tuned to a valid station.
Check your antenna connection on rear of stereo.
Try a different antenna

DVD plays sound but
no video

Make  sure  the  HDMI  cable  is  routed  from the  HDMI  output  to  the
input on the television.

Unit does not

respond to Remote
Control

Verify that you have a clear line of sight for the IR signal.
Check the batteries.
Confirm the remote IR sensor in plugged into IR input (if
applicable).

Summary of Contents for JWM40

Page 1: ...JWM40 MOBILE AUDIO SYSTEM Installation and Owner s Manual...

Page 2: ...Wiring 4 Basic Operation 5 Tuner Operation 8 Disc Operation 9 CD Operation 9 DVD VCD Operation 10 MP3 USB Operation 12 Bluetooth Operation 14 Remote Control Operation 16 DVD Settings 18 Care and Main...

Page 3: ...inserting any foreign objects into the slot of this player Failure to observe this may cause malfunction due to the precise mechanism of this unit Use Authorized Service Centers Do not attempt to dis...

Page 4: ...alized Disc Maintenance A dirty or defective disc may cause sound dropouts while playing Before playing wipe the disc using a clean cloth working from the center hole towards the outside edge Never us...

Page 5: ...cable prior to installation NOTE If the JWM40 is to be installed in a vehicle equipped with an onboard drive or navigation computer do not disconnect the battery cable If the cable is disconnected the...

Page 6: ...s available to use with your system DETAIL A SHOWN FROM PIN VIEW PIN NO WIRE COLOR DESCRIPTION 1 VIOLET BLACK REAR RIGHT SPEAKER 2 VIOLET REAR RIGHT SPEAKER 3 GREEN REAR LEFT SPEAKER 4 GREEN BLACK REA...

Page 7: ...DVD BT USB or auxiliary input mode Press again to restore the previous volume level Liquid Crystal Display LCD The liquid crystal display LCD panel 20 displays the frequency time and activated functio...

Page 8: ...back begins automatically Press the USB button 12 to switch to USB mode from another source Refer to MP3 USB Operation on page 12 for additional operating instructions NOTE USB will not support Apple...

Page 9: ...owing reasons Initial installation of the unit when all wiring is completed Function buttons do not operate Error symbol on the display Use a ball point pen or similar object to press the RESET button...

Page 10: ...FM band Store a Station Select a band if needed Press a 1 6 preset button to select the corresponding stored station Automatically Store Preset Scan AS PS Automatically Store Select an AM or FM band P...

Page 11: ...r PLAY Press the button on the control panel 3 or remote control 17 to end fast forward or reverse and resume normal playback Repeat RPT Press the 4 button 33 during disc play to access the repeat fun...

Page 12: ...the or buttons 5 2 to advance to the next or previous track on the disc The selected track number will appear on the display Enter Select While in menu mode press the ENTER button 4 to select a menu...

Page 13: ...mber 01 indicates the current chapter that is currently playing The second number 01 indicates the number of available chapters Remote Control Direct Track Entry To select a track directly use the num...

Page 14: ...reen will appear on your output monitor Select one of these icons to access the corresponding media on your disc or USB device If the media type is not present the icon will not be selectable Audio Ph...

Page 15: ...control The On Screen Display information will appear with the track number highlighted 2 Use the number keys on the remote control to enter the 3 digit track number directly i e for track 10 enter 01...

Page 16: ...ton to choose Lock Unlock Connect Disconnect or Delete for this device Bluetooth Pair BT Pair Press and hold the BT button for about 4 seconds to start pairing with a Bluetooth Disconnect To disconnec...

Page 17: ...hange to another mode the mobile device audio will pause Press the BT button 10 to return to Bluetooth mode and resume mobile phone audio playback NOTE If a Bluetooth device is disconnected due to the...

Page 18: ...View SETUP menu 10 Subtitle Choose subtitle language if available 11 Mute LOUD Silence Audio output Press and hold to turn LOUDNESS feature on off Silence Audio output Press and hold to turn LOUDNESS...

Page 19: ...ptions 24 GOTO Select exact time track or chapter for playback Select exact time track or chapter for playback 25 Display Display current playback information on the screen Display current playback in...

Page 20: ...nglish Chinese Japanese French Spanish Portuguese Latin or German Subtitle Language On Off Menu Language English Chinese Japanese French Spanish Portuguese Latin or German Password 4 digit password Ra...

Page 21: ...ng under a bridge or when passing under high voltage lines Although AM is subject to environmental noise it has the ability to receive at great distance This is because broadcasting signals follow the...

Page 22: ...ce in a residential installation This equipment generates uses and can radiate radio frequency energy and if not installed and used in accordance with the instructions may cause harmful interference t...

Page 23: ...ASA Electronics Corporation www asaelectronics com www jensenheavyduty com 2017 ASA Electronics Corporation v 201217...

Reviews: