background image

VM9020TS

12

submenu appears in a second row with the selected 
option highlighted in light blue.

2.

Select a new value by pressing the 

 or 

 buttons (14, 

22) on the remote control or the   or   buttons (6, 7) on 
the joystick.

3.

Confirm your selection by pressing the 

, or 


buttons (14, 17, 19) on the remote control, or the   or   
button (8, 9) on the joystick. The new value is 
highlighted in light blue and setup is complete. 

Exiting the System Setup Menu

To exit setup mode and resume normal playback, press the 

SYS SETUP

 button (31) on the remote control or the 

DISP


button (13) on the front panel.

MULTI-ZONE OPERATION

Independent sources can be played simultaneously on the 
VM9020TS. For example, a video game console can be seen 
on the front screen while DVD video is available to rear 
passengers. For example, DVD is selected as the front 
source and SD Card is selected for the rear source or SD 
Card is selected as the front source and DVD is selected for 
the rear source. In the first case, both sources will switch to 
SD Card. In the second case, both sources will switch to the 
DVD source because the multimedia processor is shared 
between optical and SD Card media. 

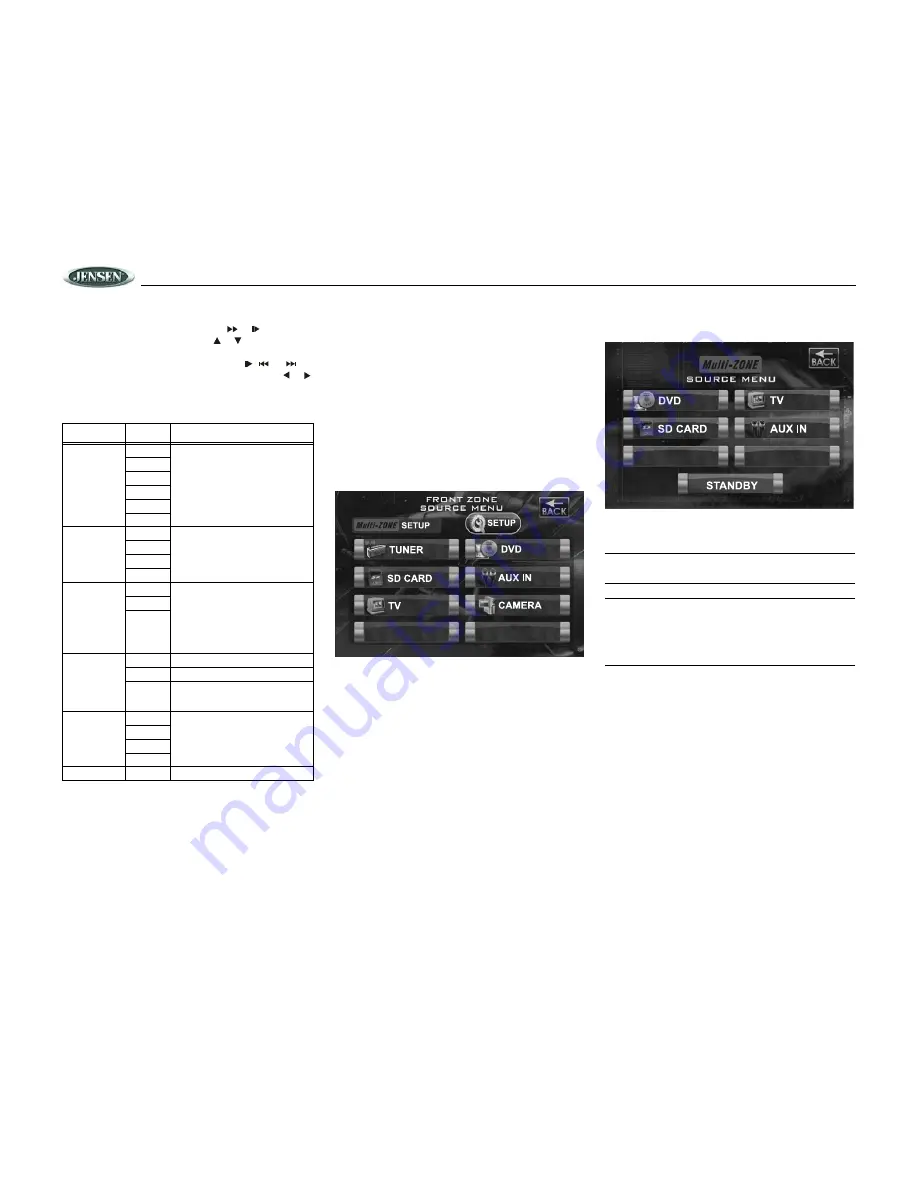
Selecting a Source for the Front Zone

To access the FRONT ZONE SOURCE MENU, touch the 
TFT screen in the top left corner of the screen. 

This menu allows you to select a source for the front zone.

Selecting a Source for the Rear Zone

To access the rear zone SOURCE MENU, touch the top right 
corner of the screen, near the Multi-ZONE icon.

Select the source to be directed to the rear Multi-ZONE RCA 
outputs. 

NOTE: Optical media and an SD Card cannot be selected 
from the Multi-ZONE Source Menu icon simultaneously.

NOTE: The AM/FM tuner graphics will change to a "blue 
screen" background when any optical or SD Card media 
is selected from the Multi-ZONE menu. In addition, only 
the top left (Front Zone Source Menu) and right (Multi-
ZONE Source Menu) quadrants of the touch screen are 
active during this mode of operation. 

Table 7: ASP Config Menu Features

Setting

Options

Function

Bass Center 
Freq

60Hz

According to the audio source, select 
the Bass Center Frequency to 
achieve the best Bass effect.

80Hz

100Hz

130Hz

150Hz

200Hz

Treble Center 
Freq

10KHz

According to the audio source, select 
the Treble Center Frequency to 
achieve the best Treble effect.

12.5KHz

15KHz

17KHz

Sub.W Filter

80Hz

Selecting a crossover frequency sets 
a cut-off frequency of the subwoofer's 
LPF (low-pass filter) and the 
“SMALL” speakers' HPF (high-pass 
filter). The Crossover frequency set-
ting has no effect if the subwoofer is 
set to “OFF” and any other speaker is 
set to “LARGE”.

120Hz

160Hz

Sub.W Phase

0D

Subwoofer output IN phase

180D

Subwoofer output OUT OF phase

NOTE: Depending on your installa-
tion, reversing the subwoofer phase 
may increase Bass output.

Bass Q-Factor

1.0

When the Bass Center Frequency is 
selected, adjusting the Bass Q-Fac-
tor alters the sharpness of the Bass 
output.

1.25

1.5

2.0

BACK

Return to previous menu.

Summary of Contents for Mobile Multimedia DVD/MP3/WMA Receiver VM9020TS

Page 1: ...VM9020TS Operation Manual...

Page 2: ...o Tuning 13 Manual Tuning 13 Using Preset Stations 13 Auto Store AS 13 Local Radio Station Seeking LOC 13 DVD Player Operation 14 Opening Closing the TFT Video Screen 14 Insert Eject Disc 14 Ejecting...

Page 3: ...severest road conditions Tools and Supplies You will need these tools and supplies to install your VM9020TS Torx type flat head and Philips screwdrivers Wire cutters and strippers Tools to remove exis...

Page 4: ...e new radio assembly to the dashboard or center console using the reverse procedure in step 1 CAUTION For proper operation of the CD player the chassis must be mounted within 30 of horizontal Make sur...

Page 5: ...1 7 7 7 7 5 5 5 5 3853 3853 3853 3853 8 7 77 5 77 5 1 7 21 6 7 1 7 21 6 7 5 5 2 2 2 2 BROWN BROWN BROWN BROWN 52 1 52 1 7 5 86 7 5 86 PINK PINK GREEN WHITE GREEN WHITE 8 8 HDUER 6ZLWFK HDUER 6ZLWFK 5H...

Page 6: ...step MENU Mode Press once to move the cursor to the left TV Mode Press to go down one frequency step 9 Joystick DVD Mode Press once to enter the next chapter or track TUNER Mode Press once to auto sea...

Page 7: ...VM9020TS 5 CONTROLS AND INDICATORS 21 Disc Slot 22 Eject Button Press once to eject the disc Press and hold to reset the mechanism 23 Disc Indicator 24 SD Card Slot 25 Reset Button see page 4...

Page 8: ...angle ANGLE 12 Continuously adjusts front panel tilt angle Continuously adjusts front panel tilt angle Continuously adjusts front panel tilt angle Continuously adjusts front panel tilt angle ANGLE 13...

Page 9: ...6 7 8 9 0 Numeric Keypad 29 Directly accesses chapter 1 6 selects preset for current band Directly accesses track DVD SETUP 30 Access DVD Setup menu Access DVD Setup menu Access DVD Setup menu Access...

Page 10: ...or rear zone SUBTITLE 9 Language selection for subtitle 14 Fast forwards the disc content Fast forwards the disc content 17 Selects the previous track chapter for playback Selects the previous track c...

Page 11: ...NTRAST and TINT you must be in AUX or CAMERA mode NOTE The default adjustment is 0 in PAL mode Tint is unavailable for adjustment Parameter Adjustment Procedure 1 Enter Picture Quality Setting mode Pr...

Page 12: ...stical characteristics of your vehicle which vary depending on the type of vehicle and its measurements To get the best possible sound quality from your new system be sure to adjust the settings for t...

Page 13: ...cursor to the Hour or Min position 3 Press the or buttons 17 19 on the remote control or the or buttons 8 9 on the joystick to adjust the hour or minutes 4 Press the button 14 on the remote control t...

Page 14: ...Zone To access the rear zone SOURCE MENU touch the top right corner of the screen near the Multi ZONE icon Select the source to be directed to the rear Multi ZONE RCA outputs NOTE Optical media and a...

Page 15: ...ontrol or screen or the button on the joystick 8 to seek the next available radio station by decreasing the tuning frequency Press the button again to stop searching Manual Tuning Press the or buttons...

Page 16: ...creen or press the BAND button 20 on the remote control to stop DVD play Pausing Playback Touch the play pause button on the screen or press the button on the remote control 18 to suspend or resume di...

Page 17: ...able angles of the on screen image Zooming Press the ZOOM button 23 on the remote control to enlarge and pan through the video image using the following options Q1 Q2 Q3 and OFF Multi Language Discs D...

Page 18: ...is the current playing source for the rear zone EQ FLAT The equalizer setting is FLAT Loud Level 1 The Loud option is set to Level 1 loudness General Disc Information Front DVD Rear AUXIN SURR II DSP...

Page 19: ...th the selected option highlighted in light blue 2 Select a new value by pressing the or buttons 14 22 on the remote control or the or buttons 6 7 on the joystick 3 Confirm your selection by pressing...

Page 20: ...ter playback for low volumes On CNTR CTRL 5ms Adjust the time difference between the center and front speakers to create a time delay between 1 and 5 millisec onds producing a more accurate audio effe...

Page 21: ...sword field and enter a new one NOTE Record the password and keep it in a safe place for future reference The rating for each disc is marked on the disc disc packing or documentation If the rating is...

Page 22: ...lected MP3 WMA Discs This player allows you to playback MP3 files recorded on CD ROM CD R and CD RW For CD RW discs please make sure it is formatted using the full method and not the quick method to p...

Page 23: ...Repeat Folder Repeat Off Random Playback Press the RDM button 33 on the remote control or touch Random on the screen to activate random playback and play all tracks in random order Moving Through Cha...

Page 24: ...r decrease the TV frequency one step Storing Stations AS Automatic Preset Memory To select the strong stations in the current TV frequency range press and hold the joystick button 5 to activate the Au...

Page 25: ...t TFT MONITOR Monitor does not open automatically TFT Auto Open is turned off Turn TFT Auto Open on No image Incorrect connection to parking brake wire Check wiring and correct PRK SW is activated and...

Page 26: ...ould this occur the screen will not operate properly until the moisture has evaporated 8 We suggest you use a cleaning disc in this unit more frequently than in the unit in your home due to the enviro...

Page 27: ...le rates from 8 192kHz Electronic Skip Protection ESP 16Mbit high speed flash memory DVD 2 3 sec CD DA 10 sec MP3 100 sec WMA 200 sec ESP time is approximate Video Format NTSC PAL auto detection Outpu...

Page 28: ...D TO THE REPAIR OR REPLACEMENT PROVIDED ABOVE AND IN NO EVENT SHALL THE COMPANY S LIABILITY EXCEED THE PURCHASE PRICE PAID BY PURCHASER FOR THE PRODUCT This Warranty is in lieu of all other express wa...

Reviews: