background image

LISTENING TO A WEATHER CHANNEL

1) Weather Band

1

.

Press the      button to turn on the unit.

2

.

Tap the MODE button to select weather band until "WB" icon appears 

    steadily on display.
3

.

Tap the TUNE          button to select your local weather broadcasting.

4

.

Press the /- button to obtain the desired sound level.

5

.

To turn the radio off, press the        button.

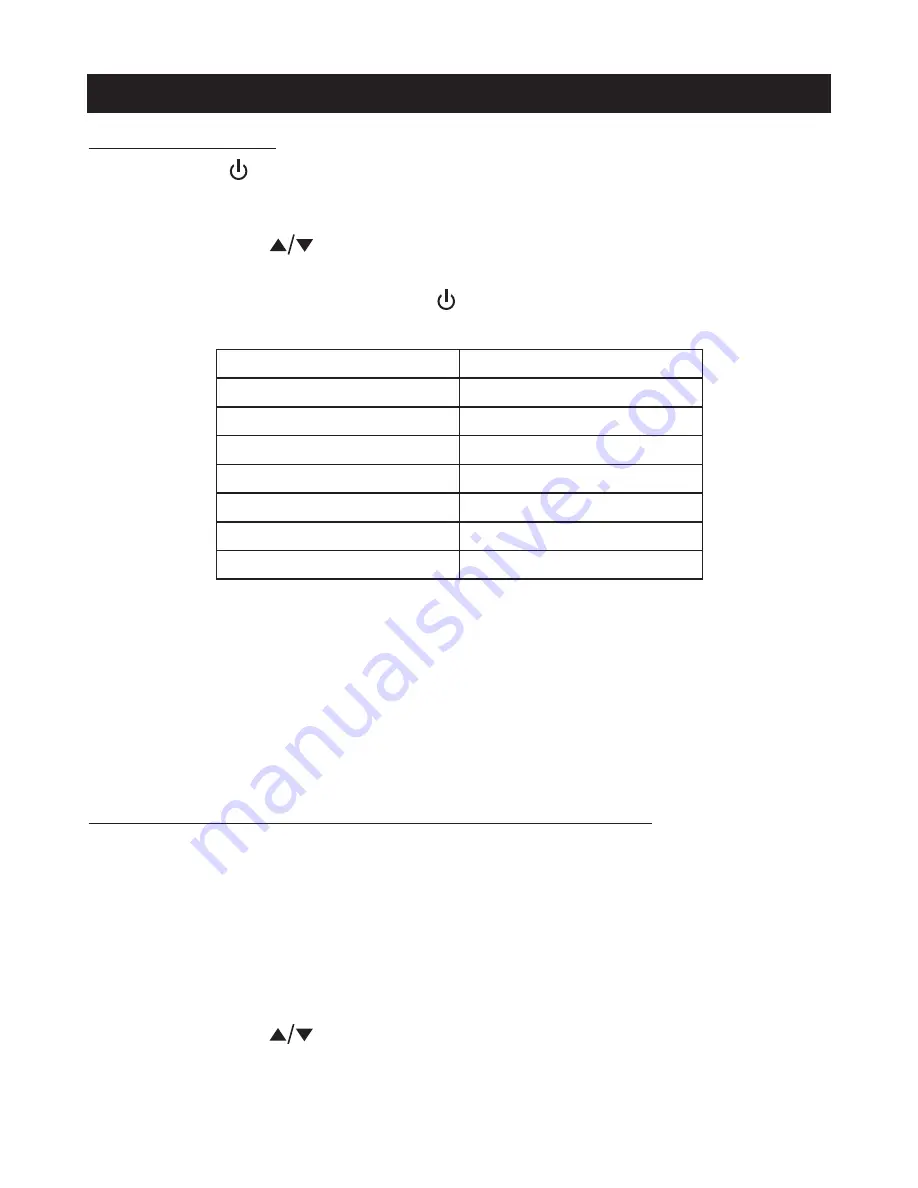
Weather Band Channel Frequency Table

CHANNEL

CH1

CH2

CH3

CH4
CH5

CH6
CH7

FREQUENCY(MHz)

162.400
162.425

162.450

162.475
162.500

162.525
162.550

Note:

 With regard to the NOAA Weather Band: You need to identify which 

band receives your local weather band report. When you change locations 
either to another city or state, you may need to choose a different band to 
get the local report in that location.

HINTS FOR BEST RECEPTION:

To insure maximum weather band reception, the Telescopic Antenna 
should be fully extended and rotated to obtain the best possible station 
reception. 

2) RECEIVING AN EMERGENCY WEATHER ALERT

The Weather Alert function allows you to set the weather radio to a standby 
mode that will turn the radio on automatically if there is a severe weather 
emergency in your area. To receive emergency weather alert warnings, 
turn the unit on, tune to the strongest local NOAA weather channel, adjust 
the volume to a level that you will hear when an alert is received. The radio 
remains silent until an “alert” broadcast occurs. 
1
    display steadily.

.

Tap the MODE button to select weather band until “WB” appears on 

2

.

Tap the TUNE         button to select your local weather station.

3

.

Tap the MODE button again to enter weather alert standby mode, WB 

    icon will be flashing. Unit will go on automatically when there is an alert 
    from the National Weather Service. 

10

Summary of Contents for MR-750

Page 1: ...R AM FM NOAA WEATHER BAND RADIO USER MANUAL MR 750 PLEASE READ THIS USER MANUAL COMPLETELY BEFORE OPERATING THIS UNIT AND RETAIN IT FOR FUTURE REFERENCE...

Page 2: ...a safe level Start your volume control at a low setting Slowly increase the sound until you can hear it comfortably and clearly and without distortion Once you have established a comfortable sound le...

Page 3: ...nded by the manufacturer 7 Do not install near any heat sources such as radiators heat registers stoves or other apparatus including amplifiers that produce heat 8 Only use attachments accessories spe...

Page 4: ...his equipment does cause harmful interference to radio or television reception which can be determined by turning the equipment off and on the user is encouraged to try to correct the interference by...

Page 5: ...el 6 LED Flashlight 7 Power On Standby button 8 Clock Radio Tune Down button 9 Volume Down Button 10 Radio Mode selection Clock Set button 11 Weather Alert Indicator 12 Speaker 2 Clock Radio Tune Up b...

Page 6: ...13 16 15 23 17 18 19 20 21 22 POWER SOURCE This radio is designed to operate on multiple power sources MPORTANT If you pull the insulation tab out to activate the internal rechargeable battery and the...

Page 7: ...and LED light do not work You may need to press the reset button if lithium battery is charged up by cranking but radio or LED light does not work 6 Press the Power On Standby button to turn on the un...

Page 8: ...ectly Wrong polarity may damage the unit AAA Note When switching the power source from internal lithium battery to the AAA batteries please make sure the unit is OFF and in standby mode You may encoun...

Page 9: ...ng Indicator will light indicating the unit is charging LOW BATTERY INDICATOR When using battery power to operate this unit and the battery power becomes weak the low battery icon will appear flashing...

Page 10: ...will stop on the first strong signal it finds 5 Press VOLUME button to obtain the desired sound level 6 Press the button on main unit to turn unit into standby mode after listenning The LCD backlight...

Page 11: ...OR BEST RECEPTION To insure maximum weather band reception the Telescopic Antenna should be fully extended and rotated to obtain the best possible station reception 2 RECEIVING AN EMERGENCY WEATHER AL...

Page 12: ...casts a test alert every Wednesday between 11 am and Noon To receive the broadcasts the radio must be within the range of the local broadcast site 10 40 miles depending on terrain and obstructions 3 W...

Page 13: ...ile charging the red Charging LED on back of the unit will be on It will turn to green when the battery is fully charged CHARGING YOUR SMART PHONE OR PORTABLE DEVICE This unit features a USB port for...

Page 14: ...conds before powering on the unit 5 In some cases the internal battery may not fully charge your portable device It s recommended that if you start to get intermittent charge indications unplug the de...

Page 15: ...f the unit 3 Clean your unit with a damp never wet cloth Solvent or detergent should never be used 4 Avoid leaving your unit in direct sunlight or in hot humid or dusty places CAUTION Never allow any...

Page 16: ...a AM reception is weak Relocate the position of the unit Unit in Weather Alert Mode Select AM FM or WB mode as desired Power is not on Unit is charging your portable device Recharge the built in recha...

Page 17: ...d within the U S A This warranty is not assignable or transferable Our obligation under this warranty is the repair or replacement of the defective unit or any part thereof except batteries when it is...

Page 18: ...state to state TO OBTAIN SERVICE please remove all batteries if any and pack the unit carefully and send it freight prepaid to SPECTRA at the address shown below IF THE UNIT IS RETURNED WITHIN THE WA...

Reviews: