background image

MSR2007

8

SIRIUS RADIO OPERATION

Switching to SIRIUS Mode (Requires Optional Sirius Tuner)

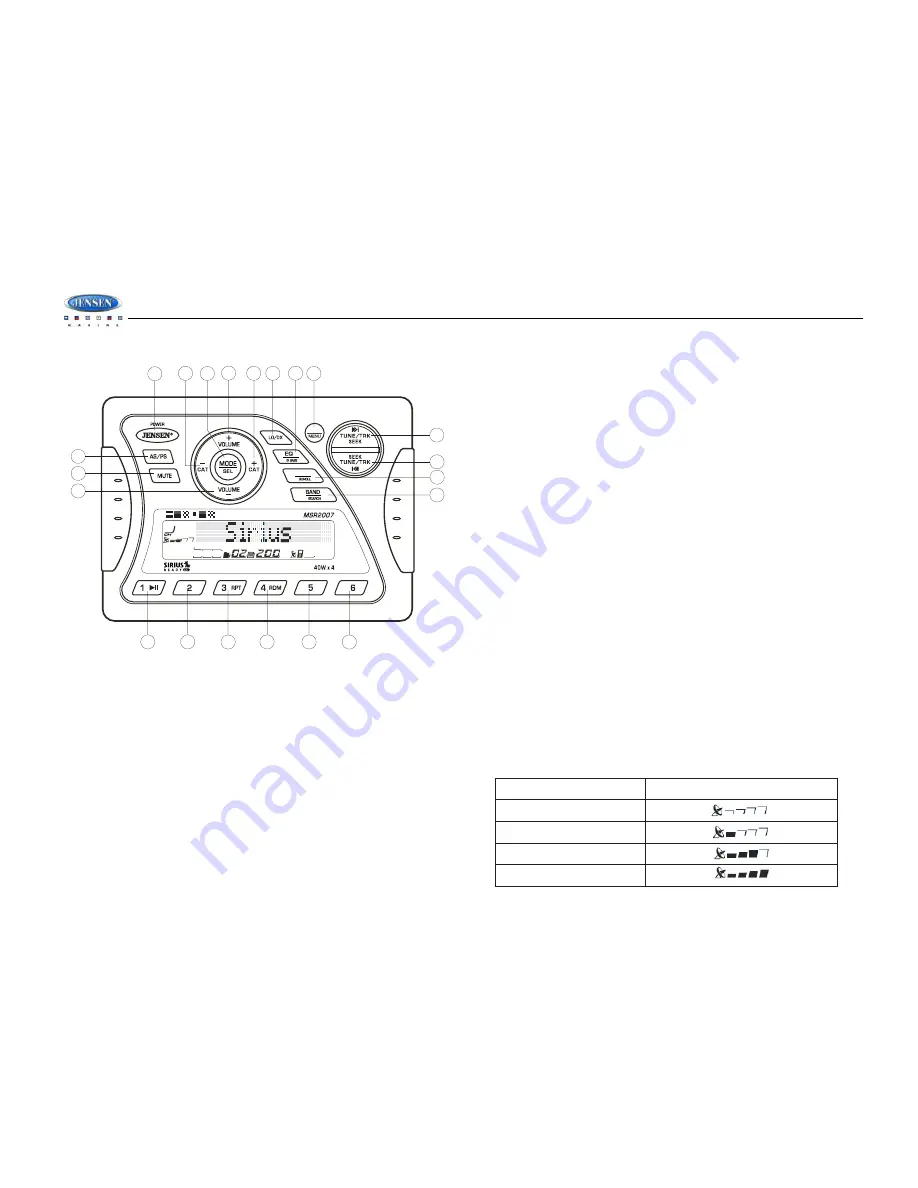
Press the 

MODE

 button (4) to change the mode to Sirius radio mode. 

Accessing your SIRIUS ID

1.

In Sirius mode, 

press and hold

 the 

BAND/SEARCH

 button (16) to select DIRECT mode.

2.

Press the 

MODE

 button (4) to activate Direct mode.

3.

Press the 

MODE

 button for each digit to enter “000”.

4.

Press 

MODE

 again to confirm. This will display the Sirius ID number for your tuner.

5.

The Sirius ID number will scroll twice and then freeze with the first 11 digits on the display. 
Press the 

INFO/SCROLL

 button (12) to display the remaining digit.

Selecting a Band

In Sirius mode, press the 

BAND

 button (16) to access the Sirius user-preset channel groups in 

the following order: SR-1, SR-2, SR-3.

Category Tuning

1.

Press the 

CAT - /+

 buttons (13/14) to change the category. Each category title and song 

title will be displayed in increments. 

2.

While in the category mode, press the 

CAT - /+

 buttons again to view category names. 

(The lowest channel number within the chosen category will always be the default first 
channel tuned.)

3.

Press the 

MODE

 button (4) or the 

TUNE/TRK


|<< / >>| 

buttons (18/19) to choose desired 

channels in that category.

4.

Press the 

TUNE/TRK

 buttons to select a channel within the chosen category.

5.

Press 

MODE

 to confirm channel selection.

Channel Up/Down Tuning

Press the 

TUNE/TRK


|<< / >>| 

buttons (18/19) to search for a channel. 

Press and hold

 the 

TUNE/TRK

 buttons to fast search.

Storing Preset Channels

The preset buttons (5-10) can be used to store 6 channels, allowing convenient access to your 
favorite channels.

Programming Channels 

1.

Select the channel you want to store in memory.

2.

Press and hold

 a preset button (5-10) until the corresponding preset button number 

appears. 

3.

Repeat steps 1 and 2 to program additional channels.

Quick Tuning

Press one of the six preset buttons (5-10) to select a preset channel directly.

Channel Direct Access Searching

1.

Press and hold

 the 

BAND/SEARCH

 button (16) to access Direct Tune mode. “DIRECT-T” 

appears on the display for a few seconds.

2.

Press the 

MODE

 button (4) to confirm.

3.

Press the 

TUNE/TRK |<< / >>|

 buttons (18/19) to move between the three digits.

4.

Use the 

/- 

buttons (2) to select a number for each position.

5.

Press the 

MODE

 button to confirm each digit. 

6.

Press the 

MODE

 button again to tune to the selected file.

Alternate Display Information

Press 

INFO/SCROLL

 button (12) to change the display information in the following order: 

ARTIST NAME > SONG TITLE > CATEGORY > CHANNEL NAME.

Satellite Signal Strength

The display will indicate satellite reception strength as shown below.

Signal Strength

Strength Display

No Signal

Weak

Good

Excellent

3

2a

4

11

12

13

14

15

16

17

1

2b

SAT

AUDIO

INFO

18

19

5

6

7

8

9

10

20

Summary of Contents for MSR2007

Page 1: ...MSR2007 Installation and Operation Manual MARINE AUDIO SYSTEM Manual del Usuario Guide d Utilisateur SAT AUDIO INFO...

Page 2: ...Seguridad 11 Instalaci n 12 Cableado 14 Operaci n B sica 15 Operaci n del Sintonizador 17 Operaci n de Radio Sirius 18 Operaci n del iPod 19 Cuidado y Mantenimiento 20 Soluci n de Problemas 20 Especi...

Page 3: ...LOCATIONS THAT MIGHT HINDER VEHICLE OPERATION Doing so may obstruct vision or hamper movement which can result in a serious accident INSTALL THE WIRING SO THAT IT IS NOT CRIMPED OR PINCHED BY SCREWS...

Page 4: ...terfere with driving and cannot injure passengers if there is a sudden or emergency stop Avoid installing the unit where it will be subject to high temperatures from direct sunlight hot air or from a...

Page 5: ...mplifier harness and cable throughout the vessel as required Keep some slack in the harness cables so it won t be too tight as this can cause damage to the wires 5 Follow the wiring diagram carefully...

Page 6: ...MSR2007 4 WIRING...

Page 7: ...function buttons do not operate error symbol on the display Use a ball point pin or thin metal object to press the RESET button located on the tuner box You can recover factory default settings using...

Page 8: ...he EQ button 11 to turn on the equalization function and select between five pre defined bass and treble curves OFF POP JAZZ CLASSIC BEAT ROCK iX Bass Press and hold the EQ IX BASS button 11 toggle lo...

Page 9: ...select six strong stations and store them in the current band The new stations replace any stations already stored in that band NOTE During Auto Store AS the tuner will default to Local mode while sca...

Page 10: ...tegory 5 Press MODE to confirm channel selection Channel Up Down Tuning Press the TUNE TRK buttons 18 19 to search for a channel Press and hold the TUNE TRK buttons to fast search Storing Preset Chann...

Page 11: ...Play During playback press the 3 RPT button 5 to repeat the current song Repeat will appear on the LCD Press 3 RPT again to stop repeat playback Random Play During playback press the 4 RDM button 7 to...

Page 12: ...is very different from reception in a stationary environment home It is very important to understand the difference AM reception will deteriorate when passing under a bridge or when passing under hig...

Page 13: ...N LUGARES QUE PUEDAN OBSTRUIR LA OPERACI N DEL VEH CULO Hacerlo puede obstruir la visi n u obstaculizar movimientos y puede provocar accidentes serios INSTALE EL CABLEADO DE TAL FORMA QUE NO SE DOBLE...

Page 14: ...manejo y no pueda herir a ning n pasajero si se frena repentinamente o de emergencia Evite instalar la unidad donde sea sometida a altas temperaturas debido a luz directa del sol aire caliente o del...

Page 15: ...v s del buque como sea necesario Mantenga el arn s cables algo flojo para que no est demasiado ajustado causando da os a los cables 5 Siga el diagrama de cableado detalladamente y aseg rese de que tod...

Page 16: ...LAMBRE DESCRIPCI N SALIDAS DE AUDIO DE BAJO NIVEL ALTAVOZ DELANTERO DERECHO ALTAVOZ TRASERO DERECHO ALTAVOZ TRASERO DERECHO SIN CONEXI N ALTAVOZ TRASERO IZQUIERDO ALTAVOZ TRASERO IZQUIERDO SALIDA DE A...

Page 17: ...or en pantalla Utilice un bol grafo o un objeto de metal delgado para presionar el bot n RESET ubicado en la caja del radio Usted puede volver a la configuraci n de f brica usando la funci n RESUME ub...

Page 18: ...to para LOW BATT es apagado OFF Si se enmudece un audio o el volumen est en 0 el bip audible no se escuchar Ecualizador Presione el bot n EQ 11 para encender la funci n de ecualizaci n y seleccionar e...

Page 19: ...leccionar autom ticamente seis estaciones fuertes y grabarlas en la banda actual Las nuevas estaciones reemplazan cualquier estaci n almacenada anteriormente en esa banda NOTA Durante el Grabado Autom...

Page 20: ...hacia Abajo Presione los botones TUNE TRK 18 19 para buscar un canal Mantenga presionado los botones TUNE TRK para b squeda r pida Guardando Canales Preseleccionados Los botones de preselecci n 5 10 s...

Page 21: ...Presione 3 RPT nuevamente para detener la repetici n Reproducci n Aleatoria Durante la reproducci n presione el bot n 4 RDM 7 para pasar todas las canciones de esa categor a en orden aleatorio La repr...

Page 22: ...asa Es muy importante entender la diferencia La recepci n AM se deteriorar cuando pase bajo un puente o cuando pase bajo l neas de alto voltaje A pesar que banda AM est sujeta a ruidos medioambientale...

Page 23: ...ger le produit NE PAS INSTALLEZ DANS DES ENDROITS OU CELA PEUT INTERFERE AVEC L OPERATION DU VEHICULE Cela peut faire obstacle la vision ou emp cher le mouvement et produire un accident s rieux INSTAL...

Page 24: ...pas avec la conduite et ne peut pas blesser les passagers lorsqu il y a un arr t abrupt Evitez d installer l appareil l o il sera sujet des temp ratures hautes venant des rayons de soleil directs de...

Page 25: ...ble du tuner amplificateur partout dans le vaisseau comme exig Gardez les c bles et le harnais rel ch s pour qu ils ne soient pas trop serr s comme cela peut endommager les c bles 5 Suivez le diagram...

Page 26: ...LEUR D AVANT GAUCHE HAUT PARLEUR D AVANT DROITE HAUT PARLEUR D AVANT DROITE PAS DE CONNECTION HAUT PARLEUR D ARRIERE GAUCHE HAUT PARLEUR D ARRIERE GAUCHE PAS DE CONNECTION LIGNE DE PRE AMPLIFICATEUR D...

Page 27: ...e tout le c blage est termin Les bouton de fonctions n op re pas Symbole d erreur sur l affichage Utilisez une bille ou un objet m tallique fin pour appuyez sur le bouton de r initialisation situ sur...

Page 28: ...lume est r gl 0 le bip audible ne sera pas entendu Egaliseur Appuyez sur le bouton EQ 11 pour mettre l galiseur en marche et pour s lectionner entre cinq courbes basse ou aigu pr d finies OFF POP JAZZ...

Page 29: ...ton AS PS 15 pendant plus de 3 secondes pour automatiquement s lectionner six stations fortes et les mettre en m moire dans la bande courante Les nouvelles stations remplacent les stations d j mises e...

Page 30: ...e cha ne Syntonisation de cha ne vers le haut vers le bas Appuyez sur le bouton TUNE TRK ou pour chercher une cha ne Appuyez et maintenez l appui sur le bouton TUNE TRK pour chercher rapidement Mise e...

Page 31: ...Appuyez de nouveau sur 3 RPT pour arr ter la r p tition de la reproduction Reproduction au hasard Pendant la reproduction appuyez sur le bouton 4 RDM 7 pour jouer toutes les chansons dans la cat gori...

Page 32: ...ement mobile est tr s diff rent de la r ception radio dans un environnement stationnaire Il est tr s important de comprendre cette diff rence La r ception AM va se d t riorer lorsque vous passez sous...

Page 33: ...MSR2007 31...

Page 34: ...ASA Electronics Corporation www asaelectronics com 2007 ASA Electronics Corporation v 030907...

Reviews: