background image

MSR7007

3

INSTALLATION

This unit is designed for installation in vessels with an existing standard size DIN radio 
opening. 

Before You Begin

1.

Disconnect Battery

Before you begin, always disconnect the battery negative terminal.

2.

Remove Transport Screw

Please remove the shipping screw before installation. If the screw is left in place, the CD 
mechanism will not operate.

Important Notes

Before final installation, test the wiring connections to make sure the unit is connected 
properly and the system works.

Use only the parts included with the unit to ensure proper installation. The use of 
unauthorized parts can cause malfunctions.

Consult with your nearest dealer if installation requires the drilling of holes or other 
modifications to your vessel.

Install the unit where it does not interfere with driving and cannot injure passengers if 
there is a sudden or emergency stop.

Avoid installing the unit where it will be subject to high temperatures from direct sunlight, 
hot air, or from a heater, or where it would be subject to excessive dust, dirt or vibration.

Install the unit within 30° of the horizontal plane.

DIN Front Mount

1.

Check the dashboard opening size by sliding the radio into it. If the opening is not large 
enough, carefully cut or file as necessary until the radio easily slides into the opening. 
Check that there will be sufficient space behind the dashboard for the radio chassis. Use 
the included drilling template to prepare the opening on a new mounting surface.

2.

Place the radio in front of the dashboard opening so the wiring can be brought through the 
DIN opening.

3.

Follow the wiring diagram carefully and make certain all connections are secure and 
insulated with crimp connectors or electrical tape to ensure proper operation. 

4.

After completing the wiring connections, turn the unit on to confirm operation (vehicle 
accessory switch must be on). If the unit does not operate, recheck all wiring until the 
problem is corrected. Once proper operation is achieved, turn the accessory switch off 
and proceed with final mounting of the chassis.

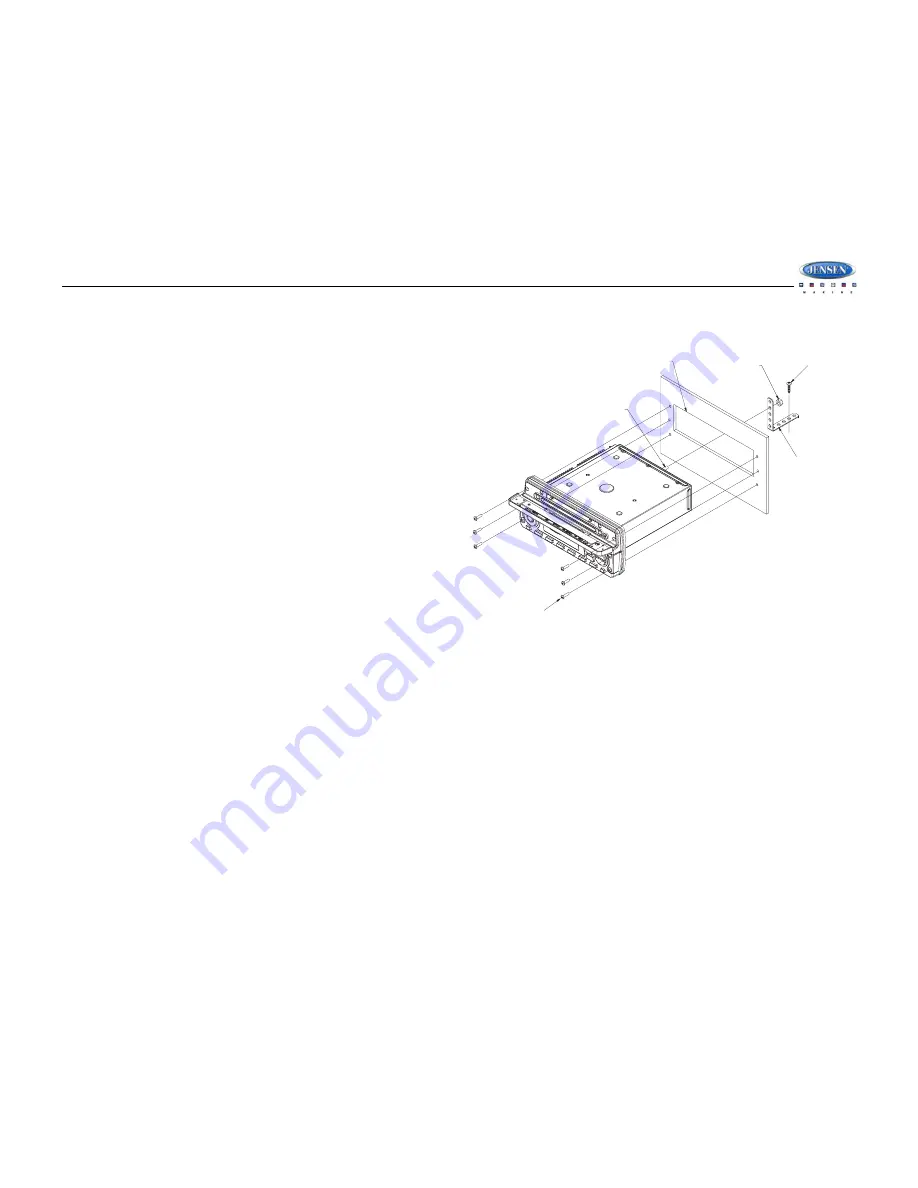
5.

Carefully slide the radio into the dashboard making sure it is right-side-up.

6.

Attach one end of the Perforated Support Strap (supplied) to the Rear Support Stud on 
the rear of the chassis using the M5 Mounting Nut provided. Fasten the other end of the 
perforated strap to a secure part of the dashboard either above or below the radio using 
the screw and plain washer provided. Bend the strap, as necessary, to position it. 

CAUTION: The perforated rear support strap must be used in the installation of the 
radio. Installation without the strap may result in damage to the radio or the 
mounting surface and void the manufacturer’s warranty

.

7.

Install the six #6 Stainless Steel Mounting Screws through the front of the radio into the 
dashboard. 

CAUTION: Radio must be secured using all 6 mounting points. Failure to do so may 
result in damage to the radio or dashboard.

8.

Test radio operation by referring to the operating instructions for the unit.

Reconnect Battery

When wiring is complete, reconnect the battery negative terminal.

#6 ROUND HEAD STAINLESS STEEL

MOUNTING SCREW (6-PLCS.)

MINIMUM SCREW LENGTH 1 1/2"

STANDARD SIZE DIN

REAR SUPPORT STUD

M5 MOUNTING NUT

PERFORATED REAR
SUPPORT STRAP

USED TO SECURE TO
SUB DASH STRUCTURE

Summary of Contents for MSR7007

Page 1: ...R7007 Installation and Operation Manual Waterproof AM FM RBDS WB CDP Sirius iPod Ready Marine Radio MODE MUTE PTY DISP SCROLL INFO Manual de la Instalación y Operación Guide d installation et d opération ...

Page 2: ...guridad 16 Instalación 17 Cableado 18 Operación Básica 19 Operación del Sintonizador 21 Operación del Equipo de CD MP3 23 Operación del Radio Satelital 24 Operación del iPod 25 Cuidado y Mantenimiento 26 Solución de Problemas 26 Especificaciones 27 TABLE DES MATIÈRES Fonctions du système 29 Information de sécurité 30 Installation 31 Câblage 32 Opération de base 33 Operation tuner 35 Opération plat...

Page 3: ...CD Player MP3 WMA Playback Capable iPod Ready Weatherband Tuner with Weather Alert Pre set Equalizer 5 settings Flat Rock Pop Classical Off Electronic Bass Treble Balance and Fader Controls Output Power 50W x 4 Clock CD Door Open Alarm Low Vehicle Battery Warning Wired Marine Remote Control Ready 4 Channel Pre amp Line Level Outputs 2 Wire Power OR Non Volatile Memory and Interior Power Clock Time...

Page 4: ...e s insulation from being cut by the metal edge of the hole It is also recommended to apply sealing caulk to any opening that may potentially allow water to enter Be sure to choose a location that is flat and has clearance above the unit to prevent any damage as well as allow for ventilation Before drilling any holes carefully inspect the area underneath and behind the mounting surface where the d...

Page 5: ...wiring can be brought through the DIN opening 3 Follow the wiring diagram carefully and make certain all connections are secure and insulated with crimp connectors or electrical tape to ensure proper operation 4 After completing the wiring connections turn the unit on to confirm operation vehicle accessory switch must be on If the unit does not operate recheck all wiring until the problem is corre...

Page 6: ...GHT LINE LEVEL OUT REAR LINE AUDIO NEGATIVE LEFT FRONT SPEAKER FRONT LINE AUDIO NEGATIVE FRONT RIGHT LINE LEVEL OUT FRONT LEFT LINE LEVEL OUT REAR LEFT LINE LEVEL OUT RIGHT FRONT SPEAKER RIGHT FRONT SPEAKER WIRE INSERTION VIEW NO CONNECTION NO CONNECTION POWER ANTENNA DESCRIPTION RED GRAY BLACK WHITE BLACK BLACK SHIELD GREEN BLACK VIOLET BLACK WIRE COLOR BLACK BLUE EMPTY RED gray wire EMPTY WHITE ...

Page 7: ...e audio menu items by pressing the AUDIO MENU button repeatedly Once the desired menu item appears on the display adjust that option by pressing the VOLUME buttons 2 within 5 seconds The unit will automatically exit the audio menu after five seconds of inactivity The following menu items can be adjusted Bass Level Use the VOLUME buttons 2 to adjust the Bass level range from 6 to 6 Treble Level Use...

Page 8: ... the LCD display NOTE OFF is the default setting for LOW BATT If the audio is muted or the volume is set to 0 the audible beep will not be heard Equalizer Press the EQ LOD button 11 to choose one of the following pre defined bass and treble curves OFF FLAT ROCK POP CLAS SIC Loudness Press and hold the EQ LOD button 11 toggle loudness on off When listening to music at low volumes this feature will ...

Page 9: ...4 to scan stations stored in the current band The unit will pause for 5 seconds at each preset station Press AS PS again to stop scanning when the desired station is reached RBDS Operation This unit is equipped to display RBDS Radio Broadcast Data Service information when broadcast by the radio station The following LCD indicators appear when data is received RBDS The current radio station is broa...

Page 10: ...our area How many stations can I expect to receive Since the broadcasts are local weather and information the transmission power is usually very low much less than standard AM or FM stations so you will usually receive only one station unless you are on the edge of two or more broadcast signals The most you will receive will be two or three and that is rare Is it possible I won t receive any stati...

Page 11: ...shuffled order Press and hold the 4 RDM button to randomly play all files in the current folder Press 4 RDM again to stop random play Folder Navigation MP3 Only Press the 5 DN button 9 to select folder down Press the 6 UP button 10 to select folder up MP3 Playback Notes on MP3 Playback Any directory that does not include an MP3 file is skipped Maximum number of folders 512 including skipped direct...

Page 12: ...nal channels Quick Tuning Press one of the six preset buttons 5 10 to select a preset channel directly Preset Scan Select a band Press AS PS 14 to scan stations stored in the current band The unit will pause for 10 seconds at each preset station Press AS PS again to stop scanning when the desired station is reached Preset Tuning Press and hold the AS PS button 14 to access Preset Tuning Mode In Pr...

Page 13: ...use will appear on the LCD Press 1 again to resume playback Repeat Play During playback press the 3 RPT button 5 to repeat the current song Repeat will appear on the LCD Press again to select Repeat All Press 3 RPT again to stop repeat playback Random Play During playback press the 4 RDM button 7 to play all songs in the current category in random order Random play will begin once the current song...

Page 14: ... environment home It is very important to understand the difference AM reception will deteriorate when passing under a bridge or when passing under high voltage lines Although AM is subject to environmental noise it has the ability to received at great distance This is because broadcasting signals follow the curvature of the earth and are reflected back by the upper atmosphere TROUBLESHOOTING Symp...

Page 15: ...N 30dB 4µV Image Rejection 45 dB Stereo Separation 25 dB AM MW Frequency Range USA 530 1710 kHz Frequency Range Europe 522 1620 kHz Sensitivity S N 20dB 36 dB General Operating Voltage DC 12 Volts Grounding System Negative Ground Speaker Impedance 4 8 ohms per channel Tone Controls Bass at 100 Hz 10 dB Treble at 10 kHz 10 dB Power Output 50W x 4 Current Drain 15 Ampere max Idle Standby Current 75m...

Page 16: ...MSR7007 14 ...

Page 17: ...A Compatible con iPod Radio de Banda del Tiempo Weatherband con Alertas de Tiempo Ecualizador Preconfigurado 5 configuraciones Plano Rock Pop Clásico Apagado Controles Electrónicos de Graves Agudos Balance Derecho Izquierdo y Balance Delantero Posterior Salida de Potencia 50W x 4 Reloj Alarma de Puerta Abierta de CD Advertencia de Batería Baja del Vehículo Compatible con Control Remoto Marino de C...

Page 18: ...se recomienda aplicar sellador en cualquier apertura que potencialmente pueda permitir el ingreso de agua Asegúrese de elegir una ubicación que sea plana y tenga lugar arriba de la unidad para prevenir cualquier daño como así también permitir la ventilación Antes de realizar algún agujero cuidadosamente inspeccione el área debajo y detrás de la superficie de montaje donde los dispositivos se fijar...

Page 19: ...r la abertura para el DIN 3 Siga el diagrama de cableado detalladamente y asegúrese de que todas las conexiones estén seguras y aisladas con conectores crimpados o cinta aisladora para asegurar la instalación adecuada 4 Luego de completar las conexiones del cableado encienda la unidad para confirmar la operación el interruptor accesorio del vehículo debe estar encendida Si la unidad no opera verif...

Page 20: ... de energía cambiada 12 voltios GRIS NEGRO GRIS VIOLETA VIOLETA NEGRO VACÍO VERDE VERDE NEGRO NEGRO PROTECTOR ROJO BLANCO BLANCO NEGRO AZUL ROJO NEGRO BLANCO cable MARRÓN BLANCO cable gris VACÍO VACÍO RED cable MARRÓN NEGRO PROTECTOR PIN DESCRIPCIÓN COLOR ALAMBRE ALTAVOZ DELANTERO DERECHO ALTAVOZ TRASERO DERECHO ALTAVOZ TRASERO DERECHO SIN CONEXIÓN ALTAVOZ TRASERO IZQUIERDO ALTAVOZ TRASERO IZQUIER...

Page 21: ...a en pantalla ajuste la opción presionando los botones de VOLUME 2 dentro de los 5 segundos La unidad automáticamente saldrá del menú de audio luego de cinco segundos de inactividad Se pueden ajustar los siguientes ítems del menú Nivel de Graves Bass Level Utilice los botones VOLUME 2 para ajustar el rango de nivel de Graves desde 6 a 6 Nivel de Agudos Treble Level Utilice los botones VOLUME para ...

Page 22: ... 30 segundos cuando el voltaje cae a 10 8V 0 03V Una advertencia visual LOW BATT aparecerá 8 destellos cada 30 segundos en la esquina inferior izquierda de la pantalla NOTA La configuración por defecto para LOW BATT es apagado OFF Si se enmudece el audio o el volumen está en 0 el bip audible no se escuchará Ecualizador Presione el botón EQ LOD 11 para elegir una de las siguientes curvas graves y a...

Page 23: ...ene por 5 segundos en cada estación potente Presione AS PS nuevamente para detener el escaneo cuando se alcanza la estación deseada Operación del Servicio de Transmisión de Datos de Radio RBDS Esta unidad está equipada para mostrar información RBDS Servicio de Transmisión de Información de Radio cuando la estación de radio lo emita Los siguientes indicadores aparecen en el LCD cuando se reciben da...

Page 24: ...n su área Cuántas estaciones puede recibir Debido a que los transmisores son tiempo e información locales la potencia de transmisión es usualmente muy baja mucho menos que las estaciones AM o FM por ello usualmente recibirá solo una estación a menos que esté en el borde de dos o más señales de transmisión Lo más que puede recibir serán dos o tres y eso es raro Es posible no recibir ninguna estació...

Page 25: ... orden aleatorio entremezclado Mantenga presionado el botón 4 RDM para pasar aleatoriamente todos los archivos en la carpeta actual Presione 4 RDM nuevamente para detener la ejecución aleatoria Navegación de Carpeta MP3 Solamente Presione el botón 5 DN 9 para seleccionar una carpeta hacia abajo Presione el botón 6 UP 10 para seleccionar una carpeta hacia arriba Reproducción de MP3 Comentarios sobr...

Page 26: ...ección 5 10 para seleccionar directamente un canal Escaneo Preseleccionado Seleccione una banda Presione el botón AS PS 14 para recorrer estaciones grabadas en la banda actual La unidad se detiene por 10 segundos en cada estación potente Presione AS PS nuevamente para detener el escaneo cuando se alcanza la estación deseada Sintonía de Estaciones Preseleccionadas Mantenga presionado el botón AS PS...

Page 27: ...l iPod En pantalla aparecerá Pause Presione nuevamente 1 para reasumir la reproducción Reproducción en Repetición Durante la reproducción presione el botón 3 RPT 5 para repetir la canción actual En pantalla aparecerá Repeat Presione 3 RPT nuevamente para detener la repetición Reproducción Aleatoria Durante la reproducción presione el botón 4 RDM 7 para pasar todas las canciones de esa categoría en...

Page 28: ... se deteriorará cuando pase bajo un puente o cuando pase bajo líneas de alto voltaje A pesar que banda AM está sujeta a ruidos medioambientales tiene la habilidad de recibir a gran distancia Esto es porque las señales de transmisión siguen la curvatura de la tierra y se rebotan de vuelta en la atmósfera superior SOLUCIÓN DE PROBLEMAS Problema Cause Solución No hay energía La fuente de energía cam ...

Page 29: ...Imagen 45 dB Separación Estérea 25 dB AM MW Cobertura de la Frecuencia USA 530 1710 kHz Cobertura de la Frecuencia Europe 522 1620 kHz Sensibilidad S N 20dB 36 dB General Voltaje de Funcionamiento DC 12 Volts Poner a Tierra el Sistema Tierra Negativa Impedancia del Altavoz 4 8 ohmios por el canall Controles del Tono Bajo at 100 Hz 10 dB Agudos at 10 kHz 10 dB Salida de Energía 40W x 4 Dren Eléctri...

Page 30: ...MSR7007 28 ...

Page 31: ...de reproduire MP3 WMA Prêt pour iPod Tuner weatherband avec alerte météo Egaliseur pré réglé 5 réglages Plat Rock Pop Classique en arrêt Contrôle électronique de basse aigu balance et équilibre Sortie puissance 50W x 4 Horloge Alarme de la fente CD ouverte Avertissement de la pile voiture en bas Prêt pour télécommande marine câblée Des sorties 4 chaînes niveau de ligne pré amplificateur Puissance ...

Page 32: ...pliquer le matage à une ouverture quelconque qui peut admettre l eau Soyez sûr de choisir un emplacement qui est plat et qui a suffisamment d espace audessus de l appareil pour éviter l endommagement et aussi permettre la ventilation Avant de percer des trous inspectez avec soin l endroit en dessous et derrière la surface de montage ou les engins seront montés pour être sûr que de tels perçage n i...

Page 33: ... puisse ramener le câblage à travers l ouverture DIN 3 Suivez le diagramme de câblage avec soin et assurez vous que tous les branchement sont sûrs et isolés avec des raccords à sertir ou avec du ruban isolant pour assurer une bonne opération 4 Après avoir terminé les branchements de câbles mettez l appareil en marche pour vérifiez l opération il faut que l interrupteur d accessoir du véhicule soit...

Page 34: ...RIERE HAUT PARLEUR D AVANT GAUCHE AUDIO NEGATIF LIGNE AVANT AVANT DROITE SORTIE NIVEAU DE LIGNE AVANT GAUCHE SORTIE NIVEAU DE LIGNE NIVEAU LIGNE ARRIERE GAUCHE EN MARCHE HAUT PARLEUR D AVANT GAUCHE HAUT PARLEUR D AVANT DROITE VUE INSERTION DE FIL PAS DE CONNECTION PAS DE CONNECTION ANTENNE DE PUISSANCE DESCRIPTION ROUGE GRIS NOIR BLANC NOIR NOIR SHIELD VERT NOIR VIOLET NOIR NOIR BLEU VIDE ROUGE fi...

Page 35: ...nt de manière répétée sur le bouton AUDIO MENU Lorsque l article du menu désiré apparaît dans l affichage ajustez cette option là en appuyant sur les boutons VOLUME 2 dans 5 secondes L appareil va automatiquement quitter le menu audio au bout de 5 secondes d inactivité Les articles du menu suivants peuvent être ajustés Niveau de basse Utilisez les boutons de VOLUME 2 pour ajuster le niveau de bass...

Page 36: ...dans le coin gauche en bas de l affichage aux cristaux liquides A noter OFF est le réglage par défaut pour LOW BATT Si l audio est assourdi ou le volume est réglé à 0 le bip audible ne sera pas entendu Egaliseur Appuyez sur le bouton EQ LOD 11 pour choisir une des courbes aigu ou basses prédéfinies OFF FLAT ROCK POP CLASSIC Intensité Loudness Appuyez et maintenez l appui sur le bouton EQ LOD pour ...

Page 37: ... moire dans cette bande Balayage des pré réglés Sélectionnez une bande Appuyez sur AS PS pour balayer les stations mise en mémoire dans la bande actuelle L appareil va faire pause pendant 5secondes à chaque station pré réglées Appuyez de nouveau sur AS PS pour arrêter le balayage lorsque la station désirée est atteinte Opération RBDS Cet appareil est équipé pour afficher de l information RBDS Radi...

Page 38: ...ns puis je recevoir Puisque les transmissions comportent la météo locale et les informations la puissance de transmission est normalement très basse beaucoup moins que les stations AM et FM standardisées de sorte que vous ne receviez qu une station à moins que vous ne soyez au point d intersection de deux signaux émis Le maximum que vous pouvez recevoir sera deux ou trois et cela est aussi très ra...

Page 39: ...sard Appuyez sur le bouton 4 RDM 7 pour jouer toutes les pistes dans un ordre mélangé Appuyez et maintenez l appui sur le bouton 4 RDM pour jouer tous les fichiers dans le dossier courant Appuyez de nouveau sur le bouton 4 RDM pour arrêter la reproduction au hasard Navigation du dossier MP3 uniquement Appuyez sur le bouton 5 DN 9 pour sélectionner un dossier vers le bas Appuyez sur le bouton 6 UP ...

Page 40: ...pour sélectionner une chaîne pré réglée directement Balayage des pré réglés Sélectionnez une bande Appuyez sur le bouton AS PS 14 pour balayer les stations mise en mémoire dans cette bande L appareil va faire pause pendant 10 secondes à chaque station pré réglées Appuyez de nouveau sur le bouton AS PS pour arrêter le balayage lorsque la station désirée est atteinte Syntonisation des pré réglés App...

Page 41: ...ppuyez sur le bouton 3 RPT 5 pour répéter la chanson actuelle Repeat va apparaître sur l affichage aux cristaux liquides Appuyez de nouveau sur 3 RPT pour arrêter la répétition de la reproduction Reproduction au hasard Pendant la reproduction appuyez sur le bouton 4 RDM 7 pour jouer toutes les chansons dans la catégorie actuelle dans un ordre mélangé La reproduction au hasard commencera dès que la...

Page 42: ... de comprendre cette différence La réception AM va se détériorer lorsque vous passez sous un pont ou sous les lignes de haut voltage Bien que AM soit sujet à des bruits environnementaux il a la capacité de recevoir à une grande distance Ceci parce que les signaux de transmission suivent la courbe de la terre et sont réfléchis par l atmosphère supérieur DÉPANNAGE Symptôme Cause Solution Pas de puis...

Page 43: ...5 dB AM MW Chaîne de Fréquence USA 530 1710 kHz Chaîne de Fréquence Europe 522 1620 kHz Sensibilité S N 20dB 36 dB Généralités Tension d Opération DC 12 Volts Fondre le Système La Terre Négative Impédance de Haut Parleurs 4 8 4 ohms par canal Commandes de Tonalité Basse at 100 Hz 10 dB Aigu at 10 kHz 10 dB Rendement de Puissance 40W x 4 Drainage Courant 15 Ampere max Commandant Dimensions 5 15 W x...

Page 44: ...ASA Electronics Corporation www asaelectronics com 2007 ASA Electronics Corporation v 062107 ...

Reviews: