14
Te
chnical User
GB
FOR FREE ADVICE ON THE USE OF THIS PRODUCT, PLEASE CONTACT OUR SALES SUPPORT TEAM
Jenx Limited, Wardsend Road, Sheffield, S6 1RQ, Tel: +44 (0)114 285 3376 Fax: +44 (0)114 285 3528 info@jenx.com www.jenx.com
CAUTION:
Do not loosen the bolt in (
fig 15)
by more than 2 full turns as this may result in the
footplate becoming detached from the chair.
Do not use
this product if you suspect the
Lumbar Support Pad
or the
Footplates & Sandals
are faulty or
broken. Contact Jenx Limited immediately for advice. +44 (0) 114 285 3376
NEVER LEAVE YOUR CHILD UNATTENDED WHILE USING THIS PRODUCT
The Lumbar Support Pad
HOW?
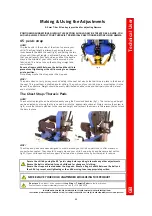
The lumbar support pad can be adjusted by loosening
the clamp with the Allen key as shown in
(fig 14).
Set the
height, depth and angle as required and re-tighten the
clamp.
WHY?
The lumbar support pad helps to support and maintain the correct position of the pelvis. By making
sure that this pad is set correctly your child’s posture can be managed more effectively.
The Footplates & Sandals
HOW?
To set the height and angle of the footplate, loosen the clamp shown in
(fig 15)
with the Allen key, set
the footplate to the required position and re-tighten the clamp. By loosening the wing nut underneath
the sandal as shown in (
fig 16a)
you can position the sandal anywhere on the surface of the footplate
and you can also rotate it to any angle.
If the footplates are not required they can be flipped up out of the way by pulling the lever
(fig 16b)
and
lifting the footplate upwards.
Making & Using the Adjustments
WHY?
You can set the footplate and sandals to suit your child’s specific therapeutic needs. You can create plantar
flexion/dorsi flexion, internal and external rotation and thereby correct the position of the feet.
Fig 14
Fig 15
Fig 16a
Fig 16b


