background image


19

jenx.com

Multistander

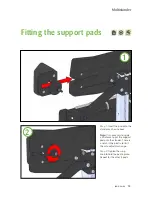
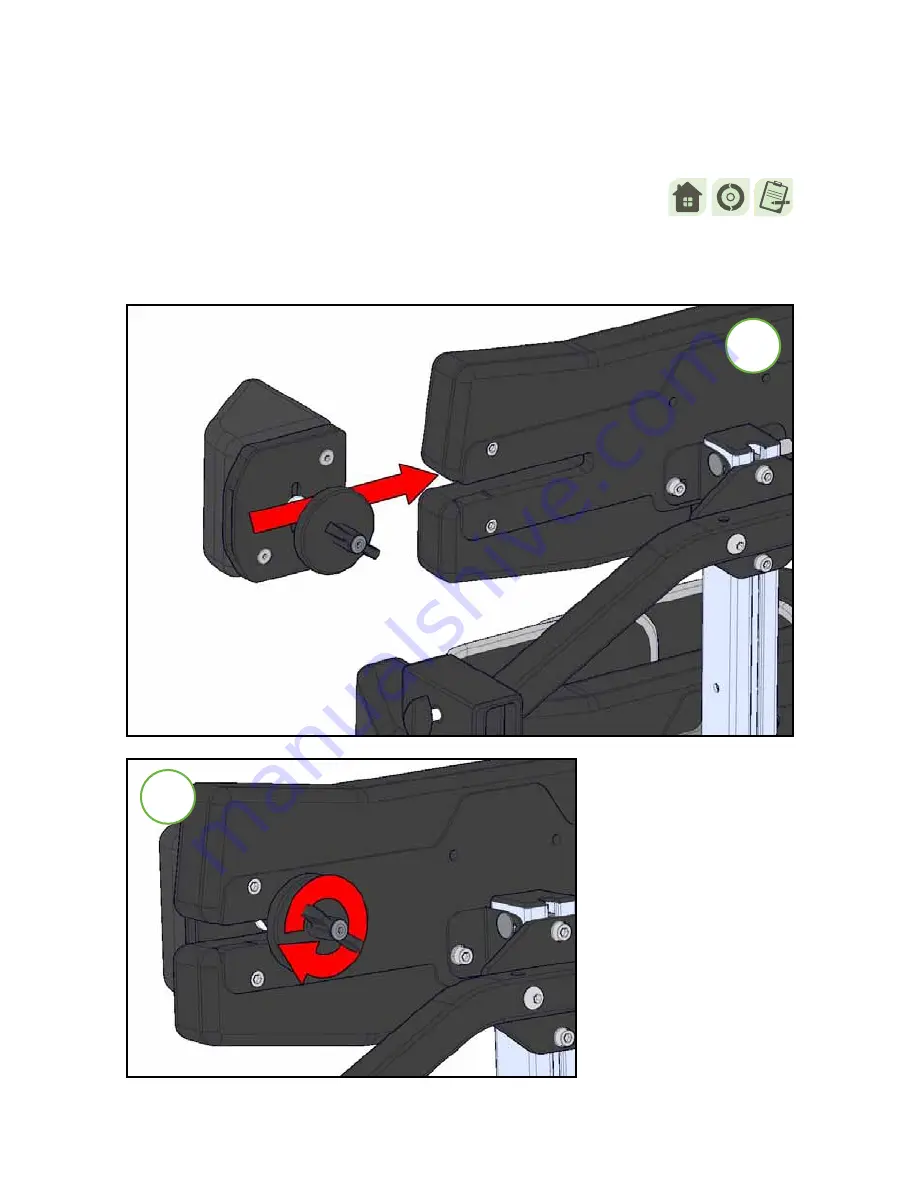
Fitting the support pads

Step 1: 

Insert the pad onto the  

stander as shown above

Note: 

It is necessary to apply 

a little force to put the support 
pad onto the stander. There is 
a notch in the plastic to limit 
the safe adjustment range.

Step 2: 

Tighten the wing 

knob to hold the pad in place. 
Repeat for the other 3 pads.

1

2

Summary of Contents for Multistander

Page 1: ...roduct at all times This product is a prescribed Medical Device To be used only under the guidance of a Therapist or Prescribing Practitioner You must read these instructions carefully before use Version 002 Max user weight 35 kg Weight of product 20 kg Multistander INSTRUCTION FOR USE ...

Page 2: ...Multistander INSTRUCTION FOR USE Note Some fabric and plastic colours may vary adjustments are not affected Prone configuration Supine configuration ...

Page 3: ... Safety straps 22 Kneeblock straps 24 Tray fixing bracket 25 Tray fitting depth height adjustment 27 Tray angle Depth 28 Fitting the sandals 29 Tray fixing bracket height remove 29 Adjusting the sandals 30 Clinical Adjustments Support pad adjustment 32 Kneeblocks 33 Upper pad angle 35 Angle adjustment 36 Height adjustment 38 Lower pad height 40 Upper pad height 41 Optional Components Removable cov...

Page 4: ...Carers and home users Re issue and stores Professional and technical users Safety Information CHAPTER ONE ...

Page 5: ...l see picture which is located on the product Please quote this number on all correspondence Serial Number CE Certification Attention Warning Please read Instruction for use Only for indoor use Always fasten and adjust positioning straps and belts to suit the child Adjust to suit changes in clothing Allow one fingers width between the belt and the child Do not leave child unattended see page 4 for...

Page 6: ...x Limited Tel 44 0 114 285 3376 Ensure that good care is taken of your product clean regularly Do not use abrasive cleaners When not in use store this product in a dry place that is not subject to extreme temperatures Places not to store this product include garages attics or garden sheds Any changes or alterations carried out by persons other than a Jenx authorised service person will invalidate ...

Page 7: ... In order to safely use the Multistander in prone mode the following features must be used Kneeblocks and straps chest pads and straps hip pads and straps footplate and sandals Failure to use these basic features may pose a risk to the user Other accessories can be added but these basic features must always be used Supine configuration Prone configuration If using in prone without the tray ensure ...

Page 8: ...Carers and home users Re issue and stores Professional and technical users General Information CHAPTER ONE ...

Page 9: ... Wing nut Star knob Plastic spacer Plastic washer Carers and home users Re issue and stores Professional and technical users Scallop wheel Clamping lever P Adjustment specific to the stander in the prone configuration S Adjustment specific to the stander in the supine configuration Note Design may vary ...

Page 10: ...en Products and Parts For deep cleaning a low pressure steam cleaner can be used Do not use organic solvents to clean Jenx Products Soap and water or antibacterial spray can be used Check for breaks or splintering of the wood before re issuing Daily cleaning Spray polish or wax polish can be used Metal Frames and Coated Parts For deep cleaning a low pressure steam cleaner can be used Do not use or...

Page 11: ...ime Check that gas spring levers are not bent Do not use the product if any levers are bent Contact Jenx Limited to arrange replacement If you have filled your product inspection log book copies can be printed from www jenx com Replace any lost or worn washers or bolts Check tray for damage Ensure that the tray edging is secure and that the tray is clean and free of any rough or sharp corners Chec...

Page 12: ...ribing professional Do not make any adjustments other than those you have been instructed to make The Carer section of this guide gives the adjustments needed to aid daily use only any other adjustments are only to be performed by the Therapist Re Issue This section refers to Stores Personnel Stores personnel must follow the checks and maintenance guide before re issue The Medicines and Healthcare...

Page 13: ...TISFACTORY QUALITY OR OF FITNESS FOR A PARTICULAR PURPOSE NOR ANY OTHER EXPRESS OR IMPLIED WARRANTY EXCEPT AS STATED ABOVE In no event shall Manufacturer or Seller be liable for any incidental consequential or special damages resulting from the use of this product THE EXCLUSIVE REMEDY OF THE USER OR BUYER AND THE EXCLUSIVE LIABILITY OF MANUFACTURER AND SELLER FOR ANY AND ALL CLAIMS LOSSES INJURIES...

Page 14: ... ensure that the stander stays stationary Angle Adjustment Benefits Can accommodate users of different abilities as altering the angle of standing changes the forces acting on the child Kneeblocks Benefits Fully adjustable to give appropriate support at the knees pg 34 pg 36 pg 21 Prone configuration ...

Page 15: ...e appropriate support pg 45 Tray optional Benefits The tray gives a surface for the child to play and learn on It is adjustable for height and angle and can be removed pg 25 pg 29 pg 00 Supine configuration Straps Ensure that the straps are fastened as soon as the child is in the stander Support Pads Benefits Adjust to support or brace the child and help to improve symmetry pg 22 pg 32 ...

Page 16: ...hould look when first taken out of the box Before use Fit footplate kneeblocks pads tray headrest supine Fitting the tray fixing bracket 1 2 Step 1 Slide the barel nut into the channel as shown above Step 2 Tighten the allen key bolts with the allen key provided ...

Page 17: ...olts supplied through the plate at the bottom of the frame through the footplate washer and nut as shown Screw the bolts into the nuts to hold the footplate in place Step 2 Tighten all 4 of the bolts using the 4mm allen key and spanner provided as shown above 1 2 2 ...

Page 18: ...ocks Step 1 Slide the knee block assembly onto the post that is pre mounted to the stander Step 2 Tighten the wing knob to hold the kneeblock in position 1 2 Kneeblocks size 1 Kneeblocks size 2 Note Both sizes of kneeblocks fit in the same way ...

Page 19: ...d onto the stander as shown above Note It is necessary to apply a little force to put the support pad onto the stander There is a notch in the plastic to limit the safe adjustment range Step 2 Tighten the wing knob to hold the pad in place Repeat for the other 3 pads 1 2 ...

Page 20: ...Carers and home users Re issue and stores Professional and technical users CHAPTER TWO Frequent Adjustments ...

Page 21: ...Lock Castors Press down on the lever to lock the castor Lock castors before using the stander Unlock Castors Lift the lever to unlock the castor Do not move the stander with the castors locked Supine configuration Supine configuration ...

Page 22: ...ses it may be necessary to deviate from this rule and any deviation should be fully documented as part of a Risk Assessment or Therapy Program and all relevant staff and carers appropriately trained Secure client with straps before adjusting product Ensure finger s width between safety strap and client to prevent over tightening or client moving to inappropriate position Adjust straps for each cli...

Page 23: ...te from this rule and any deviation should be fully documented as part of a Risk Assessment or Therapy Program and all relevant staff and carers appropriately trained Secure client with straps before adjusting product Ensure finger s width between safety strap and client to prevent over tightening or client moving to inappropriate position Adjust straps for each client and changes of clothing Mini...

Page 24: ...Step 1 Thread the strap through the plastic loop at the back of the knee pad Step 2 Pull the strap through to secure the knee in place Step 3 Stick the velcro back on itself Step 4 The knee straps secure 5 Step 5 Fasten the press stud over the strap ...

Page 25: ...ove the 2 bolts using the allen key provided as shown Ensure that the washer stays on the bolt Prone to Supine S 2 Step 2 Line up the yellow stickers This is done by rotating the bracket as shown opposite 2 Tray fixing bracket should be removed when not in use see page 29 for instructions on how to remove ...

Page 26: ... Insert bolts with washers and tighten 3 1 Step 1 Remove the 2 bolts using the allen key provided as shown Ensure that the washer stays on the bolt Supine to Prone 2 Step 2 Line up the red stickers This is done by rotating the bracket as shown opposite 2 ...

Page 27: ...e Depth Adjustment Loosen the wing knobs one on each side adjust the height or depth of the tray tighten the wing knobs The gauge shown below will enable you to match up both sides 1 2 S P Only the occupant of the product should lean on the tray Why What are the benefits Tray depth height and angle are adjusted to place the tray in an appropriate position for the child to access activities comfort...

Page 28: ...n each side 1 2 3 View of underside of tray Step 1 Loosen the wing knobs one on each side Step 2 Adjust the tray depth Step 3 Tighten the wing knobs one on each side Angle Adjustment Depth Adjustment 1 2 3 Note The tray depth must be at its minimum when the stander is in the prone configuration There must not be a gap between the stander and the tray ...

Page 29: ...n the plastic washer and through the footplate into the sandal as shown above Step 2 Tighten the wing knobs on the underside of the footplate 1 2 1 Tray fixing bracket height remove 1 2 3 Step 1 Loosen the allen key bolts Step 2 Adjust the height of the bracket or remove Step 3 Tighten the allen key bolts ...

Page 30: ...e width and depth of the sandal Step 3 Tighten the wing knob under the footplate 1 2 3 The straps must always be fastened in use and can be used in the two configurations shown opposite Why What are the benefits Sandals are adjusted to influence the standing position of the child to improve posture and weight bearing ...

Page 31: ...CHAPTER THREE Clinical Adjustments Re issue and stores Professional and technical users ...

Page 32: ...o fit or remove the support pad from the stander There is a notch in the plastic to limit the safe adjustment range Why What are the benefits Support pads are adjusted to offer support to a child s torso This may be close support for a weak child or may be a little distance from the child to encourage balance and posture shifting practice for a more able child Pads can be used to brace a child s s...

Page 33: ... Note Both sizes of kneeblocks adjust in the same way Take care of potential finger traps whilst adjusting the kneeblocks Why What are the benefits The adjustment of the knee blocks is used to ensure safety of the child especially in supine where the knee blocks will take a great deal of the child s standing weight and to maintain extension of the knees and to work with the sandals to create the d...

Page 34: ...nt Step 1 Loosen the bolts Step 2 Adjust the height of the kneeblocks Step 3 Tighten the bolts Height adjustment 1 2 3 34 Step 1 Loosen the wing knob Step 2 Adjust the angle and height of the kneeblock Step 3 Tighten the wing knob and repeat for the opposite side 1 2 3 ...

Page 35: ...y nut with the allen key provided Step 2 Adjust the angle of the pad Step 3 Tighten the allen key nut P Close up of allen key nut Why What are the benefits The angle of the upper pad can be changed to encourage extension and head control This adjustment is only used in prone ...

Page 36: ...eached remove your foot from the button Step 3 Re lock the button To lock the foot button turn it in a clockwise direction right Push down foot button shown in red for illustrative purposes only 1 2 3 Why What are the benefits The angle adjustment of the whole board is used to alter the posture of the user and to increase or decrease weight bearing It is also used in supine to allow a child to be ...

Page 37: ...ander Angle Adjustment The stander in a vertical position The stander in a horizontal position Mov e t o h o r i z o n t a l Move to vertical Hold on tight to the upper pad to steady the stander whilst changing the angle ...

Page 38: ...ovided as shown opposite 1 Step 2 To lower the stander Push down on the stander from the top pad ensuring to apply equal pressure on both sides The stander will raise when the bolts are loosened 2 Why What are the benefits The height of the board is adjusted to suit the height of the user ...

Page 39: ...39 jenx com Multistander Height adjustment Step 3 Tighten the bolts using the allen key provided 3 ...

Page 40: ...allen key provided as shown opposite 1 Step 2 Adjust lower pad height 2 Step 3 Tighten the bolts with the allen key provided 3 Why What are the benefits The lower pad and upper pad height adjustments are used to set the pads at the correct height and proportions for each user ...

Page 41: ... Insert the bolts back through the bracket and into the holes in the back of the pad Ensure the washer stays in place on the bolt Tighten both using the allen key provided P 1 2 3 Note This adjustment is only to be used with very small children in prone standing The pad must be in the upper position for supine standing Note If the headrest bolts have been left in the top holes of the upper pad the...

Page 42: ...Carers and home users Re issue and stores Professional and technical users CHAPTER FOUR Optional Components ...

Page 43: ...o the cover The chest prompt can be slotted into the top cover for use in prone standing as shown below P Removable covers Why What are the benefits Removable covers are used to protect the surface of the board and also to house the chest prompt The chest prompt is used to increase extension of the thorax and can help to improve head control This is only used in the prone configuration ...

Page 44: ...44 Optional Components Removable covers and chest prompt Fitting the removable covers Step 1 Wrap the cover around the pad 1 Step 3 Fix using both press studs 2 Stander with both covers in place ...

Page 45: ...the washer plate on the headrest and into the top pad as shown 1 2 Step 2 Tighten the bolts using the allen key provided S Why What are the benefits Headrests are used to support a child s head Only use in the supine configuration Headrests can be adjusted to offer more or less support depending on the needs of the child ...

Page 46: ...lever Loosen 1 2 3 4 Step 1 Pull the lever out to disengage Step 2 Keeping the lever pulled out rotate the lever clockwise to the upper most position Step 3 Release the lever Step 4 Rotate the lever anti clockwise to loosen Repeat steps 1 to 4 to loosen further S ...

Page 47: ...ent Adjust the angle of the joint that you have loosened S Always ensure levers are left in an appropriate and safe position Ensure that the headrest is not set to a position that would enable the user to come into contact with the metal links ...

Page 48: ...g lever Tighten 1 2 3 4 Step 1 Turn the lever clockwise to tighten If the headrest needs further tightening continue to step 2 Step 2 Pull the lever out to disengage the ratchet Step 3 Turn the lever anti clockwise Step 4 Release the lever and return to step 1 S ...

Page 49: ...grip headrest Use these bolts to adjust position of the Multigrip links To move Multigrip links undo the bolts shown above The links can then be easily moved to desired position Once position is achieved tighten the bolts securely S ...

Page 50: ...correct length wing knob is used to suit the number of blocks used 4 lengths are supplied with the raising block kit Elbow blocks tray Fitting Insert the studding through the slot in the tray through the plastic washer metal washer and onto the wing knob as shown opposite Why What are the benefits These are used to encourage a child s hands to stay on the tray and to resist attempts to take elbows...

Page 51: ... the current footplate Step 1 Remove the 4 bolts from the top of the footplate using the allen key and spanner provided The allen key is used for the bolt heads on top of the footplate and the spanner for the nuts on the underside 1 2 Step 2 Remove the footplate ...

Page 52: ...the bolt through the plate on the stander and then through the angle adjustable footplate and screw the bolt on beneath the footplate Note Only use the nuts and bolts that come with the angle adjustable footplate to fit it 1 2 2 Step 2 Tighten all 4 nuts and bolts using the allen key and spanner provided ...

Page 53: ...nob Step 2 Adjust the angle of the footplate Step 3 Tighten the wing knob Do not adjust the angle of the footplate when the stander is occupied Why What are the benefits This is used to alter the angle of the footplate which may be necessary for some children to improve their posture and weight bearing ...

Page 54: ...me way as the positioning pads see page 19 for fitting instructions and page 32 for adjustment instructions Why What are the benefits High rise thoracic pads are used in prone standing to encourage protraction of the shoulders and to bring the arms into midline This will tend to improve arm function Why What are the benefits These may be used with smaller children or where the broader pads are fou...

Page 55: ...55 jenx com Multistander High rise thoracic pads Adjusting the pads 1 2 3 Step 1 Loosen the wing knobs Step 2 Adjust the angle height and depth of the pad Step 3 Tighten the wing knobs ...

Page 56: ...Carers and home users Re issue and stores Professional and technical users CHAPTER FIVE Maintenance Inspection ...

Page 57: ...n fully cleaned taking into account the condition of the fabric and the foam inside Check that all hand wheels and levers are in good condition and fitted securely Check the product and any accessories fully for any sign of wear and tear or distortion Check that all the functions of the product are working correctly e g tilt height adjustment or back recline etc Always ensure that the Instruction ...

Page 58: ...s and Bolts Are there nuts and bolts missing or damaged Castors are the castors in good order Do swivels and brakes work Springs do all gas springs work and hold pressure and weight Sandals are the sandals in good condition Do straps and Velcro show signs of wear Upholstery and PU is the upholstery and PU in good clean condition with no rips wear or gaping of the cushions Steel and Woodwork is the...

Page 59: ...spect products Answer The purchasing authority has a duty under the MHRA guidelines DB2006 05 to address training for Medical Devices Management Check with your authority Question Does Jenx run technical competency courses Answer Yes Please visit jenx com for details of available courses Notes ...

Page 60: ...Standing Seating Mobility Therapy Sleeping Bathroom Jenx Limited Wardsend Road Sheffield S6 1RQ T 0114 285 3376 E sales jenx com jenx com ...

Reviews: