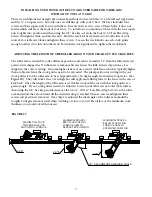
The track has eight #19 drill size holes to be used as a drill guides for pilot holes for the self tapping screws.
These are the smallest holes on the track and should be closest to the back of your saw. These holes are ½”
in from of the counter bored mounting holes for the self tapping screws. One final note in placing the
track, if the outside edge of the track is placed a minimum of ¾” from the edge of the table saw fence then
the stock guides can be swung out of the way when not in use. If this is not possible then they can be
removed from the track by just loosening the track knobs and sliding them off the track. Once the position
of the track is determined to your satisfaction, move the track toward the front of the saw ½” and then
clamp the track to your table saw fence in this position ensuring the track is parallel to the side of the fence.
Using the included #19 drill bit and either a hand held drill or using a drill press, drill the eight holes into
your fence using these #19 drill holes as a guide for your drill bit. Once the holes have been drilled, remove
the clamps and clean or blow off the shavings from drilling the holes and place the track so the
counterbored holes for the self tapping screws line up with the holes you just previously drilled. Using the
included #10 torx drive self tapping screws and the included T-25 torx screwdriver attach the track to your
table saw fence. (Note: start all eight of the self tapping screws first before you tighten them to ensure
that all line up before the track is tightened)
1.50
1.50
1.00
FIGURE #2
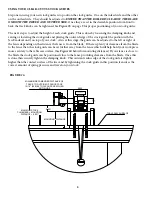
Now your track is installed and your stock guides can be slid onto the track. Your stock guides come with the
track knobs already mounted and tightened to the track mounting block so you will need to loosen these
knobs to allow the stock guides to slide on. (See exploded parts view for reference if needed) One stock guide
should be mounted on the outfeed side of the blade and the other to the infeed side of the blade. The
installation of your stock guides should now be complete.
TRACK MOUNTING UPPER VIEW
6.


