THREE DIFFERENT FENCE POSITIONS FOR
MITERING AND 90 DEGREE CROSS-CUTS
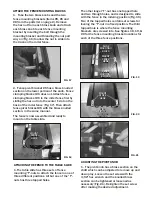
1. The miter fence can be positioned in one
of three different locations on top of the
sliding table assembly (Fig. 22). Fence
position (A) is mounted furthest in the front
position on the sliding table. This is intended
to be a fixed 90 degree to the blade position
for making right angle cuts only. Fence
position (B) is an inner front position and is
the optimal position for mitering work using
the miter fence at various angles up to 45
degrees in both directions. Fence position (C)
is a rear position and the fence is to be
rotated so the fence face points toward the
front of the table saw. This is also intended
to be used in a fixed 90 degree to the blade
position for making right angle cuts only.
This rear end position offers the maximum
cross cut capacity when pushing the
material through the blade with the
workpiece positioned square against the
fence face to achieve a greater cross cut
capacity. This will not necessarily result in a
cut that is carried all the way through the
blade (depending on the configuration of
your table saw).
NOTE:THE
FENCE
FACE IS
TURNED
AROUND
FACING THE
FRONT OF
THE SAW
(A)
(B)
(C)
FIG. 23
OPERATION OF THE MITER FENCE
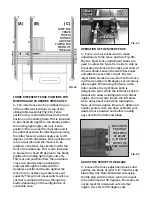
1. There are four knobs used to make
adjustments to the fence position (Fig. 23).
The two brass fence adjustment knobs are
used to adjust the fence from side to side as
to position the fence to the right, just short of
the saw blade. Loosen the two brass knobs
and slide the fence left or right. The two
larger black knobs are used to lock the fence
in a fixed position at 90 degrees or at various
other angles. When using the fence in the
miter position the right black knob is
designed to pivot, while the left black knob is
loosened to allow a sliding action at various
angles. You must also loosen the left brass
fence adjustment knob while rotating the
fence at various angles. Be sure to tighten all
knobs securely once you have achieved your
desired fence position and before making
any cut with the table saw blade.
FENCE
ADJUSTMENT
KNOBS
FENCE
ADJUSTMENT
KNOBS
PIVOT
KNOB
LOOSEN
TO SLIDE
LOOSEN
TO SLIDE
PIVOT
KNOB
PIVOT
KNOB
FIG. 24
ADJUST THE FENCE TO THE BLADE
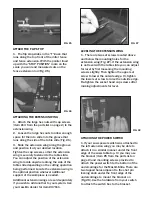
1. Loosen the fence adjustment knobs and
position the blade at least 1/8” from the saw
blade (Fig. 24). Note: Measured cuts using
the flip stop with the fence scale are meant
to be performed at 90 degrees. The scale can
not be reset for measured cuts at other
angles. It is only for 90 degree cuts.
FIG. 22
BE SURE TO
POSITION
THE FENCE
AT LEAST
1/8” AWAY
FROM THE
SAW BLADE


