ATTACH THE FENCE MOUNTING BLOCKS
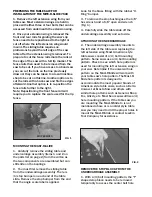
1. Take the two brass knobs and the two
fence mounting brackets (items #5, #6 and
#8 from the parts list on page 2). Remove
the hex nut from each brass knob and attach
each brass knob to each fence mounting
bracket by inserting the bolt through the
mounting bracket and threading the nut part
way on (Fig. 16) to allow the nut to slide into
the track on the miter fence.
FIG. 18
FRONT
FENCE
MOUNTING
BLOCKS
FRONT
FENCE
MOUNTING
BLOCKS
MOUNT
FENCE
HERE
MOUNT
FENCE
HERE
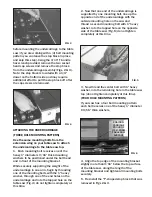
2. Fence pivot bracket #5 has a brass knurled
section on the lower portion of the knob. Fence
clamping bracket #6 does not. Attach fence
clamping bracket #6 to the miter fence first by
sliding the hex nut into the center T-slot on the
back of the miter fence (Fig. 17). Then attach
fence pivot bracket #5 with the brass knurled
section, in the same manner.
The fence is now assembled and ready to
mount on the table slide.
FIG. 17
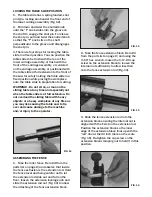
The other longer “T”-nut has one tapped hole
and two through holes, and is designed to slide
with the fence in the mitering position (Fig. 19).
Two of the tapped holes contain set screws for
locking the “T”-nut in a fixed position. The third
tapped hole is where the fence mounting
brackets are screwed into. See figures 18, 19, &
20 for the fence mounting bracket locations for
each of the three fence positions.
FIG. 19
FIG. 20
MITER
FENCE
MOUNTING
BLOCKS
MITER
FENCE
MOUNTING
BLOCKS
REAR
FENCE
MOUNTING
BLOCKS
REAR
FENCE
MOUNTING
BLOCKS
SLIDE
MOUNTING
BLOCK
SLIDE
MOUNTING
BLOCK
MOUNT
FENCE
HERE
MOUNT
FENCE
HERE
MOUNT
FENCE
HERE
MOUNT
FENCE
HERE
ADJUSTING THE PIVOT KNOB
1. The pivot knob has a brass section on the
shaft which can be adjusted to remove up and
down play. Loosen the set screw with the
3/32” hex wrench and the knurled brass
section can be tightened or loosened as
necessary (Fig. 21). Re-tighten the set screw
after making the desired adjustment.
FIG. 21
ATTACHING THE FENCE TO THE TABLE SLIDE
1. The table slide has three sets of fence
mounting “T”-nuts to attach the fence in one of
three different positions. All but one of the “T”-
nuts has three tapped holes.


