background image

20

WARNING: To Avoid Injury  

1.   DO read ANSI B30.16 safety standard for overhead hoists and hoist manufacturer’s Operating and Maintenance Instructions. 
2.   DO be familiar with hoist operating controls, procedures and warnings. 
3.   DO make sure hook travel is in the same direction as shown on controls. 
4.   DO make sure hoist limit switches function properly. 
5.   DO maintain firm footing when operating hoist. 
6.   DO make sure that load slings or other approved slinging attachments are properly sized and seated in the hook saddle. 
7.   DO make sure that the hook latch is closed and not supporting any part of load. 
8.   DO make sure that load is free to move and will clear all obstructions. 
9.   DO take up slack carefully, check load balance, lift a few inches and check load holding action before continuing. 
10.  DO avoid swinging of load or load hook. 
11.  DO make sure that all persons stay clear of the suspended load. 
12.  DO warn personnel of an approaching load. 
13.  DO protect load chain from weld spatter or other damaging contaminants. 
14.  DO promptly report any malfunction, unusual performance, or damage of the hoist. 
15.  DO inspect hoist regularly, replace damaged or worn parts, and keep appropriate records of maintenance. 
16.  DO use the hoist manufacturer’s recommended parts when repairing a hoist. 
17.  DO use hook latches whenever possible. DO NOT remove the hook latch. 
18.  DO apply lubricant to the load chain as recommended by the hoist manufacturer. 
19.  DO not lift more than rated load. 

20.  DO NOT use the hoist load limiting device to measure the load. 
21.  DO NOT use damaged hoist or hoist that is not working correctly. 
22.  DO NOT use the hoist with twisted, kinked, damaged or worn chain. 
23.  DO NOT lift a load unless chain is properly seated in chain wheel(s) or sprocket(s). 
24.  DO NOT use load chain as a sling or wrap chain around the load. 
25.  DO NOT lift a load if any binding prevents equal loading on all supporting ropes or chains. 
26.  DO NOT apply the load to the tip of the hook. 
27.  DO NOT operate unless load is centered under hoist. 
28.  DO NOT allow your attention to be diverted from operating the hoist. 
29.  DO NOT operate the hoist beyond limits of load chain travel. 
30.  DO NOT use limit switches as routine operating stops unless recommended. They are emergency devices only. 
31.  DO NOT use hoist to lift, support, or transport people. 
32.  DO NOT lift loads over people. 
33.  DO NOT leave a suspended load unattended unless specific precautions have been taken. 
34.  DO NOT allow sharp contact between two hoists or between hoist and obstructions. 
35.  DO NOT allow any part of hoist to be used as a ground for welding. When gas welding ensure that the load chain or hook is  

not subject to heat. 

36.  DO NOT allow any part of hoist to be touched by a live welding electrode. 
37.  DO NOT remove or obscure the warnings on the hoist. 
38.  DO NOT adjust or repair a hoist unless qualified to perform hoist maintenance. 
39.  DO NOT attempt to lengthen the load chain or repair damaged load chain. 
40.  DO NOT apply a sudden load to the chain such as pushing a load off a ledge and allowing the chain to ‘catch’ it. 
41.  DO be sure that the hoist is unloaded and power supply is disconnected before performing maintenance and repair 

procedures.

Summary of Contents for FA Series

Page 1: ...Tools Ltd www jetgroupbrands com M15 MH107202 66 EN Owner s MANUAL FA Series Electric Chain Hoists Heavy Duty Prod No 107202 107206 Mod No FA1 0 5S FA 1 5S Prod No 107212 107216 Mod No FA 0 5S FA 5S Prod No 107262 107266 Mod No FA 0 5S FA 5S ...

Page 2: ...2 TABLE OF CONTENTS Warranty 3 1 Installation 4 2 Operation 9 3 Inspection Maintenance 10 4 Wiring Diagram 15 ...

Page 3: ... product under this warranty Warranty is expressly in lieu of all other warranties including the implied warranty of merchantability or any implied warranty of fitness for a particular application Any JET product for which there is a warranty claim should be returned PREPAID to an authorized JET distributor or service center Authorized Warranty Depots are found at www jetgroupbrands com ALL warran...

Page 4: ...ere organic solvents or explosive dusts exist The electric chain hoist may not be used in areas where extremely low or high temperatures high humidity or chemicals predominate Consult your local JET distributor when the electric chain hoist is used in a special environment such as HIGH TEMPERATURE hotter than 104 F or 40 C LOW TEMPERATURE colder than 0 F or 18 C HIGH HUMIDITY more than 90 or CHEMI...

Page 5: ...o be safely operated even in the rain if the grounding work has been completely performed But in order to prolong its service life a cover should be provided if you install the hoist outside 1 3 BEFORE CONNECTING POWER TO THE HOIST 1 3 1 POWER SETTING OF HOIST Make sure that the power supply corresponds to the hoist power setting If your hoist is a dual voltage type NEVER FAIL TO SET its wiring so...

Page 6: ...expose the connector panel with 2 female sockets one marked 115V and another marked 230V as well as one male plug If the voltage of the power source is 115V engage the male plug to the female socket marked 115V and if the voltage is 230V engage the male plug to the female socket 230V NOTE Once the power source is disconnected you must wait 3 minutes before converting to a new voltage power source ...

Page 7: ...F OPERATING MODULE AND POWER SUPPLYING MODULE How to connect and install the above mentioned modules are explained in the instructions attached to them Install them correctly in accordance with the instructions 1 3 6 REVERSE PHASE INSPECTION RELAY For 3 phase model only If the electric chain hoist does not work after connecting to the power supply the negative phase inspection relay has operated I...

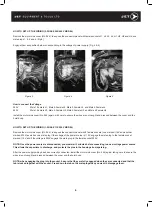
Page 8: ... MOUNT THE BUCKET CORRECTLY The chain bucket must be mounted correctly Do not operate the hoist without the chain bucket The chain bucket should be mounted to the hoist with the chain on the no load side under the operating element B with less than 50 cm of load chain to avoid kinks and jamming of the load chain Refer to the illustrations and mounting position Fig 8 Choose the right mounting posit...

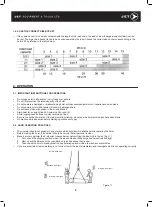
Page 9: ...ick reversing of load Be sure to use the hook latch If the latch is malfunctioning do not use the hoist until repairs have been made Do practice daily inspection before starting operation every day 2 2 GOOD OPERATING PRACTICES The operator should not engage in any practice which will divert his attention while operating the hoist Before starting the hoist the operator should be certain that all pe...

Page 10: ...e carefully examined and corrected The intervals between inspection will vary depending on the operating conditions 3 1 DAILY INSPECTION Inspect the following items daily before operating hoist 3 1 1 TOP HOOK PARTS Check the hook latch to ensure it is opening and closing properly Inspect the top hook and parts for flaws or deformations that are visibly noticeable Ensure the idle sheave where appli...

Page 11: ...in until about 10 cm before the lower limit switch engages 3 Disconnect the power supply 3 2 1 MOTOR BRAKE Thickness of 531 lining o The minimum thickness of the 531 lining is 7 5mm The brake disc must be replaced when the thickness Fig 16 is less than 7 5 mm Initial thickness is 8 mm How to measure 1 Remove all the connectors connected to A and B in Fig 17 2 Remove 361 electric component cover ca...

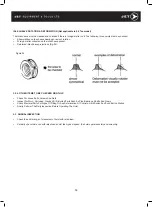
Page 12: ...n containing a link with its diameter decreased due to corrosion or any other reason must be replaced Inspect chain link thickness where critical pitch expansion appears using the gauge If the mouth of the gauge applied fits the link as illustrated in Fig 20 that means diameter is less than the allowable limit OTHER VISUAL DEFECTS If any FLAWS or BENDS are found or if any person has welded the loa...

Page 13: ...ion A shown in Fig 21 has exceeded the limit shown in the table below Do not use heat to repair the hook as the strength of the hook would be substantially reduced FLAWED WORN OR BENT HOOKS Such hooks as are found in Fig 22 24 must also be replaced Fig 22 A flaw is clearly apparent Fig 23 Wear exceeds the allowable limit specified below Fig 24 A bend can be visually detected Figure 21 Figure 22 Fi...

Page 14: ...4 OTHER ITEMS TO BE CHECKED MONTHLY Check For Loose Bolts Screws And Nuts Inspect For Worn Corroded Cracked Or Distorted Parts Such As Pins Bearings Shafts And Gears Check Electrical Parts For Signs Of Pitting Or Any Deterioration Of Controls Limit Switch And Push Button Station Finally Perform The Daily Inspection Before Operating The Hoist 3 3 ANNUAL INSPECTION Check the entire range of movement...

Page 15: ...15 ...

Page 16: ...16 ...

Page 17: ...17 ...

Page 18: ...18 ...

Page 19: ...19 ...

Page 20: ...d limiting device to measure the load 21 DO NOT use damaged hoist or hoist that is not working correctly 22 DO NOT use the hoist with twisted kinked damaged or worn chain 23 DO NOT lift a load unless chain is properly seated in chain wheel s or sprocket s 24 DO NOT use load chain as a sling or wrap chain around the load 25 DO NOT lift a load if any binding prevents equal loading on all supporting ...

Reviews: