11
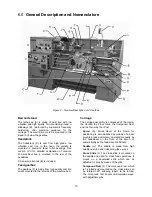
Four-Way Tool Post
(K).
The tool post is a
turret design, mounted to the compound rest. It
holds up to four tools simultaneously, and
includes an indexing function.
(Always use a
minimum of two clamping screws when installing
a cutting tool.)
Tailstock
The tailstock (L) slides on a v-way and can be
locked at any location by a clamping lever. The
tailstock has a heavy duty quill with a No. 4 Morse
Taper or No. 5 Morse Taper (18” and 22” models)
and etched graduation scale. The tailstock can be
offset for taper cutting.
Leadscrew and feed rod
The leadscrew (M) and feed rod (N) are mounted
on the front of the machine bed. They are
connected to the gearbox at the left and are
supported by bearings on both ends. Both are
equipped with shear pins.
Spindle direction control axle
(O)
Spindle rotation can be reversed by simply moving
the control lever (P) mounted at the right of the
carriage. (Allow spindle to come to a stop before
reversing.)
Travel setting rod
(Q)
The stops can be moved and tightened into
position at any point along the rod, to limit travel of
the carriage.
Thread chaser
(R)
Simplifies the process of setting leadscrew/carriage
positions in relation to the workpiece, by indicating
the point on the leadscrew where the half nut can
be reengaged to continue threading.
Steady rest
(S)
The steady rest serves as a support for shafts on
the free tailstock end. The steady rest is mounted
on the bedway and secured from below with a bolt,
nut and locking plate.
Follow rest
(T)
The traveling follow rest is mounted to the saddle,
and thus follows the movement of the turning tool.
Only two fingers are required as the place of the
third is taken by the turning tool. The follow rest is
used for turning operations on long, slender work
pieces. It prevents the work piece from flexing
under the pressure of the cutting tool.
Work lamp
(U)
Adjustable halogen lamp with independent on/off
switch.
Coolant nozzle
(V)
Fully adjustable gooseneck; flow is regulated
through a valve lever at its base.
Foot brake
(W)
Activates a braking strap at the motor for
emergency stopping of all lathe functions.
Chuck guard
(X)
Hinged, with upper and front windows.
Micro stop
(Y)
Used for manual carriage operation.
Summary of Contents for GH-1440ZX
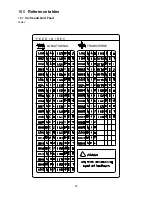
Page 26: ...26 T H R E A D I N G C H A R T I N I N C H ...
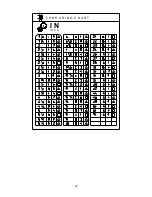
Page 27: ...27 m m M E T R I C T H R E A D I N G C H A R T M P M O D U L E P I T C H ...
Page 31: ...3 1 1 Stand Assembly Exploded View ...
Page 34: ...6 2 1 Brake Assembly Exploded View ...
Page 36: ...8 3 1 Bed Assembly Exploded View ...
Page 39: ...11 4 1 Headstock Assembly I Exploded View ...
Page 43: ...15 5 1 Headstock Assembly II Exploded View ...
Page 46: ...18 6 1 Headstock Assembly III Exploded View ...
Page 48: ...20 7 1 Headstock Assembly IV Exploded View ...
Page 50: ...22 8 1 Change Gear Box Assembly I Exploded View ...
Page 52: ...24 9 1 Change Gear Box Assembly II Exploded View ...
Page 54: ...26 10 1 Quick Change Gear Box I Exploded View ...
Page 57: ...29 11 1 Quick Change Gear Box II Exploded View ...
Page 59: ...31 12 1 Quick Change Gear Box III Exploded View ...
Page 61: ...33 13 1 Apron Assembly I Exploded View ...
Page 64: ...36 14 1 Apron Assembly II Exploded View ...
Page 67: ...39 15 1 Apron Assembly III Exploded View ...
Page 69: ...41 16 1 Carriage Assembly Exploded View ...
Page 73: ...45 18 1 Carriage Stop Assembly Exploded View ...
Page 75: ...47 19 1 Quick Change Tool Post Exploded View ...
Page 77: ...49 20 1 Tailstock Assembly I Exploded View ...
Page 79: ...51 21 1 Tailstock Assembly II Exploded View ...
Page 81: ...53 22 1 Steady Rest Assembly Exploded View ...
Page 83: ...55 23 1 Follow Rest Assembly Exploded View ...
Page 85: ...57 24 1 Coolant Work Light Assembly Exploded View ...
Page 89: ...61 26 2 Electrical Cabinet Breakdown 6 7 8 12 11 10 17 22 21 23 13 9 9a 20 18 3a 1 2 4 19 3 ...
Page 90: ...62 27 0 Wiring Diagram ...
Page 94: ...66 427 New Sanford Road LaVergne Tennessee 37086 Phone 800 274 6848 www jettools com ...


