7
Read and understand all
assembly instructions before attempting
assembly. Failure to comply may cause serious
injury.
7.0
Setup and assembly
It is recommended that the belt and disc sander be
secured to the floor for safe operation. The machine
stand has mounting holes in a flange on the inside
of stand enclosure. The stand can be secured to the
floor using these mounting holes.
8.0
Electrical connections
The J-4210 Belt/Disc Sander is rated at 115/230V
power, and is pre-wired for 115 volt.
Before connecting to power source, be sure switch
is in
off
position.
It is recommended that the sander be connected to
a dedicated 15 amp circuit with circuit breaker or
fuse. If connected to a circuit protected by fuses, use
time delay fuse marked “D”.
Local codes take
precedence over recommendations.
8.1
Grounding Instructions
1. All Grounded, Cord-connected Tools:
In the event of a malfunction or breakdown,
grounding provides a path of least resistance for
electric current to reduce the risk of electric shock.
This tool is equipped with an electric cord having an
equipment-grounding conductor and a grounding
plug. The plug must be plugged into a matching
outlet that is properly installed and grounded in
accordance with all local codes and ordinances.
Do not modify the plug provided - if it will not fit the
outlet, have the proper outlet installed by a qualified
electrician.
Improper connection of the equipment-grounding
conductor can result in a risk of electric shock. The
conductor with insulation having an outer surface
that is green with or without yellow stripes is the
equipment-grounding conductor. If repair or
replacement of the electric cord or plug is
necessary, do not connect the equipment-grounding
conductor to a live terminal.
Check with a qualified
electrician or service pe
r
sonnel if the grounding
instructions are not completely understood, or if
in doubt as to whether the tool is properly
grounded. Failure to comply may cause serious
or fatal injury.
Use only 3-wire extension cords that have 3-prong
grounding plugs and 3-pole receptacles that accept
the tool's plug.
Repair or replace damaged or worn cord
immediately.
2. Grounded, cord-connected tools intended for use
on a supply circuit having a nominal rating
less than
150
volts:
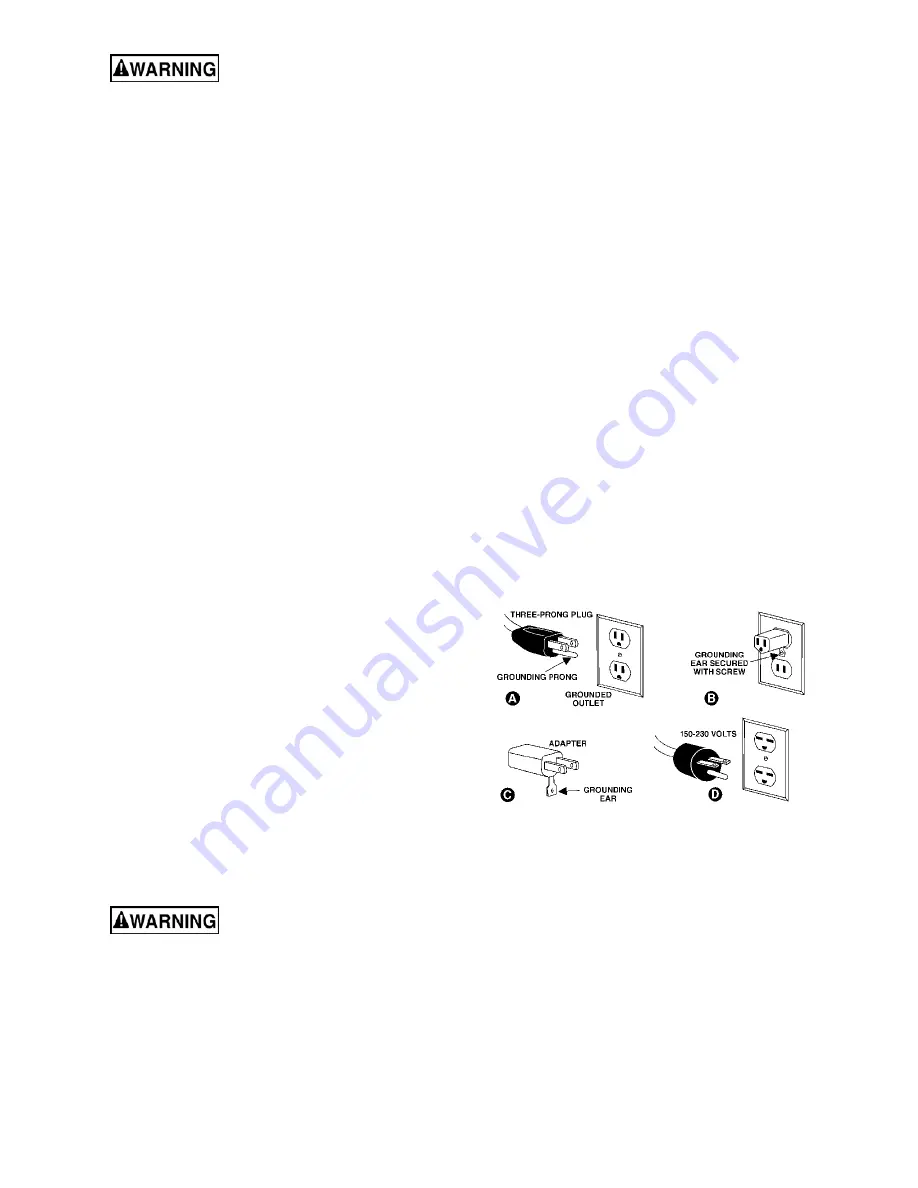
This tool is intended for use on a circuit that has an
outlet that looks like the one illustrated in
A,
Figure
3. An adapter, shown in
B
and
C
, may be used to
connect this plug to a 2-pole receptacle as shown in
B
if a properly grounded outlet is not available. The
temporary adapter should be used only until a
properly grounded outlet can be installed by a
qualified electrician.
This adapter is not permitted in
Canada.
The green-colored rigid ear, lug, and the
like, extending from the adapter must be connected
to a permanent ground such as a properly grounded
outlet box.
3. Grounded, cord-connected tools intended for use
on a supply circuit having a nominal rating between
150 - 250 volts
, inclusive:
This tool is intended for use on a circuit that has an
outlet that looks like the one illustrated in
D,
Figure
3. The tool has a grounding plug that looks like the
plug illustrated in
D
. Make sure the tool is connected
to an outlet having the same configuration as the
plug. No adapter is available or should be used with
this tool. If the tool must be reconnected for use on
a different type of electric circuit, the reconnection
should be made by qualified service personnel; and
after reconnection, the tool should comply with all
local codes and ordinances.
Figure 3
4. Permanently connected tools:
This tool should be connected to a grounded metal
permanent wiring system; or to a system having an
equipment-grounding conductor.
5. Polarized plugs
– To reduce the risk of electric
shock, this equipment has a polarized plug (one
blade is wider than the other). This plug will fit in a
polarized outlet only one way. If the plug does not fit
fully in the outlet, reverse the plug. If it still does not
fit, contact a qualified electrician to install the proper
outlet. Do not change the plug in any way.


