background image

JET   


Maintenance 

Lubrication 

The air riveter should be lubricated daily (or before 
each  use)  with  air  tool  oil  through  the  air  inlet. 
During  continual  operation,  it  should  be  re-oiled 
every 1 to 2 hours. This can be done with an in-
line oiler, or manually. If done manually, proceed 
as follows: 

1. 

Disconnect air hose from tool. 

2. 

Place 4 or 5 drops of air tool oil into air inlet 
(Figure 1). 

NOTE: Air tool oil not provided; it is available 
at most major hardware and tool stores. SAE 
#10 oil or sewing machine oil may be used 
as a substitute. Do not use detergent oil. 

3. 

Re-connect air. Fire riveter several times to 
distribute the oil throughout tool. 

4. 

When finished  operating  riveter, disconnect 
air  hose. Wipe  off  housing  with  a  dry cloth. 
Place 4 or 5 drops of air tool oil into air inlet; 
re-connect  air and  fire  tool several times  to 
distribute the oil. Disconnect air. 

Cleaning 

The  rivet  head  and  jaw  assembly  should  be 
inspected, cleaned and lubricated as needed. 

1. 

Disconnect riveter from air supply. 

2. 

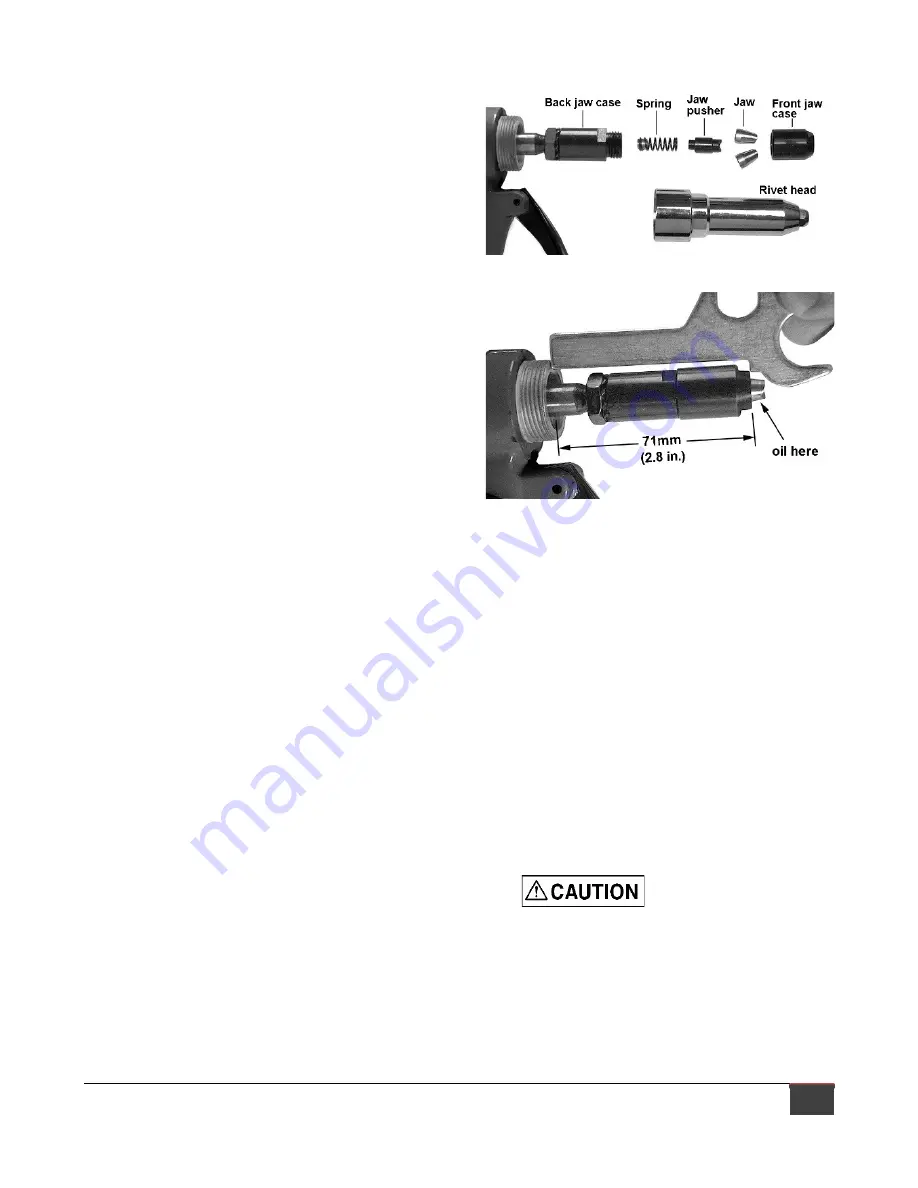
Loosen  rivet  head  (Figure  3)  with  an 
adjustable  wrench  (not  provided),  and 
remove rivet head from nozzle. 

3. 

Use  the  provided  gauge  wrench  to 
disassembled  jaw  case,  jaw  halves,  jaw 
pusher and the spring. 

4. 

Clean each of the disassembled parts. Use 
a  cleaning  brush  on  the  internal  threads  of 
the jaw and inside the rivet head. 

5. 

Reassembled parts in proper order. 

6. 

Use  gauge  wrench  to  check  that  length  of 
jaw  assembly  is  correct  (Figure  4).  This 
length ensures proper spring tension. Rotate 
jaw assembly as needed until it fits the span 
of the gauge as shown. 

7. 

Apply air tool to outside of jaw halves. 

8. 

Reinstall rivet head. 


Figure 3 


Figure 4 

Storage  

Avoid storing the air riveter in very humid locations 
which  promotes  rusting  of  internal  mechanisms. 
Always oil the tool and disconnect air hose before 
storage. A hanger is provided for suspending the 
tool upright from a hook. 

Air system requirements 

1. 

Use  proper  air  hose  size  (refer  to  tool 
specifications). The hose should be just long 
enough to serve the working area. Excessive 
hose length will cause pressure drop.  

2. 

Make  sure  air  compressor  supplies  clean, 
dry air at correct CFM for the tool. 

3. 

Set air pressure to 90 psi.  


Excess  air  pressure 

and/or unclean air will shorten the tool’s 
life and may create a hazardous situation.


4. 

Drain water from air compressor tank daily, 
as  well  as  any  condensation  from  air  lines. 
Water in the air line may enter the tool and 
cause damage. 

5. 

Change filters on the air system on a regular 
basis. 

Summary of Contents for JAT-920 505920

Page 1: ...Pneumatic Riveter 505920 JAT 920 Operation Parts Manual M 505920 Edition 2 11 2018 JET 427 New Sanford Road LaVergne TN 37086 Ph 800 274 6848 www jettools com Copyright 2015 JET ...

Page 2: ...needed JET has Authorized Service Centers located throughout the United States For the name of an Authorized Service Center in your area call 1 800 274 6846 or use the Service Center Locator on the JET website More Information JET is constantly adding new products For complete up to date product information check with your local distributor or visit the JET website How State Law Applies This warra...

Page 3: ...p against the work surface 11 Do not operate air tool without its guards in place Do not modify the tool 12 Do not operate this tool while tired or under the influence of drugs alcohol or any medication 13 Adopt a comfortable posture with proper balance and maintain secure footing at all times Non slip footwear or anti skid floor strips are recommended 14 Do not wear loose clothing or jewelry Conf...

Page 4: ...veter without safety cap installed as mandrel may be expelled from the tool forcefully causing injury 36 Do not install rivets close to the edge of a work surface as it may cause workpiece to split causing a safety hazard 37 Make sure tool is cleared of spent mandrel before inserting new rivet into nosepiece 38 This tool is for inserting rivets into metal surfaces do not use on soft surfaces Famil...

Page 5: ...ion of your tool on the cover of this manual for quick access Retain this manual for future reference If the tool transfers ownership the manual should accompany it Tool specifications Model number JAT 920 Stock number 505920 Capacity mild steel 3 16 in Maximum pulling load 2 000 lb Blind rivet setting capacity 3 16 in Stroke length 9 16 in Traction power 1 940 lb Included nosepieces Four 3 16 5 3...

Page 6: ...ure 2 3 Push new nosepiece into jaws against the spring tension and rotate until threads engage Tighten nosepiece with wrench 4 Remove protective cap from air inlet Figure 1 If an in line oiler is not being used add 4 or 5 drops of air tool oil not included into the air inlet 5 Blow out air line to remove any dirt or moisture then connect air supply hose to tool Set air pressure to 90 psi IMPORTAN...

Page 7: ...isassembled jaw case jaw halves jaw pusher and the spring 4 Clean each of the disassembled parts Use a cleaning brush on the internal threads of the jaw and inside the rivet head 5 Reassembled parts in proper order 6 Use gauge wrench to check that length of jaw assembly is correct Figure 4 This length ensures proper spring tension Rotate jaw assembly as needed until it fits the span of the gauge a...

Page 8: ...fe of the tool Air System Recommendations Equip the air compressor intake with a replaceable air filter that can be easily cleaned Use safety shut off valves so air flow can be stopped quickly in case of a line break When using multiple hoses air hoses should be larger than leader hose Join multiple hoses directly rather than with quick connect fittings which may cause pressure drops and tool powe...

Page 9: ...JET 9 Figure 3 Recommended arrangement of air piping and air line system ...

Page 10: ...ct and repair trigger and or trigger lever Insufficient pulling action Air valve obstructed Clear any obstructions Low air pressure Verify compressor has proper CFM rating for tool Check compressor regulator setting set air pressure to 90 psi Check for loose connections Dirt or gum deposits on components Flush tool with gum solvent If problem persists disassemble clean and lubricate internal parts...

Page 11: ...ollowing pages To order parts or reach our service department call 1 800 274 6848 Monday through Friday 8 00 a m to 5 00 p m CST Please have the stock number and serial number of your tool available when you call so that we may serve you quickly and accurately ...

Page 12: ...12 JAT 920 Pneumatic Riveter 505920 JAT 920 Pneumatic Riveter exploded view ...

Page 13: ...ring 27x2 1 18 706 18 Safety cap 1 19 706 19 Setting screw pin 4x32 1 20 706 20 Backup ring P12 1 Index Part No Description Qty 21 706 21 Backup O ring P12 2 22 706 22 Frame lock nut 1 23 706 23 Rubber cushion 1 24 706 24 Air cylinder 1 25 706 25 Air piston stem 1 26 706 26 Air piston 1 27 706 27 Air piston lock nut 5 16x18UNC 1 29 706 29 Air piston O ring P60 1 31 706 31 Cylinder O ring 70x2 5 1 ...

Page 14: ...14 JAT 920 Pneumatic Riveter This page intentionally left blank ...

Page 15: ...JET 15 This page intentionally left blank ...

Page 16: ...16 JAT 920 Pneumatic Riveter 427 New Sanford Road LaVergne Tennessee 37086 Phone 800 274 6848 www jettools com ...

Reviews: