background image

JET   


User Maintenance 

Inspect  chipping  hammer  before  each  use. 
Ensure that retainer and lock spring are secured. 
After  use,  wipe  down  the  tool  with  a  rag. 
Periodically apply light coat of oil to exposed metal 
surfaces to inhibit rust. (Do not get oil on exhaust 
deflector  which  will  compromise  its  gripping 
surface.) 

Lubrication 

The hammer should be lubricated 

daily

 (or before 

each  use)  with  air  tool  oil  through  the  air  inlet. 
During  continual  operation,  it  should  be  re-oiled 
every 1 to 2 hours. This can be done with an in-
line oiler, or manually. If done manually, proceed 
as follows: 

1. 

Disconnect air hose from tool. 

2. 

Place 4 or 5 drops of air tool oil into air inlet. 

NOTE: Air tool oil not provided; it is available 
at most major hardware and tool stores. SAE 
#10  oil  or  sewing  machine  oil  may  be  used 
as a substitute. Do not use detergent oil. 

3. 

Re-connect  air.  Run  hammer  at  low  throttle 
without  load  for  a  few seconds  to  distribute 
the oil throughout tool. 

4. 

When  finished  operating  chipping  hammer, 
disconnect air hose. Wipe off housing with a 
dry cloth. Place 4 or 5 drops of air tool oil into 
air inlet; re-connect air and run tool for a few 
seconds to distribute the oil. Disconnect air. 

Storage  

Avoid storing the chipping hammer in very humid 
locations  which  promotes  rusting  of  internal 
mechanisms.  Always  oil  the  tool  and  disconnect 
air hose before storage. 

Air System Requirements 

1. 

Use  proper  air  hose  size  (refer  to  tool 
specifications). The hose should be just long 
enough to serve the working area. Excessive 
hose length will cause pressure drop.  

2. 

Make  sure  air  compressor  supplies  clean, 
dry air at correct CFM for the tool. 

3. 

Set air pressure to 90 psi.  


Excess  air  pressure 

and/

or unclean air will shorten the tool’s 

life and may create a hazardous situation. 

4. 

Drain  water from  air compressor tank  daily, 
as  well  as  any  condensation  from  air  lines. 
Water in the air line may enter the tool and 
cause damage. 

5. 

Change filters on the air system on a regular 
basis. 

6. 

Air-line 

pressure 

may 

be 

increased 

accordingly to compensate for extra-long air 
hoses (usually over 25 feet). Inside diameter 
of hose should be minimum 1/2-inch. 

General Air Tool 
Information 

If  the  air  tool  is  not  performing  according  to 
specifications,  the following  are  among  the most 
common  causes.  (See  also 

“Troubleshooting” 

section.) 


Contaminated air such as a dirty air system 
or water in the system. 


Using wrong size tool for the job. 


Poor  maintenance  practices,  such  as  using 
excessive air pressure or air volume. 


Improper or no lubrication. 

Rule of Thumb 

If it takes more than 8 seconds to tighten or loosen 
a  bolt  or  nut  with  an  air  impact  wrench  at 
maximum  setting,  the  air  wrench  is  too  small  or 
the  air  compressor  CFM  is  not  powerful  enough 
for  the  job.  Continued  use  in  either  capacity  will 
cause damage to the tool.  

Tool Pressure 

JET  Air Tools  operate  on  70-to-100  psi  (pounds 
per square inch) air pressure measured at the tool 
when  the  tool  is  operating.  Set  tool  to  90  psi 
unless indicated otherwise. Pressure in excess of 
100 psi will shorten the life of the tool. 

Air System Recommendations 

Equip  the  air  compressor  intake  with  a 
replaceable air filter that can be easily cleaned. 

Summary of Contents for JCT-3620A

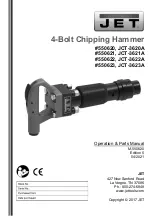
Page 1: ...mmer 550620 JCT 3620A 550621 JCT 3621A 550622 JCT 3622A 550623 JCT 3623A Operation Parts Manual M 550620 Edition 5 04 2021 JET 427 New Sanford Road La Vergne TN 37086 Ph 800 274 6848 www jettools com...

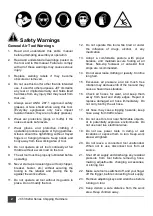
Page 2: ...and placing the tip against the work surface 11 Do not operate air tool without its guards in place Do not modify the tool 12 Do not operate this tool while tired or under the influence of drugs alco...

Page 3: ...er training and knowledge have been obtained 35 Make sure chisel has appropriate shank with oval collar and dimensions for this chipping hammer 36 Always secure tool in retainer and place end of tool...

Page 4: ...eakdown Your tool has been designed and constructed to provide consistent long term operation if used in accordance with the instructions set forth in this document The instructions and warnings in th...

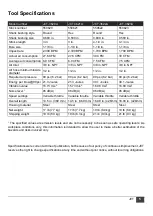
Page 5: ...es 30 1 Joules Vibration value 15 73 m s2 15 73 m s2 16 08 m s2 16 08 m s2 Noise level 1 96 dB A 96 dB A 96 dB A 96 dB A Speed settings Variable throttle Variable throttle Variable throttle Variable t...

Page 6: ...nto groove until completely installed If needed spray lubricant into groove to facilitate spring insertion An unsecured tool can be ejected from the cylinder with force causing injury Retainer and loc...

Page 7: ...serve the working area Excessive hose length will cause pressure drop 2 Make sure air compressor supplies clean dry air at correct CFM for the tool 3 Set air pressure to 90 psi Excess air pressure an...

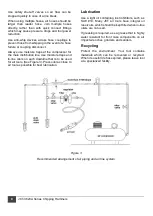
Page 8: ...moisture traps and in line oilers on each downline that is to be used for air tools See Figure 3 Place oiler as close to air tool as possible for best lubrication Lubrication Use a light oil containi...

Page 9: ...power erratic action Low air pressure Verify compressor has proper CFM rating for tool Check compressor regulator setting set air pressure to 90 psi Check for loose connections at air inlet O rings et...

Page 10: ...848 Monday through Friday 8 00 a m to 5 00 p m CST Please have the stock number and serial number of your tool available when you call so that we may serve you quickly and accurately Non proprietary p...

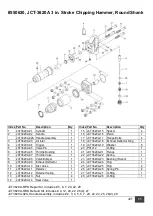
Page 11: ...3620A 12 Retainer Spring 1 13 JCT3620A 13 Nut 4 14 JCT3620A 14 Seat Valve 1 Index Part No Description Qty 15 JCT3620A 15 Spacer 4 16 JCT3620A 16 Piston 1 17 JCT3620A 17 Flange Bolts 4 18 JCT3620A 18 E...

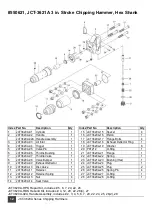
Page 12: ...tainer 1 12 JCT3620A 12 Retainer Spring 1 13 JCT3620A 13 Nut 4 14 JCT3620A 14 Seat Valve 1 Index Part No Description Qty 15 JCT3620A 15 Spacer 4 16 JCT3620A 16 Piston 1 17 JCT3620A 17 Flange Bolts 4 1...

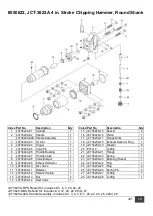
Page 13: ...3620A 12 Retainer Spring 1 13 JCT3620A 13 Nut 4 14 JCT3620A 14 Seat Valve 1 Index Part No Description Qty 15 JCT3620A 15 Spacer 4 16 JCT3622A 16 Piston 1 17 JCT3620A 17 Flange Bolts 4 18 JCT3620A 18 E...

Page 14: ...tainer 1 12 JCT3620A 12 Retainer Spring 1 13 JCT3620A 13 Nut 4 14 JCT3620A 14 Seat Valve 1 Index Part No Description Qty 15 JCT3620A 15 Spacer 4 16 JCT3622A 16 Piston 1 17 JCT3620A 17 Flange Bolts 4 1...

Page 15: ...tional action needed JET has Authorized Service Centers located throughout the United States For the name of an Authorized Service Center in your area call 1 800 274 6846 or use the Service Center Loc...

Page 16: ...16 JCT 3620A Series Chipping Hammers 427 New Sanford Road LaVergne Tennessee 37086 Phone 800 274 6848 www jettools com...

Reviews: