background image

 2


1.0

  IMPORTANT SAFETY INSTRUCTIONS 

-  Misuse of this machine can cause serious 

injury. 

-  For safety, machine must be set up, used and 

serviced properly. 

-  Read, understand and follow instructions in the 

Operating Instructions and Parts Manual which 
was shipped with your machine. 


When setting up machine: 

-  Always avoid using machine in damp or poorly 

lighted work areas. 

- Always be sure the machine support is 

securely anchored to the floor or the work 
bench. 


When using machine: 

-  Always wear safety glasses with side shields 

(See ANSI Z87.1)  

-  Never wear loose clothing or jewelry. 
-  Never overreach—you may slip and fall. 

When servicing machine: 

- Always disconnect the machine from its 

electrical supply while servicing. 

- Always follow instructions in Operating 

Instructions and Parts Manual when changing 
accessory tools or parts. 

-  Never modify the machine without consulting 

JET. 

You—the stationary power tool user—hold the 
key to safety. 

Read and follow these simple rules for best results 
and full benefits from your machine. Used properly, 
JET machinery is among the best in design and 
safety. However, any machine used improperly can 
be rendered inefficient and unsafe. It is absolutely 
mandatory that those who use our products be 
properly trained in how to use them correctly. They 
should read and understand the Operating 
Instructions and Parts Manual as well as all labels 
affixed to the machine. Failure to follow all of these 
warnings can cause serious injuries.

1.1

  Machinery general safety warnings 

1. Always wear protective eye wear when 

operating machinery. Eye wear shall be impact 
resistant, protective safety glasses with side 
shields which comply with ANSI Z87.1 
specifications. Use of eye wear which does not 
comply with ANSI Z87.1 specifications could 
result in severe injury from breakage of eye 
protection. 

2.  Wear proper apparel. No loose clothing or 

jewelry which can get caught in moving parts. 
Rubber soled footwear is recommended for 
best footing. 

3.  Do not overreach. Failure to maintain proper 

working position can cause you to fall into the 
machine or cause your clothing to get caught, 
pulling you into the machine.  

4.  Keep guards in place and in proper working 

order. Do not operate the machine with guards 
removed. 

5.  Avoid dangerous working environments. Do not 

use stationary machine tools in wet or damp 
locations. Keep work areas clean and well lit.  

6.  Avoid accidental starts by being sure the start 

switch is “OFF” before plugging in the machine. 

7. Never leave the machine running while 

unattended. Machine shall be shut off whenever 
it is not in operation. 

8.  Disconnect electrical power before servicing. 

Whenever changing accessories or general 
maintenance is done on the machine, electrical 
power to the machine must be disconnected 
before work is done. 

9.  Maintain all machine tools with care. Follow all 

maintenance instructions for lubricating and the 
changing of accessories. No attempt shall be 
made to modify or have makeshift repairs done 
to the machine. This not only voids the warranty 
but also renders the machine unsafe. 

10.  Machinery must be anchored to the floor. 

11.  Secure work. Use clamps or a vise to hold work, 

when practical. It is safer than using your hands 
and it frees both hands to operate the machine. 

12.  Never brush away chips while the machine is in 

operation. 

13. Keep work area clean. Cluttered areas invite 

accidents. 

14. Remove adjusting keys and wrenches before 

turning machine on. 

15. Use the right tool. Don’t force a tool or 

attachment to do a job for which it was not 
designed. 

16.  Use only recommended accessories and follow 

manufacturer’s instructions pertaining to them. 

Summary of Contents for JDP-20VS-3

Page 1: ...Manual 20 Variable Speed Drill Press Models JDP 20VS 1 JDP 20VS 3 JDP 20VST JDP 20VST JDP 20VS JET 427 New Sanford Road LaVergne Tennessee 37086 Part No M 354230 Ph 800 274 6848 Edition 5 10 2018 www...

Page 2: ...not comply with ANSI Z87 1 specifications could result in severe injury from breakage of eye protection 2 Wear proper apparel No loose clothing or jewelry which can get caught in moving parts Rubber...

Page 3: ...y 1 2 General electrical cautions This drill press should be grounded in accordance with the National Electrical Code and local codes and ordinances This work should be done by a qualified electrician...

Page 4: ...lds complying with ANSI Z87 1 specifications Use of eye wear which does not comply with ANSI Z87 1 specifications could result in severe injury from breakage of eye protection B Figure 1 1 7 When dril...

Page 5: ...ation 12 9 1 Operating precautions 12 9 2 Drilling recommendations 12 10 0 User maintenance 13 10 1 Drive belt replacement 13 10 2 Motor replacement 13 10 3 Lubrication 13 10 4 Additional servicing 13...

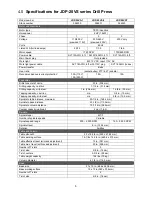
Page 6: ...Drilling capacity mild steel 1 in 25 4 mm 1 3 8 in 35 mm Tapping capacity cast iron n a 3 4 in 19 mm Tapping capacity mild steel n a 5 8 in 15 9 mm Spindle to table distance maximum 30 1 4 in 768 4 m...

Page 7: ...des 2 The specified values are emission levels and are not necessarily to be seen as safe operating levels As workplace conditions vary this information is intended to allow the user to make a better...

Page 8: ...ft key 1 Operating and parts manual 1 Product registration card 5 2 Securing base It is strongly recommended that drill press be secured to floor The drill press base has four mounting slots see Figur...

Page 9: ...is available for the operator During hard wiring of the machine make sure the fuses have been removed or the breakers have been tripped in the circuit to which the drill press will be connected ALWAY...

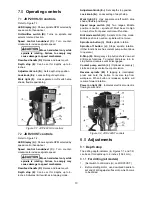
Page 10: ...th stop position Lock knob E2 Locks setting of depth stop Work light F Has separate on off switch atop shade flexible positioning Speed range switch G Two ranges Middle position is neutral spindle off...

Page 11: ...of scrap wood on table 4 Raise table to approximately 8 to 10 inches below spindle 5 Insert MT 4 tool into spindle 6 Lower spindle using downfeed handle and seat tool against the wood 7 If installing...

Page 12: ...at which the outer periphery of the tool moves in relation to the work being drilled The common term for this is Surface Feet per Minute SFM The relationship of SFM is expressed in the following formu...

Page 13: ...ower to drill press to avoid possibility of inadvertent operation and exposure to potentially lethal voltage levels 1 Remove drive belt sect 10 1 2 Disconnect electrical wiring from motor junction box...

Page 14: ...locations and drill holes Refer to Figure 11 1 Note Mount components near the lower edge of the spindle casting DO NOT mount components above the line shown in Figure 11 1 5 Install power switch and...

Page 15: ...No or improper cutting fluid or coolant being used Use cutting fluid or change to proper fluid or coolant for material being drilled Improperly ground drill bit Check for proper angles and reliefs Reg...

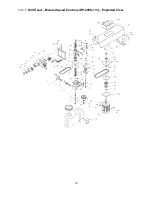
Page 16: ...16 13 1 1 Drill Head Manual Speed Control JDP 20VS 1 3 Exploded View...

Page 17: ...ring 6302zz 2 29 F006077 C Ring Internal Hole R 42 1 30 JDP20VS TH30 Speed Change Bracket 1 30 1 JDP20VS TH30 1 Support Rod 1 30 2 6286478 C Ring External Shaft S 12 2 31 JDP20VS TH31 Speed Change Lev...

Page 18: ...bly 1PH includes 74 78 1 JDP20VS TH69 3 Fwd Rev Switch Assembly 3PH includes 74 78 1 70 JDP20VS TH70 Cap Screw 2 71 JDP20VS TH71 Face Plate 1 72 TS 1533032 Phillips Pan Hd Machine Screw M5x10 4 73 551...

Page 19: ...19 13 2 1 Drill Head Two Speed Control JDP20VST Exploded View...

Page 20: ...302zz 2 29 F006077 C Ring Internal Hole R 42 1 30 JDP20VS TH30 Speed Change Bracket 1 30 1 JDP20VS TH30 1 Support Rod 1 30 2 6286478 C Ring External Shaft S 12 2 31 JDP20VS TH31 Speed Change Lever 1 3...

Page 21: ...Switch 1 104 JDP20VST TH104 Selection Switch D T 1 105 JDP20VST TH105 Emergency Stop Switch 1 106 JDP20VST TH106 Stop Switch 1 107 JDP20VST TH107 Start Switch 1 108 JDP20VST TH108 Electric Box 1 109 J...

Page 22: ...22 13 3 1 Spindle Components All Models Exploded View...

Page 23: ...x Nut 1 4 1 28 5510273 Depth Rod 1 29 JDP20VS LH29 Depth Scale Bracket 1 30 5510272 Nut 1 31 5510278 Depth Scale 1 32 5510279 Screw 3 16 x5 16 4 33 5510266 Spring Seat 1 34 5510265 Screw 3 16 x5 16 3...

Page 24: ...cket Bar 1 3 32106A 3 Bushing 1 4 32106A 4 Spacer 1 5 32106A 5 Lock Handle M6x20 1 6 32106A 6 C Clip S30 1 7 32106A 7 Bracket 1 8 32106A 8 Safety Shield 530x210mm 1 9 32106A 9 Lower Bracket Bar 1 10 T...

Page 25: ...25 13 5 1 Table and Base Assembly All Models Exploded View...

Page 26: ...Large Bevel Gear 1 18 5517391 Bearing Housing 1 18 1 BB 6202ZZ Ball Bearing 6202ZZ 2 18 2 TS 0720071 Washer 1 4 2 18 3 TS 1482041 Cap Screw M6x20 2 19 5510304 Small Bevel Gear 2 20A J 5510305A Bracket...

Page 27: ...Flat Washer 10 2 58 5517488 Hex Nut 1 2 1 59 5517489 Power Cord 1 60 5517490 Switch Assembly 1 61 5517491 Pump Cord 1 Phase 1 5517492 Pump Cord 3 Phase 1 62 5517493 Hose Clamp Rad Type 2 65 5512104 Co...

Page 28: ...28 14 0 Electrical connections Similar diagrams are affixed inside electrical cabinet door In case of discrepancy diagrams on machine take precedence 14 1 JDP 20VS 1 and JDP 20VS 3 wiring diagram...

Page 29: ...29 14 2 JDP20VST wiring diagram...

Page 30: ...tional action needed JET has Authorized Service Centers located throughout the United States For the name of an Authorized Service Center in your area call 1 800 274 6846 or use the Service Center Loc...

Page 31: ...31 This page intentionally left blank...

Page 32: ...32 427 New Sanford Road LaVergne Tennessee 37086 Phone 800 274 6848 www jettools com...

Reviews: