background image


16 

below  the  straightedge  (a  gap  exists)  or 
pushes  the  straightedge  up,  proceed  to  the 
next step. 

6.  Using a 4mm hex wrench, slightly loosen the 

four gib screws. 

7.  Using  a  3mm  hex  wrench,  loosen  the  cam 

locking  screws  to  permit  adjustment  of  the 
cam (described in the next step). 

Important:

  Always  keep  the  cam  locking 

screws  snug  enough  so  that  the  cam  can’t 
rotate freely. This is especially important for 
when  the  cam  is  rotated  counterclockwise 
since  this  action  will  cause  the  cam  locking 
screw to loosen further. 

8.  Using an 8mm hex wrench, adjust the cam. 

This is a very sensitive adjustment. Start by 
rotating the cam in a clockwise direction just 
a few degrees. 

9.  Next,  keep  the  cutterhead  steady  by  firmly 

holding  on  to  the  pulley,  place  a  piece  of 
wood  pressed  against  the  knife’s  edge  and 
press to properly seat the blade. 

10.  Check  your  progress  by  repeating  steps  4 

and  5.  If  the  knife  becomes  more  out  of 
adjustment,  turn  the  cam  in  the  other 
direction. 

11.  The adjustment is almost complete when the 

requirements described in Steps 4 and 5 are 
met. 

12.  Next, while pressing the knife firmly against 

the cam, snug the two inside gib screws that 
hold  the  gib  and  knife  in  place.  Verify  that 
the  knife  is  still  in  adjustment  (steps  4  and 
5). 

13.  Tighten the two outside gib screws, then the 

two inside gib screws. Verify that the knife is 
still in adjustment (steps 4 and 5). 

14.  Tighten the gib lock screws. 

15.  Repeat  this  entire  procedure  for  the 

remaining two knives. 


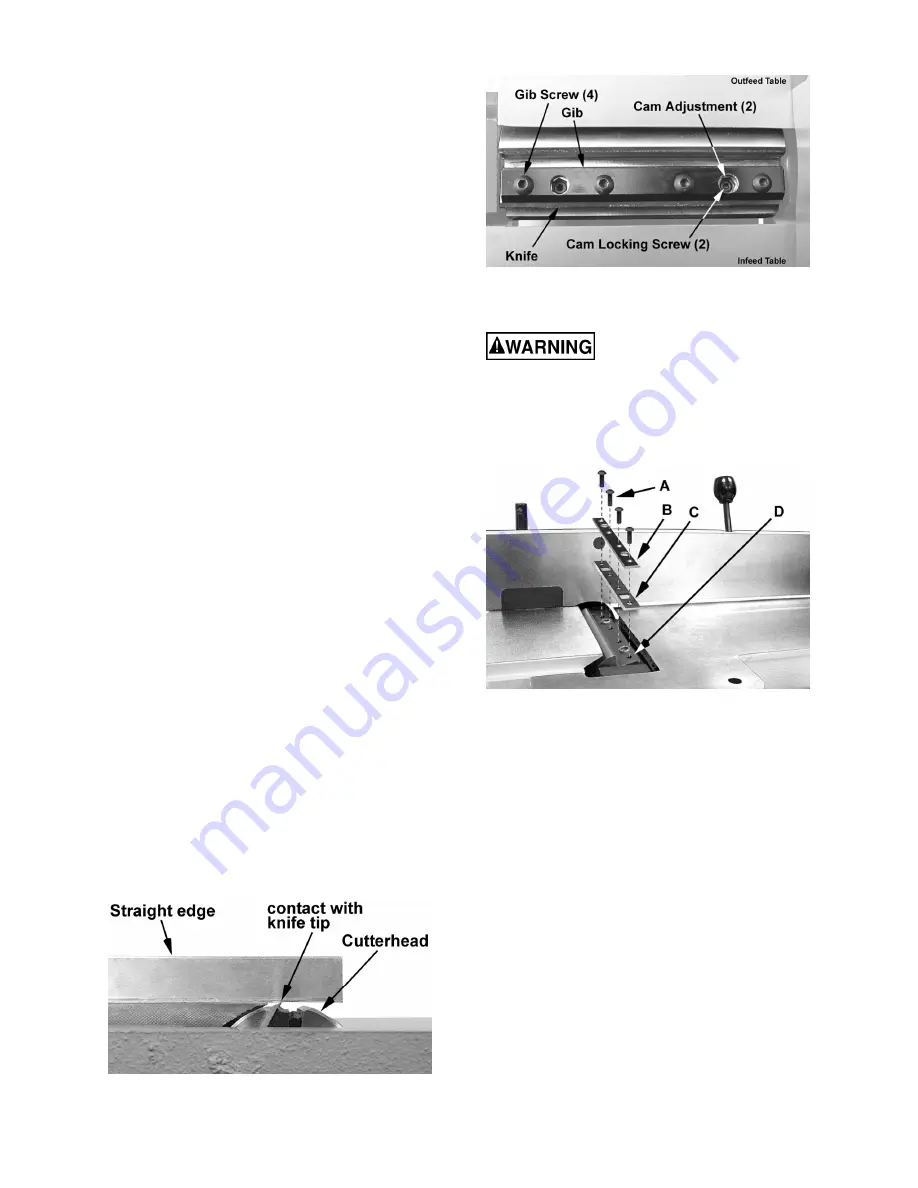
Figure 8-11 


Figure 8-12 

8.8

  Replacing knives (JJ-6CSDX) 


Jointer 

knives 

are 

dangerously  sharp.  Use  extreme  caution 
when  inspecting,  removing,  or  replacing 
knives. 


To  remove/replace  a  knife  (Refer  to  Figure 8-
13): 


Figure 8-13 

1.  Remove four 

gib screws

 (A) with a 4mm hex 

wrench. 

2.  Remove the 

gib

 (B) and 

knife

 (C). 

If  the  knife  is  being  reused  (knives  are 
double-edged),  clean  the  knife,  gib  and 
cutterhead of all pitch and debris. 

3.  Lay the new knife or unused edge of the old 

knife back onto the 

cutterhead

 (D). 

4.  Replace  the 

gib

  (B)  and 

screws

  (A).  Finger 

tighten only at this time. 

5.  Press against the cutting edge of the knife at 

the center of the blade with a piece of wood. 

DO  NOT  USE  FINGERS! 

This  is  to  ensure 

that  the  cam  is  making  proper  contact  with 
the knife. 

6.  Snug the inside two screws, then the outside 

two screws.  

7.  Release the piece of wood pressing against 

the knife and tighten the gib screws. 

Summary of Contents for JJ-6HHDX

Page 1: ...Manual 6 inch Woodworking Jointer Models JJ 6CSDX JJ 6HHDX JET 427 New Sanford Road LaVergne Tennesseee 37086 Part No M 708457DX Ph 800 274 6848 Revision D1 06 2019 www jettools com Copyright 2018 JET...

Page 2: ...maintenance with the machine unplugged from the power source 13 Remove adjusting keys and wrenches Form a habit of checking to see that keys and adjusting wrenches are removed from the machine before...

Page 3: ...such as edging surfacing etc depth of cut should not be over 1 8 to avoid overloading the machine and to minimize chance of kickback 35 To avoid kickback the grain must run in the same direction you a...

Page 4: ...ck is highly recommended Figure 1 2 On Off Switch Padlock 2 0 Introduction This manual is provided by JET covering the safe operation and maintenance procedures for Models JJ 6CSDX and JJ 6HHDX Jointe...

Page 5: ...Models Exploded View 27 15 1 2 Fence Assembly All Models Parts List 28 15 2 1 Stand Assembly JJ 6CSDX Exploded View 29 15 2 2 Stand Assembly JJ 6CSDX Parts List 30 15 3 1 Stand Assembly JJ 6HHDX only...

Page 6: ...8 W x 56 L x 31 1 4 H Fence 3 7 8 H x 32 3 4 L 3 7 8 H x 32 3 4 L Knife Size 6 1 16 x 3 4 x 5 64 T 0 59 L x 0 59 W x 0 10T Fence Tilt 45 L 45 R 45 L 45 R Positive Stops 45 L 90 45 R 45 L 90 45 R Motor...

Page 7: ...Hardware 1 Pedestal Switch with Mounting Hardware JJ 6HHDX only Main Unit Carton 1 Bed Assembly 1 Fence Assembly 1 Cutterhead Guard A 1 Belt Guard E 1 V Belt D 4 1 4 20 x 1 2 Pan Head Screws L 4 1 4...

Page 8: ...ation label C on the bed faces the same direction as the switch D on the stand Figure 6 1 2 Line up two holes in the stand top E with holes in the bed assembly by viewing through the access door in re...

Page 9: ...sure that motor pulley and cutterhead pulley are vertically aligned and the V belt does not contact the sides of the opening in the base If the pulleys are not aligned remove belt and adjust the moto...

Page 10: ...to the fence when released If guard does not return fully pull guard apply more tension to the spring knob B by turning it another half turn counter clockwise and re insert guard If guard closes too...

Page 11: ...odworking Jointer is ready to run at 115 volt operation This Jointer when wired for 115 volt is intended for use on a circuit that has an outlet and a plug that look like the ones illustrated in A Fig...

Page 12: ...Fig 8 1 It also tilts up to 45 degrees forward and has a positive stop at 90 degrees To slide fence forward or backward When edge jointing the fence assembly should periodically be moved to different...

Page 13: ...Figure 8 3 1 Set the infeed table to approximately the same height as the outfeed table 2 Move the fence by releasing lock handle D and pushing the fence assembly until it overlaps the tables B 3 Tigh...

Page 14: ...s B Note The infeed table has three gib adjustment screws A Infeed The outfeed table has two gib adjustment screws A Outfeed and two gib lock wing screws B 2 Tighten each setscrew 1 4 turn starting at...

Page 15: ...Setting cutterhead knives JJ 6CSDX Note Before setting knives for model JJ 6CSDX Jointer the Outfeed Table Adjustment should be done to ensure the proper knife height in relation to the outfeed table...

Page 16: ...ng the knife firmly against the cam snug the two inside gib screws that hold the gib and knife in place Verify that the knife is still in adjustment steps 4 and 5 13 Tighten the two outside gib screws...

Page 17: ...t No further adjustment is necessary Use the two provided star point screwdrivers to remove the knife insert screw Use one of the screwdrivers to help hold the cutterhead in position and the other to...

Page 18: ...ct setting Figure 8 18 illustrates the correct setting of outfeed table level with the knives The workpiece will rest firmly on both tables with no open space under the finished cut Figure 8 18 9 0 Op...

Page 19: ...orkpiece for grain orientation 10 1 Hand placement Never pass hands directly over the cutterhead At the start of the cut the left hand holds the workpiece firmly against the infeed table and fence whi...

Page 20: ...th of rabbet 3 Check width of the rabbet by measuring the distance from the end of a knife in the cutterhead to the fence 4 Re connect power It is easier and safer to take a series of shallow cuts Low...

Page 21: ...ully remove with a strong solvent Failure to remove gum and pitch build up may result in excessive friction blade wear and overheating When blades become dull replace them 11 2 Cutterhead removal The...

Page 22: ...ck on the V belt 9 Using a 3mm hex wrench loosen two set screws that secure the cutterhead pulley D to the cutterhead shaft Set the pulley and shaft key aside 10 Using a 14mm wrench remove two screws...

Page 23: ...e straight edge across front of outfeed table and extending over infeed table 7 Raise infeed table until it contacts straight edge and tighten infeed table in position 8 The straight edge should lie e...

Page 24: ...od Inspect wood closely for imperfections use different stock if necessary Fuzzy grain Wood has high moisture content Allow wood to dry or use different stock Dull knives or knife inserts Sharpen or r...

Page 25: ...If incoming voltage is incorrect you have a power supply problem If voltage between switch and motor is incorrect you have a switch problem If voltage between switch and motor is correct you have a mo...

Page 26: ...service department call 1 800 274 6848 Monday through Friday 8 00 a m to 5 00 p m CST Having the Model Number and Serial Number of your machine available when you call will allow us to serve you quick...

Page 27: ...27 15 1 1 Fence Assembly All Models Exploded View...

Page 28: ...5 Stud 1 14 JEJ F06 Swivel Block 1 15 JEJ F07 Plate 1 16 5FF J12 Spring Pin 4x12 mm 1 17 JEJ F08 Hex Cap Bolt 1 18 JEJ F09 Plate 1 19 TS 0640132 Hex Nylon Lock Nut 5 8 18UNF 1 20 JEJ F10 Bushing 1 21...

Page 29: ...29 15 2 1 Stand Assembly JJ 6CSDX Exploded View...

Page 30: ...1 JI X04 DA Junction Box motor not shown 1 JI X04 EA Junction Box Cover motor not shown 1 JI X02 A Motor Cord not shown 1 JJ6CS HK Hardware Kit not shown 1 TS 152704 Hex Key Wrench 3mm not shown 3 mm...

Page 31: ...31 15 3 1 Stand Assembly JJ 6HHDX only Exploded View...

Page 32: ...TS 152704 Hex Wrench 3mm not shown 3 mm 1 TS 152707 Hex Wrench 6mm not shown 6 mm 1 JJ6CS OEW Open End Wrench 8 10mm not shown 8 10 mm 1 JJ6CS OEW2 Open End Wrench 12 14mm not shown 12 14 mm 1 27 JJ6...

Page 33: ...33 15 4 1 Bed Assembly All models Exploded View...

Page 34: ...1 29 JH T25 Spring 1 30 JH T26 Spring Knob 1 31 JH T27 Retainer 1 32 TS 081B042 Screw 8 32x5 8 3 33 JC T17 Pointer 1 34 TS 081B012 Screw 8 32x1 4 1 35 JJ6 19 Depth Scale 1 36 JJ6 01CS Warning Label 1...

Page 35: ...ck Washer 3 8 2 3 JEA B01 Bolt 2 4 3H C02 Bearing Housing 1 5 BB 6202ZZ Ball Bearing 6202ZZ 1 6 JJ6CSDX 106 Cutterhead 1 7 5F G108 Key 5x5x25 mm 1 8 BB 6203ZZ Ball Bearing 6203ZZ 1 9 JH C04 Bearing Ho...

Page 36: ...JH C07 Cutterhead Pulley 1 3 JH C04 Bearing Housing 1 4 BB 6203VV Ball Bearing 6203VV 1 5 5F G108 Key 5x5x25 mm 1 1791221 4 Helical Cutterhead Unit Index 6 thru 8 1 6 1791212 Knife Insert set of 10 to...

Page 37: ...37 16 0 Wiring diagrams All Models...

Page 38: ...tional action needed JET has Authorized Service Centers located throughout the United States For the name of an Authorized Service Center in your area call 1 800 274 6846 or use the Service Center Loc...

Page 39: ...39 This page intentionally left blank...

Page 40: ...40 427 New Sanford Road LaVergne Tennessee 37086 Phone 800 274 6848 www jettools com...

Reviews: