background image


Grounding Instructions 


Caution:  This tool must be grounded while in use to protect the operator from electric shock. 

 
In the event of a malfunction or breakdown, grounding provides a path of least resistance for electric 
current to reduce the risk of electric shock.  This tool is equipped with an electric cord having an 
equipment-grounding conductor and a grounding plug.  The plug must be plugged into a matching outlet 
that is properly installed and grounded in accordance with all local codes and ordinances. 
 
Do not modify the plug provided.  If it will not fit the outlet, have the proper outlet installed by a qualified 
electrician. 
 
Improper connection of the equipment-grounding conductor can result in a risk of electric shock.  The 
conductor, with insulation having an outer surface that is green with or without yellow stripes, is the 
equipment-grounding conductor.  If repair or replacement of the electric cord or plug is necessary, do not 
connect the equipment-grounding conductor to a live terminal. 
 
Check with a qualified electrician or service personnel if the grounding instructions are not completely 
understood, or if in doubt as to whether the tool is properly grounded.  Use only three wire extension 
cords that have three-prong grounding plugs and three-pole receptacles that accept the tool’s plug. 
 
Repair or replace a damaged or worn cord immediately. 


115 Volt Operation 

 
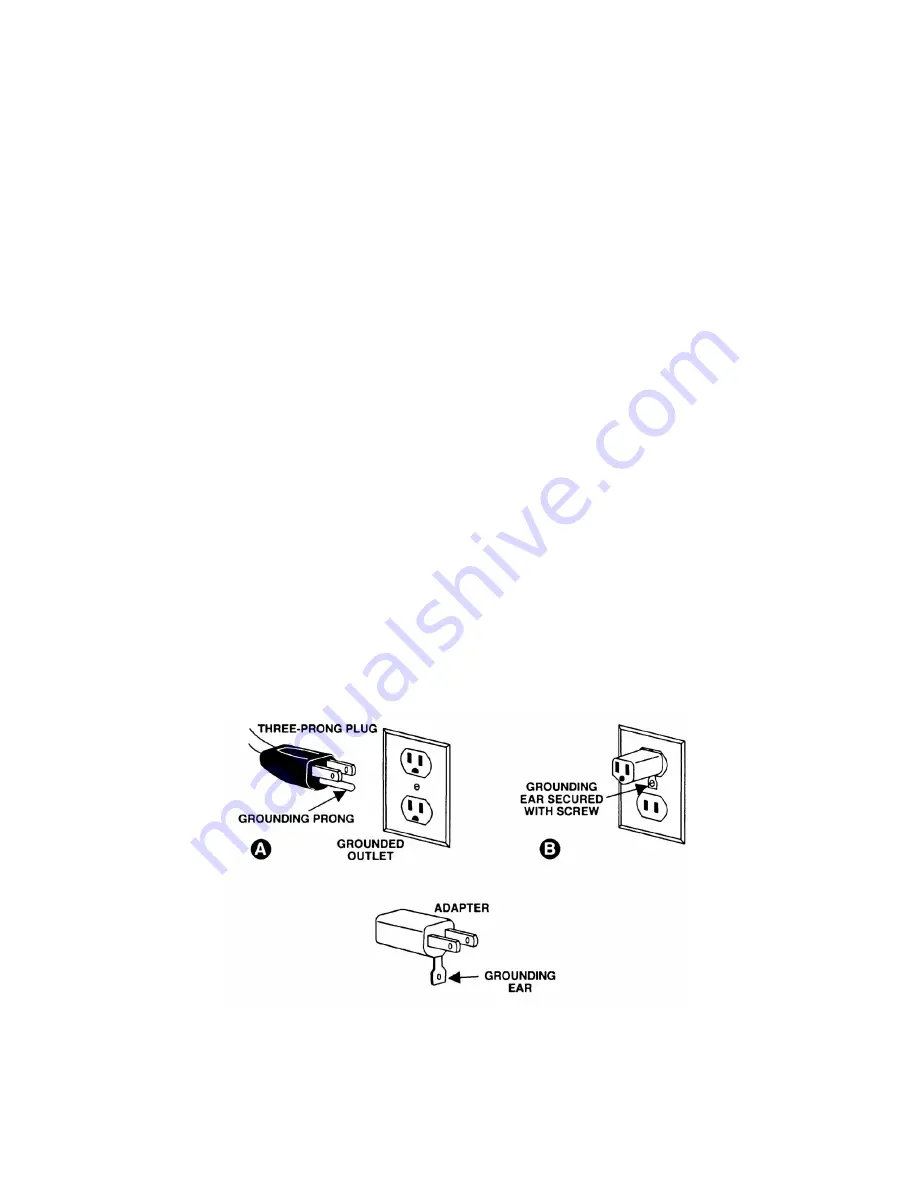
As received from the factory, your sander is ready to run at 115 volt operation.  This sander, when wired 
for 115 volt, is intended for use on a circuit that has an outlet and a plug that looks like the one illustrated 
in (A).  A temporary adapter, which looks like the adapter as illustrated in (B), may be used to connect 
this plug to a two-pole receptacle, as shown in (B) if a properly grounded outlet is not available. The 
temporary adapter should only be used until a properly grounded outlet can be installed by a qualified 

electrician.  

This adapter is not applicable in Canada. 

 The green colored rigid ear, lug, or tab, 

extending from the adapter, must be connected to a permanent ground such as a properly grounded 
outlet box, as shown in (B). 


Summary of Contents for JOVS-10

Page 1: ...al Oscillating Spindle Sander Model JOVS 10 WALTER MEIER Manufacturing Inc 427 New Sanford Road LaVergne Tennessee 37086 Part No M 708411 Ph 800 274 6848 Revision A 04 2010 www waltermeier com Copyright 2010 Walter Meier Manufacturing Inc ...

Page 2: ...age prepaid to a location designated by us For the name of the location nearest you please call 1 800 274 6848 You must provide proof of initial purchase date and an explanation of the complaint must accompany the merchandise If our inspection discloses a defect we will repair or replace the product or refund the purchase price at our option We will return the repaired product or replacement at ou...

Page 3: ...nding Sleeves 9 Installing Sanding Assemblies 9 Removing Sanding Assemblies 9 Table Insert 10 Sanding Assembly 90 to Table 10 Replacing Sanding Sleeve 11 Dust Collection 11 Maintenance 11 Replacement Parts 12 Breakdown for the JOVS 10 Oscillating Spindle Sander 13 Parts List for the JOVS 10 Oscillating Spindle Sander 14 Sanding Assemblies 16 Sanding Assemblies 17 Electrical Connections 18 ...

Page 4: ...esigned USE THE PROPER EXTENSION CORD Make sure your extension cord is in good condition When using an extension cord be sure to use one heavy enough to carry the current your machine will draw An undersized cord will cause a drop in the line voltage resulting in power loss and overheating The table following shows the correct size to use depending on the cord length and nameplate ampere rating If...

Page 5: ...epending on how often you do this type of work To reduce your exposure to these chemicals work in a well ventilated area and work with approved safety equipment such as those dust masks that are specifically designed to filter out microscopic particles DO NOT operate tool while under the influence of drugs alcohol or any medication AVOID kickback by sanding in accordance with directional arrows DO...

Page 6: ...quipment grounding conductor to a live terminal Check with a qualified electrician or service personnel if the grounding instructions are not completely understood or if in doubt as to whether the tool is properly grounded Use only three wire extension cords that have three prong grounding plugs and three pole receptacles that accept the tool s plug Repair or replace a damaged or worn cord immedia...

Page 7: ... or comments please contact either your local supplier or Walter Meier Walter Meier can also be reached at our web site www waltermeier com Specifications Model Number JOVS 10 Stock Number 708411 Table Size in 24 x 24 Table Tilt deg 45 down Dust Port Diameter in 4 Spindle Speed RPM 1 725 Oscillations Per Minute 75 Length of Oscillation in 1 1 2 Motor TEFC 1HP 1Ph 115V Only 60Hz Overall Dimensions ...

Page 8: ...ual before attempting assembly or operation of the sander Failure to comply may cause serious injury 1 Remove all contents from shipping carton 2 Report any damage to your distributor 3 Do not discard any shipping material until the sander has been assembled and is running properly 4 With help from another person move the sander off of the pallet and into the desired position 5 Remove the protecti...

Page 9: ...ng Assemblies Disconnect the sander from the power source when installing or removing sanding assemblies Failure to comply may cause serious injury 1 Thoroughly clean the arbor and arbor housing before installing the sanding assemblies 2 Thread the arbor A Figure 3 into the arbor housing B Figure 3 3 Use the provided wrenches to hold the lower arbor housing nut C Figure 3 while turning the arbor n...

Page 10: ... Assembly 90 to Table 1 Loosen the lock knobs C Figure 5 on the trunnions and position the table so that it rests against the 90 stop D Figure 6 Tighten lock knobs 2 Place a square E Figure 5 on the working side of the table and make sure the sanding drum is perpendicular to the table 3 If an adjustment needs to be made loosen the hex nut F Figure 6 4 Loosen lock knobs 5 Rotate the 90 stop in the ...

Page 11: ...Tighten the set screw Dust Collection In order to collect wood dust attach a dust collection hose to the dust port A variety of JET dust collectors air filtration units hoses and adaptors etc are available that will work effectively with your new sander Contact your local JET Distributor for more information Maintenance The manufacturer recommends replacing the 90 SAE gear lube at 800 hours of use...

Page 12: ...tand or base on uneven surface Adjust stand or base so that it rests evenly on the floor Sanded edge not square Table not square to sanding drum Use a square to adjust table to sanding drum Sanding marks on wood Wrong grit sanding sleeve Use coarser grit for stock removal and fine grit for finish sanding Feed pressure too great Never force workpiece Replacement Parts Replacement parts are listed o...

Page 13: ...13 Breakdown for the JOVS 10 Oscillating Spindle Sander ...

Page 14: ... 64 OVS10 064 Oil Lid 1 66 OVS10 066 Hex Socket Cap Screw 3 8 16x3 4 4 67 TS 0680042 Flat Washer 3 8 8 86 OVS10 086 Angle Pointer 1 87 OVS10 087 Pan Head Machine Screw 10 24x1 4 1 88 OVS10 088 Cap 1 89 OVS10 089 Nut 15 16 24 R H 2 134 JOVS10 134 Oil Plug PT1 4 1 135 JOVS10 135 Brass Bushing Bracket 1 136 JOVS10 136 Shaft Brass Bushing 4 137 JOVS10 137 Knob 5 16 18x3 4 1 139 JOVS10 139W Bracket Bas...

Page 15: ...d 1 170 TS 0561031 Hex Nut 3 8 16 2 171 JOVS10 171 Rubber Feet 4 172 JOVS10 172 Sinking Head Screw 5 16 18x3 4 4 174 JOVS10 174 JET Logo 1 177 JOVS10 177 Pan Head Screw 3 16 24x3 8 2 178 JOVS10 178 Switch 1 179 JOVS10 179 Spring Pin 3x22 1 180 JOVS10 180 Fiber Washer 3 8 2 181 TS 0720091 Lock Washer 3 8 4 182 TS 0271071 Set Screw 3 8 16x3 4 1 183 JOVS10 183 Warning Label 1 184 JOVS10 184 I D Label...

Page 16: ...16 Sanding Assemblies ...

Page 17: ...g Sleeve 60 Grit 1 575819 Sanding Sleeve 80 Grit 1 575820 Sanding Sleeve 100 Grit 1 112 OVS10 112 Washer 1 2 113 575814 Sanding Sleeve 60 Grit 3 4 575815 Sanding Sleeve 80 Grit 3 4 575816 Sanding Sleeve 100 Grit 3 4 114 OVS10 114A Arbor 5 8 1 115 OVS10 115 Hex Nut 5 8 1 118 575810 Sanding Sleeve 60 Grit 5 8 575811 Sanding Sleeve 80 Grit 5 8 575812 Sanding Sleeve 100 Grit 5 8 575813 Sanding Sleeve ...

Page 18: ...18 Electrical Connections ...

Page 19: ...19 ...

Page 20: ...20 WALTER MEIER Manufacturing Inc 427 New Sanford Road LaVergne Tennessee 37086 Phone 800 274 6848 www waltermeier com ...

Reviews: