12
8.3
Tool rest adjustment
As the wheel wears down, the tool rest must be re-
adjusted to maintain a 1/16" to 1/8” distance.
1. Loosen two hex cap screws (H, Figure 8) with
a 12mm wrench.
2. Slide tool rest bracket (Q) as needed.
3. Tighten
screws
(H).
9.0
Operation
A bench grinder is designed for hand-grinding
operations such as sharpening chisels,
screwdrivers, drill bits, removing excess metal, and
smoothing metal surfaces.
A
Medium Grain Abrasive Grinding Wheel
is
suitable for rough grinding where a considerable
amount of metal must be removed or when
obtaining a smooth finish is not important.
A
Fine Grain Abrasive Grinding Wheel
should be
used for sharpening tools to close size tolerances
because it removes metal more gradually for
precision grinding and gives work a smooth finish.
Do not operate this grinder
without all guards and shields in place and in
working order. Always use approved safety
glasses or face shields. Failure to comply may
cause serious injury.
9.1
Switch
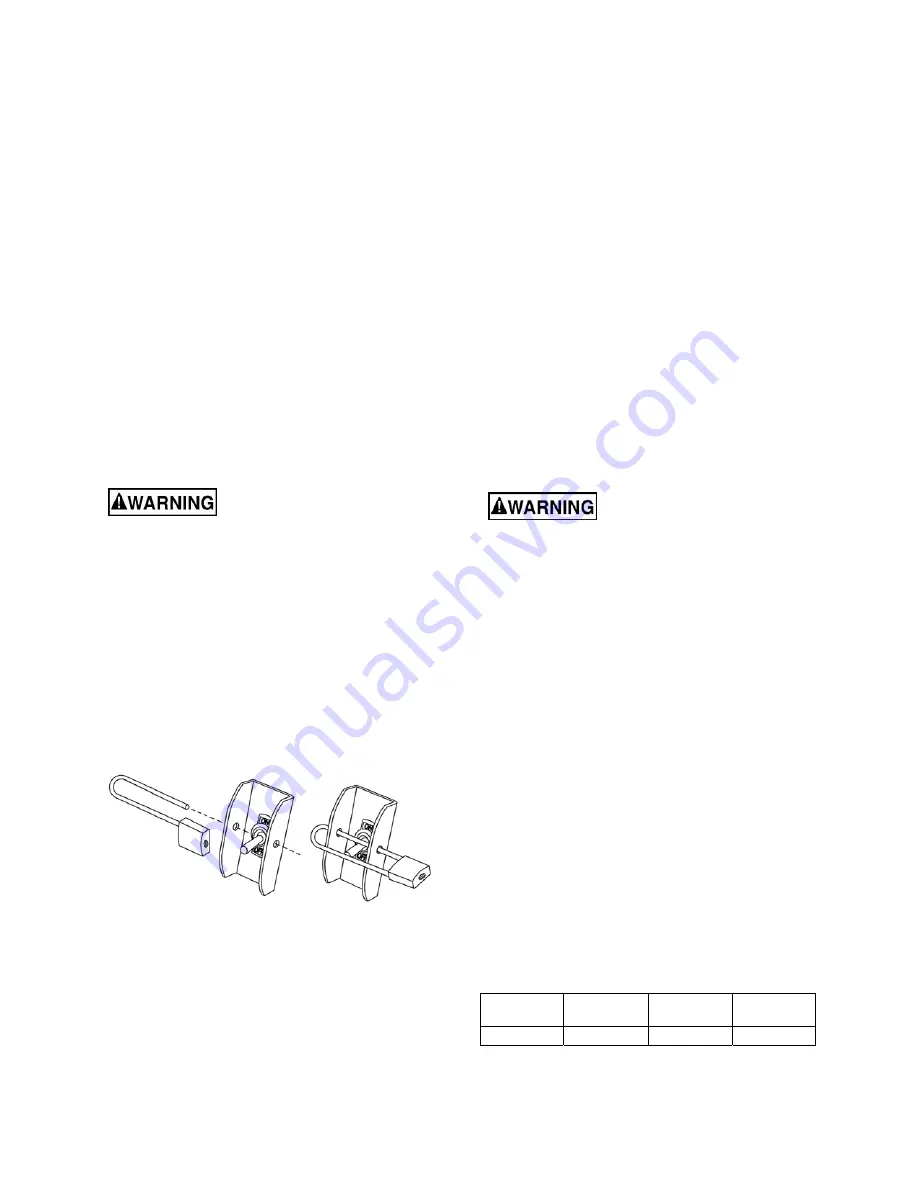
The toggle switch guard will accept a padlock, as
shown in Figure 9. To safeguard the grinder from
unauthorized operation and accidental starting by
young children, use of a padlock (not provided) is
highly recommended. Place the key in a location
inaccessible to children and others not qualified to
use the tool.
Figure 9 – switch lockout (padlock not provided)
9.2
Precautions
Before starting the grinder, turn the wheels by hand
to verify they are clear of obstructions and will turn
freely. Tool rests and spark guards should not
touch the wheel.
Adjust spark arrestor, eye shield, and tool rest into
proper positions. Stand to one side of the wheel
paths, and turn on the grinder. Allow it to reach full
running speed before beginning operation.
Keep a steady, moderate pressure on the
workpiece and keep it moving at an even pace for
smooth grinding. Pressing too hard overheats the
motor and prematurely wears down the grinding
wheels. Note the original bevel angle on the item to
be sharpened and try to maintain the same shape.
The tilt scale on the tool rest will aid in establishing
this angle. The grinding wheel should rotate into
the object being sharpened. Keep a tray filled with
water and dip your work into it regularly to prevent
overheating. Overheating can weaken metals.
Do not use the side of the grinding wheel; this puts
dangerous stress on the wheel.
When the wheel becomes loaded or dull, use an
approved grinding wheel dresser and dress the
wheel face.
Keep tool rest and spark guard to within 1/16" of
the grinding wheel. See
Adjustment
section to
adjust.
10.0
Maintenance
Always disconnect power to
the machine before performing maintenance.
Failure to do this may result in personal injury.
For safety, turn the switch to OFF and remove plug
from the power source outlet before adjusting or
servicing the bench grinder. If the power cord is
worn, cut or damaged in any way, have it replaced
immediately.
10.1
Care of grinding wheels
In normal use, grinding wheels may become
cracked, grooved, rounded at the edges, chipped,
out of true or loaded with foreign material.
Cracked wheels should be replaced
immediately
.
While any of the other conditions can be remedied
with a dressing tool (available at most hardware
stores), new wheels sometimes require dressing to
make them round.
10.2
Changing wheels
If you must replace a wheel be sure to obtain one
with a safe rated speed at least as high as the
NO
LOAD RPM
marked on the grinder's nameplate.
Table 2 shows correct dimensions for the
replacement wheel.
Wheel
Diameter
Maximum
width
Center
hole
JWBG-8 8”
3/4" 5/8”
Table 2


