4
24. Check centers and center sockets in the headstock and tailstock to be sure they are free of dirt or rust
and oil lightly before inserting centers.
25. Test each set-up by revolving the work by hand to insure it clears the tool rest and bed. Check setup
at the lowest speed before increasing it to the operating speed.
26. Use the correct cutting tool for the operation to be performed and keep all tools in a sharpened
condition.
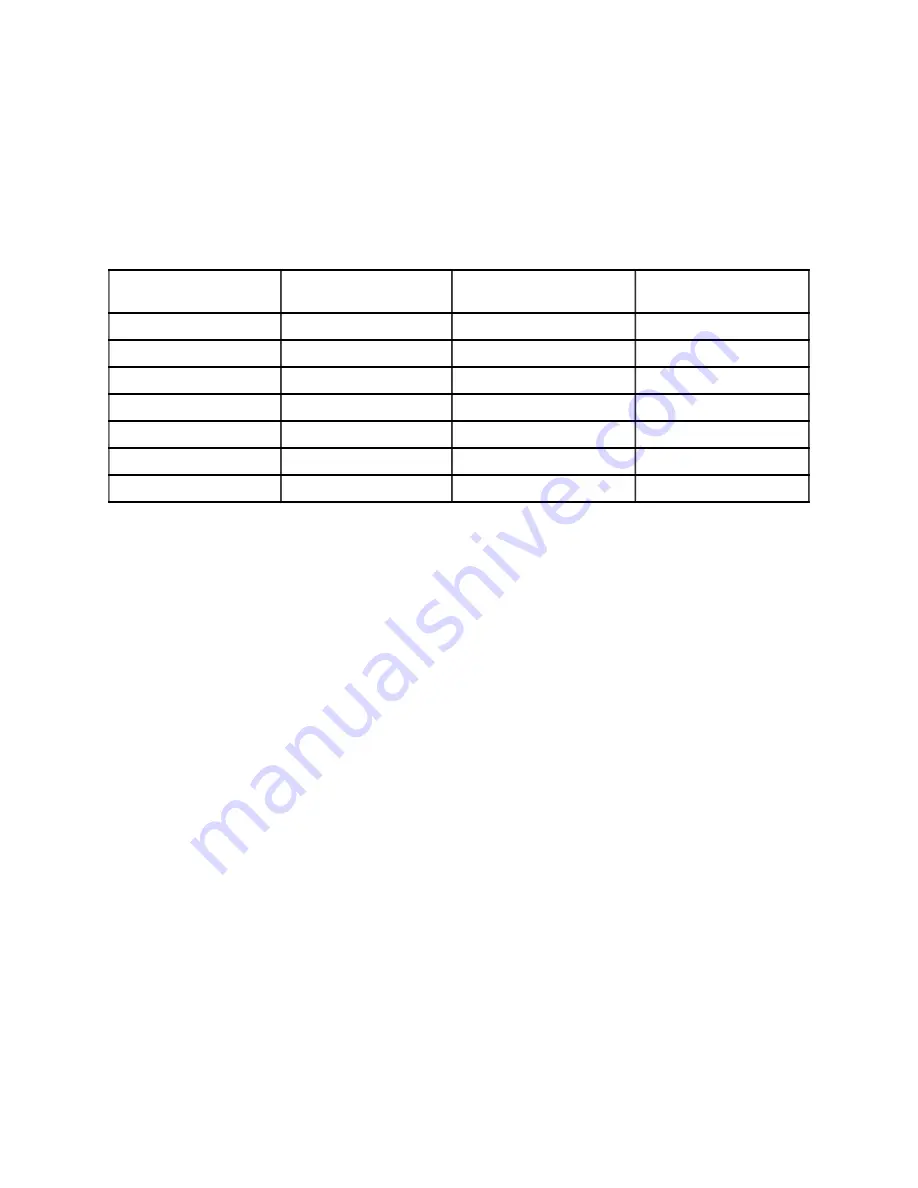
27. Use low speeds for roughing and for long or large diameter work. If vibration occurs, stop the
machine and correct the cause. See speed recommendations.
Diameter of Work
Roughing RPM
General Cutting RPM
Finishing RPM
Under 2"
1500
3000
3000
2 to 4"
600
1500
2300
4 to 6"
450
1100
1500
6 to 8"
450
600
1100
8 to 10"
450
600
850
10 to 12"
450
600
850
12 to 14"
450
450
600
28. When sanding, remove the tool rest from the machine, apply light pressure, and use a slow speed to
avoid heat build up.
29. When turning large diameter pieces, such as bowls, always operate the lathe at low speeds. See
speed recommendations.
30. Do not attempt to engage the spindle lock pin until the spindle has stopped. If leaving the machine
area, turn it off and wait until the spindle stops before departing.
31. Make no adjustments except speed change with the spindle rotating and always disconnect machine
from power source when performing maintenance to avoid accidental starting or electrical shock.
32. Provide for adequate surrounding work space and overhead non-glare lighting.
33. When stopping the lathe, never grab the part or face plate to slow it down. Let the work coast to a
stop.
34. Use only JET factory authorized replacement parts and accessories; otherwise the warranty and
guarantee are null and void.
35. Do not use this JET wood lathe for other than its intended use. If used for other purposes, JET
disclaims any real or implied warranty and holds itself harmless from any injury that may result from
that use.
Summary of Contents for JWL-1442VS
Page 22: ...22 Bed Assembly...
Page 24: ...24 Headstock Assembly...
Page 28: ...28 Wiring Diagram...


