

Page 2
Install Guide
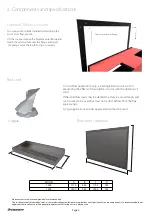
A. Design and Installation Considerations
Consideration must be given to:
•
Safety
•
Convenience
•
Traffic flow
•
Chimney and flue requirements
It is a good idea to plan your installation on paper, using
exact measurements for clearances and floor protection,
before actually beginning the installation. If you are not
using an existing chimney, place the appliance where there
will be a clear passage for a factory-built listed chimney
through the ceiling and roof.
We recommend that a qualified building inspector and your
insurance company representative review your plans
before and after installation.
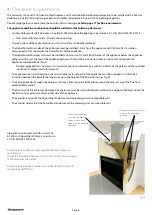
If this appliance is in an area where children may be near
it is recommended that you purchase a decorative barrier
to go in front of the appliance. Remember to always keep
children away while it is operating and do not let anyone
operate this appliance unless they are familiar with these
operating instructions.
Check building codes prior to installation.
•
Installation MUST comply with local, regional,
state and national codes and regulations.
•
Consult insurance carrier, local building, fire
officials or authorities having jurisdiction about
restrictions, installation inspection, and permits.
CAUTION
NOTICE:
JETMASTER ASSUMES NO
RESPONSIBILITY FOR THE IMPROPER
PERFORMANCE OF THE APPLIANCE
SYSTEM CAUSED BY:
•
Inadequate draft due to environmental conditions
•
Down drafts
•
Tight sealing construction of the structure
•
Mechanical exhausting devices
•
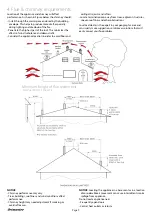
Over drafting caused by excessive chimney heights
•
Ideal performance is with height of chimney
minimum 4.6 metres as per AS/NZS 2918:2018.
C. Negative Pressure
Negative pressure results from the imbalance of air
available for the appliance to operate properly. It can be
strongest in lower levels of the house.
Causes include:
•
Exhaust fans (kitchen, bath, etc.)
•
Range hoods
•
Combustion air requirements for furnaces, water
appliances and other combustion appliances
•
Clothes dryers
•
Location of return-air vents to furnace or air
conditioning
•
Imbalances of the HVAC air handling system
•
Upper level air leaks such as:
-
Recessed lighting
-
Attic hatch
-
Duct leaks
B. Fire Safety
To provide reasonable fire safety, the following should be
given serious consideration:
1.
Install at least one smoke detector on each floor of
your home to ensure your safety. They should be
located away from the heating appliance and close to
the sleeping areas. Follow the smoke detector
manufacturer’s placement and installation instructions,
and be sure to maintain regularly.
2.
A conveniently located Class A fire extinguisher to
contend with small fires resulting from burning embers.
3.
A CO detector should be installed in the room with the
appliance.
4.
A practiced evacuation plan, consisting of at least two
escape routes.
5.
A plan to deal with a chimney fire as follows:
In the event of a chimney fire:
a.
Evacuate the house immediately
b.
Notify the fire brigade.
WARNING
Asphyxiation Risk.
•
Negative pressure can cause spillage
of combustion fumes, soot and carbon
monoxide.
•
Appliance needs to draft properly for
safety.
WARNING
Asphyxiation Risk.
•
Do NOT connect this appliance to a
chimney flue servicing another appliance.
•
Do NOT connect to any air distribution
duct or system.
May allow flue gases to enter the house.
1. Getting Started


