background image

5

Model #: JHUM90 | Version #: 1

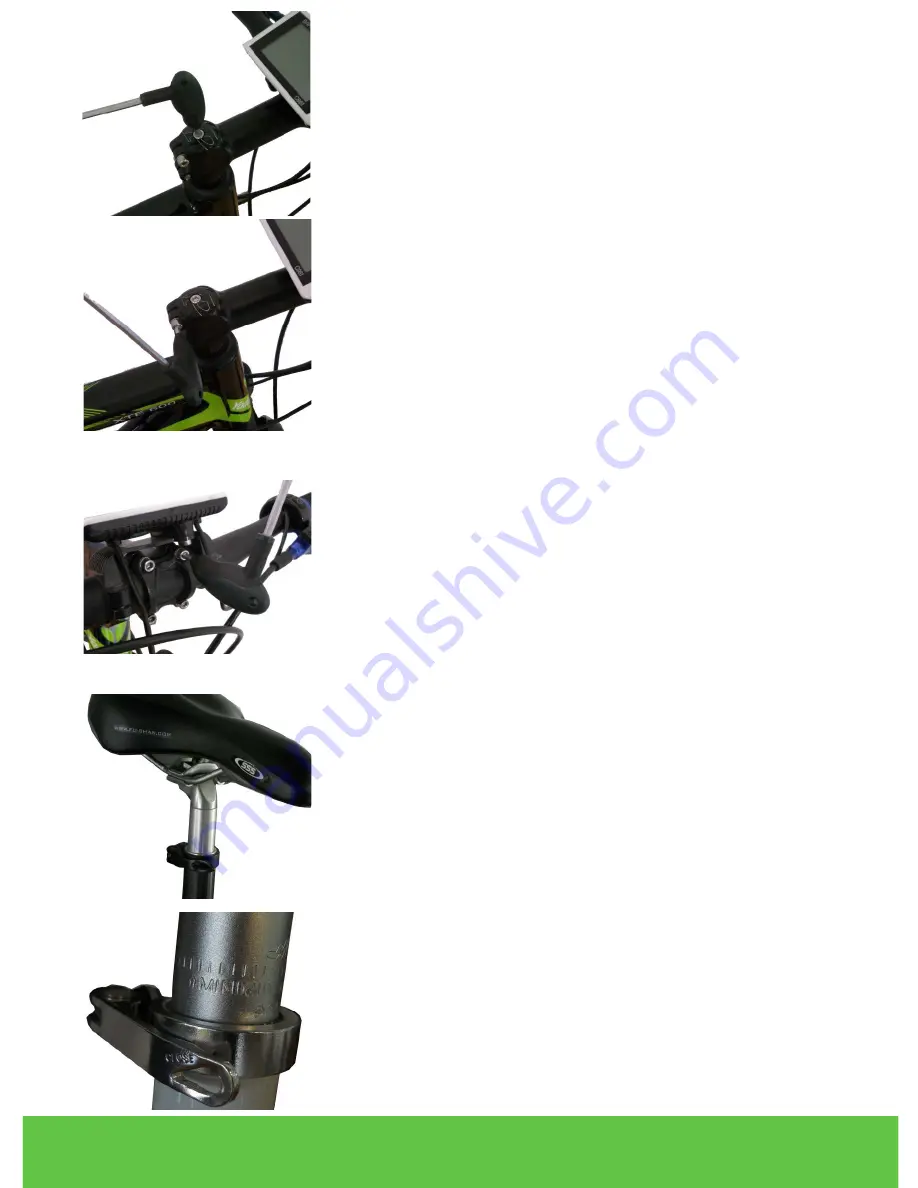
To Attach a Non-Tooth-Type Stem:

 Insert the stem 

into the front fork of the frame. Make sure that the stem 

is facing the proper direction (and is in line with the 

frame), then tighten into place using the M5 hexagon 

tool.

Once the stem is securely in place, tighten the two 

screws on the front side of the stem using the M4 hexa-

gon tool.

ASSEMBLING THE HANDLEBAR

Use the M4 and M5 hexagon tools to attach the handle-

bar to the stem. When attaching the handlebar, make 

sure that you can grip it comfortably, that it is parallel 

with the ground, and that it is centered on the stem.

ATTACHING THE SEAT

Unbuckle the quick-release handle. Insert the seat tube 

into the frame, as pictured on the left. Adjust the saddle 

so that you can sit comfortably, and make sure the seat 

tube is in line with the tube of the frame.

Check the safety line on the seat tube, as pictured on 

the left. If the safety line is exposed, lower the seat 

until the safety line is fully covered. Then, buckle the 

quick-release handle, locking it in the closed position.

Summary of Contents for JHUM90

Page 1: ...USER MANUAL MODEL JHUM90 VERSION 1 FAT TIRE ELECTRIC BICYCLE...

Page 2: ...n and authorized dealers cannot be held liable for injury or dam age caused from riding the Jetson Fat Tire Falling losing control and colli sions including failure to obey the Jetson Fat Tire manual...

Page 3: ...ider assumes all responsibility and risk associated with high stress activity Keep your fingers and other body parts away from the drive chain steering system wheels and all other moving components wh...

Page 4: ...Tube 10 Saddle Seat 11 Pedal 12 Wheel Stand 13 Battery Pack 14 Frame 15 Handle 16 Bar End Grips 17 Stand Pipe 18 Headset 19 Front Fork 20 Front Brake 21 Left Brake Lever 22 Right Brake Lever 23 Shifte...

Page 5: ...e center of the fork and make sure that the center of the wheel is aligned with the frame of the bike Tighten into place by securing the buckle as seen in the picture on the left ASSEMBLING THE STEM T...

Page 6: ...ch the handle bar to the stem When attaching the handlebar make sure that you can grip it comfortably that it is parallel with the ground and that it is centered on the stem ATTACHING THE SEAT Unbuckl...

Page 7: ...To attach the pedals you will need a 15 wrench or spanner The two pedals will be labeled with R for Right and L for Left Line up the 15 wrench or spanner as seen above then twist the pedals toward th...

Page 8: ...eft Make sure that the brake pads are in line with the curve of the wheel and that they can make full contact with the surface of the steel rim Use the nut seen on the left to adjust the alignment Tes...

Page 9: ...c ture above and to the right BATTERY To uninstall the battery turn the key clockwise to unlock the battery pack Lift the battery pack up to remove it When reinstalling the battery put the bottom righ...

Page 10: ...ailure to use the provided charger will void the warranty To charge the electric bike plug the charger into the charging port located on the side of the battery compartment Plug the other side of the...

Page 11: ...out of extreme temperatures Operating temperature when charging 32 113 F Operating temperature when discharging 4 113 F Do not short circuit the discharge charge terminals of the battery Do not leave...

Page 12: ...anty will not cover any damage which results from the application of improper cleaners solvents or chemicals to the Product water damage smoke or soot or from exposure to salt water sea breeze or salt...

Page 13: ..._________________________________ Serial Number _____________________________________________________________ Product ___________________________________________________________________ Gender ______...

Page 14: ...88 976 9904 CUSTOMERSERVICE JETSONBIKE COM WWW JETSONBIKE COM IF YOU LIKE THIS PRODUCT PLEASE CHECK OUT THE OTHER PRODUCTS ON OUR WEBSITE INCLUDING OUR ELECTRIC BICYCLE FOLDING ELECTRIC SCOOTER ELECTR...

Reviews: