© 2018 Jetta Corporation. All rights reserved. REV 03/2018
1(800) 288-7771
INSTALLATION INSTRUCTIONS | JETTA CORPORATION
PAGE | 12
SHOWER BASE INSTALLATION INSTRUCTIONS
PREPERATION
READ ALL OF THE INSTRUCTIONS BELOW AND FOLLOW ALL LOCAL PLUMBING AND BUILDING CODES.
Unpack and inspect the shower base for any shipping damages and ensure no pieces are missing.
If any damages are discovered, DO NOT INSTALL.
Ensure plumbing rough-in for both the drain and the supply lines are completed according to your shower base’s
dimensions.
The floor area where your shower will be installed must be structurally sound and strong enough to hold the shower base
and an adult’s weight. Also make sure that the walls and floor are square, plumb, and level. If need by, level the floor with
floor leveler.
Sweep the floor to remove construction debris and vacuum to remove all remaining dust.
If renovating, remove all existing wall material in order to install shower base directly on wall studs.
Ensure that the wood frame has the appropriate dimensions.
If you plan on installing a door, you will also need to plan studs to receive the fastener screws when installing the jams.
Please refer to the installation guide provided with the door.
All plumbing rough-in for both the drain and the supply should be completed before installing the shower base.
INSTALLATION STEPS
Ensure walls and floor are square, plumb and level and that the waste
pipes are well positioned. Position the unit in the prepared location and
adjust level with wood shims or mortar. It will be easier to adjust the tray
if you have access to it from the outside of the formwork. Before
proceeding to the final installation, verify drainage by pouring water in the
shower base.
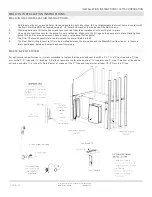
Tray with tiling flange on 3 sides and corner tray
The sides with tiling flange must lean against the 2 x 4s. (see fig)
Ceramic tiles must be flush with the base’s interior walls, the walls must be
perfectly square and the tray perfectly level in or-der to be able to adjust the
doors correctly. (see fig)
IMPORTANT!
Note that to install all basic shower models, the sides and feet of the base must be properly supported. It is strongly
recommended that you rest the base on a mortar bed, make a structure to support the center (drain) of the base, and
level the floor using a floor leveler.
REQUIRED TOOLS & MATERIALS
o
Safety glasses
o
Drill
o
Screwdriver
o
Paper and pencil
o
Tape measure
o
Level
o
Hammer
o
Pipe wrench
o
Set square
o
Drill bit
o
Silicone sealant (mildew resistant)
o
Construction glue
o
Shims (cedar shingles)
Summary of Contents for RAIN SHOWER BASES
Page 2: ......


