© 2018 Jetta Corporation. All rights reserved. REV 03/2018
1(800) 288-7771
INSTALLATION INSTRUCTIONS | JETTA CORPORATION
PAGE | 13
WALK-IN INSTALLATION INSTRUCTIONS
TESTING:
Water test your unit prior to installation. Set the tub on a level surface where it can be drained after testing. Fill to the overflow. Make
sure all fittings, through walls and piping are water tight. While each unit is checked at the factory, the process of shipping or improper
handling may have loosened the joints. If there are leaks, mark the spot(s), drain and repair with GE Silicone Sealer (fiber glass to PVC)
or PVC cement (PVC to PVC). Repeat test when dry.
The air switch must be located on or near bath, with access available. Check to ensure that the air hose is plugged into the switch that
is located at the back of the rectangular box on top of the motor. For additional safety, a ground-fault circuit-interrupter must be
added.
Faucets may be installed through the wall or mounted on the bath. Insert drain and overflow to waste line. After installation, fill the
bath and let stand 3 - 4 hours (operating it for at least 30 minutes) to double check that it is still water tight. Inspect tub completely
(around pump and or blower, all plumbing fittings and doors for leaks) any defect must be reported prior to installation in order to have
it covered under warranty.
Check to ensure that your installation will conform to all applicable codes and secure necessary permits. All electrical and plumbing
connections should be made by qualified electricians and plumbers.
LEVELING INSTRUCTIONS:
1.
Feet are extended for shipping purposes to provide clearance and protection of the front skirt. The tub must be reset to proper
installation height by installer.
2.
Raise the two center feet so that tub rests only on the four corner feet.
3.
Raise the corner feet to lower tub to desired height and level tub in both directions.
4.
After the tub has been water tested and all plumbing connections are made up, verify tub level and lock the four corner feet in
position.
5.
Lower the two center feet so they firmly contact the floor and tighten in place.
SYSTEM TEST: AFTER INSTALLATION MAKE SURE ALL PLUMBING CONNECTIONS AND HYDRO MASSAGE AND AIR
MASSAGE SYSTEM CONNECTIONS ARE CORRECTLY INSTALLED, RUN THE FOLLOWING TESTS:
1.
Before filling the tub with water, be sure to remove all loose debris from tub. Wipe down the door seal using a damp cloth, as
well as the surface in the door jamb that will come in contact with the door seal.
2.
Fill the tub to the overflow and check for leaks. Check by hand where visual verification is not possible.
3.
Turn the pump and or blower on and let run for at least 30 minutes. Check for leaks while the system/systems are running
and again after you turn them off. Check by hand where visual verification is not possible.
U-BAR INSTALLATION INSTRUCTIONS
•
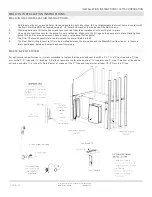
For ease of access, mount the Grab Bar prior to Walk-In Tub placement.
•
Using the accompanying hardware, slide the Chrome decorative ring onto the bolts on the Grab Bar.
•
Mount the Grab Bar into the predrilled holes on the deck of the tub.
•
Under the deck, slide the washers onto the Grab Bar bolts and tighten the Grab Bar using the provided nuts.
NOTE: DO NOT OVER TIGHTEN
as this may cause damage to the tub surface.
Not using washers at install may cause injury
due to failure of the grab bar.
Summary of Contents for RAIN SHOWER BASES
Page 2: ......


