© 2018 Jetta Corporation. All rights reserved. REV 03/2018
1(800) 288-7771
INSTALLATION INSTRUCTIONS | JETTA CORPORATION
PAGE | 5
OPTIONAL SKIRT INSTALLATION INSTRUCTIONS
OPTIONAL SKIRT:
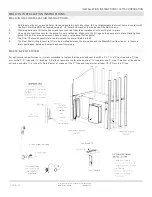
1. The skirt may need to be trimmed to size. Take the measurements of the skirt opening and compare those of the skirt itself to
determine if the skirt must be trimmed to fit. If so, mark the dimensions on the skirt and trim the skirt on the bottom and sides (do
not trim the top of the skirt) and cut to within 1/8” of the required dimensions using a circular saw with sharp tooth blade. Using a
belt sander is recommended to finish trimming the sides and bottom of the skirt to the exact size of the opening.
2. To create a positive stop for the skirt, nail, glue or screw 2x2” or 2x4” wood blocks on both side walls and along the full length of
the front floor section (parallel to tub lip). The wood blocks must be mounted securely against a wall or stud wall framing and the
floor.
3. The top of the skirt is notched. Foam blocks are glued to the top backside of the skirt (section that is notched) and will compress to
hold the skirt against the bathing well of the tub. Check the underside of the tub lip for smoothness. There may be fiberglass chop
that requires sanding, so the skirt will fit snugly in place. Slide the notched top edge of the skirt under the lip of the tub. Move the
bottom section of the skirt in place until it is resting against the wood blocks. Verify the vertical edge of the skirt is perpendicular to
the f l o o r .
4. Included with the skirt are two screws and decorative caps that cover/conceal the screw head and are color matched to the acrylic.
Drill two (2) screw holes in the bottom of the skirt to protect the acrylic from cracking, position to align with wood block. Screw
both lower ends of the skirt through the decorative caps, through the acrylic and into the wood blocks to hold the skirt securely in
place.
Note:
the skirt is not marked where the screws should be positioned as application will dictate position.
Installer may then seal the sides and floor with caulk or silicone if so desired.
Parts included for optional skirt installation:
o
(1) skirt
o
(2) screws
o
(2) decorative caps
o
(1) instruction sheet
Parts / tools needed for optional skirt installation that are NOT included:
o
circular saw with sharp tooth blade and a belt sander
o
drill
o
2x2” or 2x4” wood blocks
o
caulk or silicone
o
screw driver
o
tape measure
o
square / level
IMPORTANT: MANUFACTURER WILL NOT BE LIABLE FOR THE REMOVAL OR RE- INSTALLATION OF THE BATHTUB IF
THERE IS A FAILURE TO FOLLOW THE MANUFACTURERS RECOMMENDED PRE-INSTALLATION AND INSTALLATION
PROCEDURES, FAILURE TO FOLLOW THE MANUFACTURER’S RECOMMENDATIONS COULD RESULT IN THE
WARRANTY BEING VOIDED.
Summary of Contents for RAIN SHOWER BASES
Page 2: ......


